Garmin eTrex Solar Owners Manual - Page 11
Stopping the Current Activity, Navigating with the Map, Changing the Map Orientation
 |
View all Garmin eTrex Solar manuals
Add to My Manuals
Save this manual to your list of manuals |
Page 11 highlights
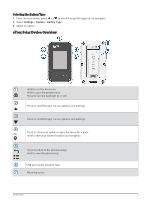
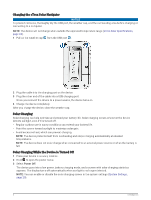
Stopping the Current Activity 1 From the main menu, press or to scroll through the apps on the navigator. 2 Select Tracking. 3 Press OK to open the options menu. 4 Select Tracking Controls. 5 Select an option: • To pause recording, select Pause. • To save the activity, select Save > Done. TIP: You can edit the name or type before saving the activity. • To delete the activity, select Discard. Navigating with the Map 1 Begin navigating to a destination (Navigating to a Destination, page 14). 2 From the main menu, select Tracking, and press or to scroll to the map page. The path to your destination is marked with a line on the map. A position icon represents your location. As you travel, the icon moves and displays your path. 3 Press OK to open the options menu. 4 Select Pan/Zoom Map. 5 Select an option: • To toggle between panning up and down, panning left and right, or zooming, press OK. • To pan or zoom the map, press and . • To quit, press . Changing the Map Orientation 1 From the main menu, select Tracking, and press or to scroll to the map page. 2 Press OK to open the options menu. 3 Select Map Settings > Orientation. 4 Select an option: • Select North Up to show north at the top of the page. • Select Track Up to show your current direction of travel at the top of the page. Navigating with the Compass When navigating to a destination, points to your destination, regardless of the direction you are moving. 1 Begin navigating to a destination (Navigating to a Destination, page 14). 2 From the main menu, select Tracking, and press or to scroll to the compass page. 3 Turn until points toward the top of the compass, and continue moving in that direction to the destination. Tracking Pages 7
-
 1
1 -
2
-
3
-
4
-
5
-
 6
6 -
 7
7 -
 8
8 -
 9
9 -
 10
10 -
 11
11 -
 12
12 -
 13
13 -
 14
14 -
 15
15 -
 16
16 -
17
-
18
-
19
-
20
-
21
-
22
-
23
-
24
-
25
-
26
-
27
-
28
-
29
-
30
-
31
-
32
 |
 |
