Gateway GT5268E 8511625 - Gateway Computer Hardware Reference (6-Bay Micro BTX - Page 45
RAID 0 and RAID 10, 64 KB for RAID 5. We recommend accepting
 |
View all Gateway GT5268E manuals
Add to My Manuals
Save this manual to your list of manuals |
Page 45 highlights
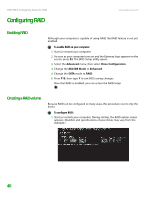
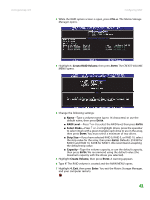
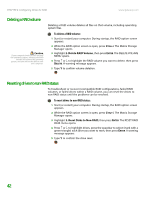
www.gateway.com Configuring RAID 2 While the RAID option screen is open, press CTRL+i. The Matrix Storage Manager opens. 3 Highlight 1. Create RAID Volume, then press ENTER. The CREATE VOLUME MENU opens. 4 Change the following settings: ■ Name-Type a volume name (up to 16 characters) or use the default name, then press ENTER. ■ RAID Level-Press ↑ or ↓ to select the RAID level, then press ENTER. ■ Select Disks-Press ↑ or ↓ to highlight drives, press the spacebar to select (mark with a green triangle) each drive to use in the array, then press ENTER. You must select a minimum of two drives. ■ Strip Size-If you have selected RAID 0, RAID 5, or RAID 10, select the strip value for the array, then press ENTER. Defaults: 218 KB for RAID 0 and RAID 10, 64 KB for RAID 5. We recommend accepting the default strip value. ■ Capacity-Type the volume capacity, or use the default capacity, then press ENTER. We recommend using the default value (the maximum capacity with the drives you selected). 5 Highlight Create Volume, then press ENTER. A warning appears. 6 Type Y. The RAID volume is created and the MAIN MENU opens. 7 Highlight 4. Exit, then press Enter. You exit the Matrix Storage Manager, and your computer restarts. 41
-
 1
1 -
2
-
3
-
4
-
5
-
6
-
7
-
8
-
9
-
10
-
11
-
12
-
13
-
14
-
15
-
16
-
17
-
18
-
19
-
20
-
21
-
22
-
23
-
24
-
25
-
26
-
27
-
28
-
29
-
30
-
31
-
32
-
33
-
34
-
35
-
36
-
37
-
38
-
39
-
 40
40 -
 41
41 -
 42
42 -
 43
43 -
 44
44 -
 45
45 -
 46
46 -
 47
47 -
 48
48 -
 49
49 -
 50
50 -
51
-
52
 |
 |
