Gateway HD2200 User Guide - Page 9
Starting the monitor - speaker
 |
UPC - 827103136548
View all Gateway HD2200 manuals
Add to My Manuals
Save this manual to your list of manuals |
Page 9 highlights
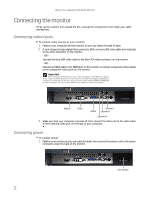
www.gateway.com 5 Plug the speaker bar's audio plug into the audio jack on your monitor. Important For best audio performance, if your video connection uses HDMI, the digital audio is also conveyed along the same cable, and no additional audio connection is required. You may need to set your video source's audio mode to PCM or ANALOG to hear the audio. See your source device's user guide for more information. To remove the speaker bar: 1 Disconnect all audio and power cables from the speaker bar. 2 Press the two clips on the back of your monitor, then slide the speaker bar back. Starting the monitor To start the monitor: 1 Touch the power button on the front of monitor. The power LED on the power button changes from purple (off) to blue (on). Power button 2 Turn on your computer. After your computer is running, the power LED on the monitor's power button should be blue. Allow about 10 seconds for the display image to appear. If the power LED is not blue or you do not see a display image, check the connections. For more troubleshooting information, see "Troubleshooting" on page 12. 3 Adjust the tilt of the monitor for the best viewing angle. 4 Use the on-screen display (OSD) to adjust other monitor settings. For more information, see "Adjusting monitor settings" on page 6. 5
-
 1
1 -
2
-
3
-
 4
4 -
 5
5 -
 6
6 -
 7
7 -
 8
8 -
 9
9 -
 10
10 -
 11
11 -
 12
12 -
 13
13 -
 14
14 -
15
-
16
-
17
-
18
-
19
-
20
-
21
-
22
-
23
-
24
-
25
-
26
-
27
-
28
-
29
-
30
 |
 |
