Gateway ML6714 8511725 - Gateway Service Guide - Page 44
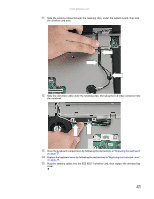
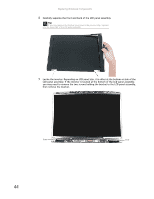
Place the new LCD panel assembly onto the notebook, then replace the four hinge screws.
 |
View all Gateway ML6714 manuals
Add to My Manuals
Save this manual to your list of manuals |
Page 44 highlights
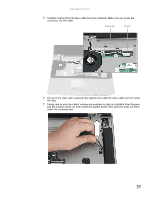
Replacing Notebook Components 8 Remove the four hinge screws that secure the LCD panel to the notebook. Screws 9 Lift the LCD panel assembly away from the notebook. The LCD panel assembly is now completely detached from the notebook. 10 Place the new LCD panel assembly onto the notebook, then replace the four hinge screws. 40
-
 1
1 -
2
-
3
-
4
-
5
-
6
-
7
-
8
-
9
-
10
-
11
-
12
-
13
-
14
-
15
-
16
-
17
-
18
-
19
-
20
-
21
-
22
-
23
-
24
-
25
-
26
-
27
-
28
-
29
-
30
-
31
-
32
-
33
-
34
-
35
-
36
-
37
-
38
-
 39
39 -
 40
40 -
 41
41 -
 42
42 -
 43
43 -
 44
44 -
 45
45 -
 46
46 -
 47
47 -
 48
48 -
 49
49 -
50
-
51
-
52
-
53
-
54
-
55
-
56
-
57
-
58
-
59
-
60
-
61
-
62
-
63
-
64
-
65
-
66
-
67
-
68
-
69
-
70
-
71
-
72
-
73
-
74
-
75
-
76
-
77
-
78
 |
 |

Replacing Notebook Components
40
8
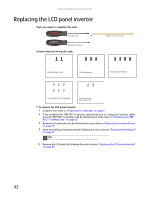
Remove the four hinge screws that secure the LCD panel to the notebook.
9
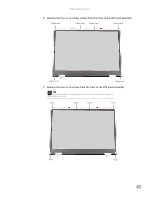
Lift the LCD panel assembly away from the notebook. The LCD panel assembly is now
completely detached from the notebook.
10
Place the new LCD panel assembly onto the notebook, then replace the four hinge screws.
Screws