GE CT9070SHSS Installation Instructions - Page 5
Three-conductor Branch Circuit Connection, Four-conductor Branch Circuit Connection, Slide Oven Into
 |
View all GE CT9070SHSS manuals
Add to My Manuals
Save this manual to your list of manuals |
Page 5 highlights
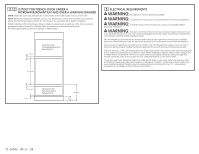
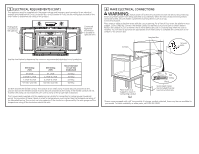
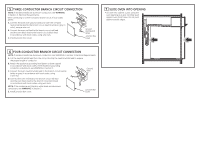
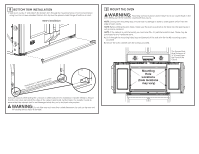
5 THREE-CONDUCTOR BRANCH CIRCUIT CONNECTION NOTE: If residence leads are aluminum conductors, see WARNING in Section 3, Electrical Requirements. When connecting to a three-conductor branch circuit, if local codes permit: A. Connect the bare oven ground conductor with the crimped neutral (white) lead to the branch circuit neutral (white or gray in color), using a wire nut. B. Connect the oven red lead to the branch circuit red lead and the oven black lead to the branch circuit black lead in accordance with local codes, using wire nuts. C. Install junction box cover. Ground and Neutral Wires Junction Box Cover 7 SLIDE OVEN INTO OPENING • Lift oven into cabinet cutout using the oven opening as a grip. Carefully push against oven front frame. Do not push against outside edges. 6 FOUR-CONDUCTOR BRANCH CIRCUIT CONNECTION NOTE: If residence leads are aluminum conductors, see WARNING in Section 3, Electrical Requirements. A. Cut the neutral (white) lead from the crimp. Re-strip the neutral (white) lead to expose the proper length of conductor. B. Attach the appliance grounding lead (green or bare copper) in accordance with local codes. If the residence grounding conductor is aluminum, see WARNING in Section 3. C. Connect the oven neutral (white) lead to the branch circuit neutral (white or gray) in accordance with local codes, using a wire nut. Ground Wire D. Connect the oven red lead to the branch circuit red lead and the oven black lead to the branch circuit black lead in accordance with local codes, using wire nuts. NOTE: If the residence red, black or white leads are aluminum conductors, see WARNING in Section 3. E. Install junction box cover. Junction Box Cover
-
 1
1 -
 2
2 -
 3
3 -
 4
4 -
 5
5 -
 6
6 -
 7
7 -
 8
8 -
 9
9 -
 10
10 -
 11
11 -
12
-
13
-
14
-
15
-
16
 |
 |
