GE CT9070SHSS Installation Instructions - Page 7
Oven Rack Guide Installation, Door Adjustment Mechanism - installation manual
 |
View all GE CT9070SHSS manuals
Add to My Manuals
Save this manual to your list of manuals |
Page 7 highlights
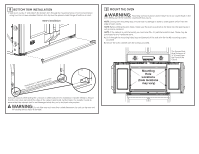
10 OVEN RACK GUIDE INSTALLATION A. Locate included oven rack guide mounting hardware. B. Place oven rack guides on cavity wall studs with L bracket towards back of cavity as shown. C. Install guides using the 8 provided mounting nuts. French doors removed for illustration clarity only 11 DOOR ADJUSTMENT MECHANISM Door Adjustment Mechanism is located on both the right and left doors at the bottom hinges. Only the left side Adjustment Mechanism is shown in this manual. NOTE: Adjust the doors inward only until the center gap is even. Over-adjusting can damage the center seals and make the doors more difficult to open. A. Using 9/16" socket wrench, tighten Vertical Adjustment Screw to adjust door up and loosen to adjust door down. B. Horizontal Adjustment Screws pivot Horizontal Adjustment Screws the door about an axis. Using a 1/8" Hex Key, loosen both screws, then tighten appropriate screw to pivot door. Once door is in place, verify both screws are tightened. Vertical Adjustment Screw EXAGGERATED EXAMPLES FOR LEFT DOOR ADJUSTMENT Example 1: Left door low, center gap even. Example 2: Left door low, center gap larger at bottom. Example 3: Left door high, center gap larger at top. French doors removed for illustration clarity only Metal Posts to be installed in the rear of cavity Oven rack guide shown in place. Steps for adjustment: A. Tighten left Vertical Adjustment Screw. B. If left door is still low, loosen right Vertical Adjustment Screw. Steps for adjustment: A. Loosen inside Horizontal Adjustment Screw. Steps for adjustment: A. Loosen outside Horizontal Adjustment Screw. B. Tighten outside Horizontal B. Tighten Outside Horizontal Adjustment Screw until center Adjustment Screw until center gap even. gap even. C. If left door is still low, tighten C. If left door is still low, tighten left Vertical Adjustment Screw. Left Vertical Adjustment D. Tighten inside Horizontal Screw. Adjustment Screw. D. Tighten Inside Horizontal Adjustment Screw. 31-10962 08-14 GE
-
 1
1 -
 2
2 -
 3
3 -
 4
4 -
 5
5 -
 6
6 -
 7
7 -
 8
8 -
 9
9 -
 10
10 -
 11
11 -
 12
12 -
13
-
14
-
15
-
16
 |
 |
