GE DCVH680GJMV Installation Instructions - Page 10
Remove Hinge, Reinstall Hinge Assembly
 |
UPC - 084691208921
View all GE DCVH680GJMV manuals
Add to My Manuals
Save this manual to your list of manuals |
Page 10 highlights
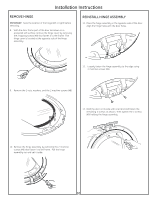
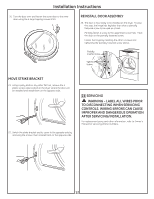
Installation Instructions REMOVE HINGE IMPORTANT: Note the location of the hinge (left or right) before removing. 8. With the door frame part of the door laid down on a protected soft surface, remove the hinge cover by removing the 2 tapping screws (#8) that fasten it to the frame. The hinge cover is located at the opposite side of the hinge assembly. REINSTALL HINGE ASSEMBLY 11. Place the hinge assembly in the opposite side of the door. Align the hinge holes with the door holes. 12. Loosely fasten the hinge assembly to the edge using 2 machine screws (#8). 9. Remove the 2 nuts, washers, and the 2 machine screws (#8). 13. Hold the door on its side with one hand and fasten the remaining 2 screws as shown. Then tighten the 2 screws (#8) holding the hinge assembly. 10. . Remove the hinge assembly by removing the 2 machine screws (#8) that fasten it to the frame. Pull the hinge assembly out and set it aside. 10
-
 1
1 -
2
-
3
-
4
-
 5
5 -
 6
6 -
 7
7 -
 8
8 -
 9
9 -
 10
10 -
 11
11 -
 12
12 -
 13
13 -
 14
14
 |
 |
