GE GFSF2KEXCC Use and Care Manual - Page 27
Installation Instructions, REPLACING THE DOORS, Double Door Refrigerator Models only
 |
View all GE GFSF2KEXCC manuals
Add to My Manuals
Save this manual to your list of manuals |
Page 27 highlights
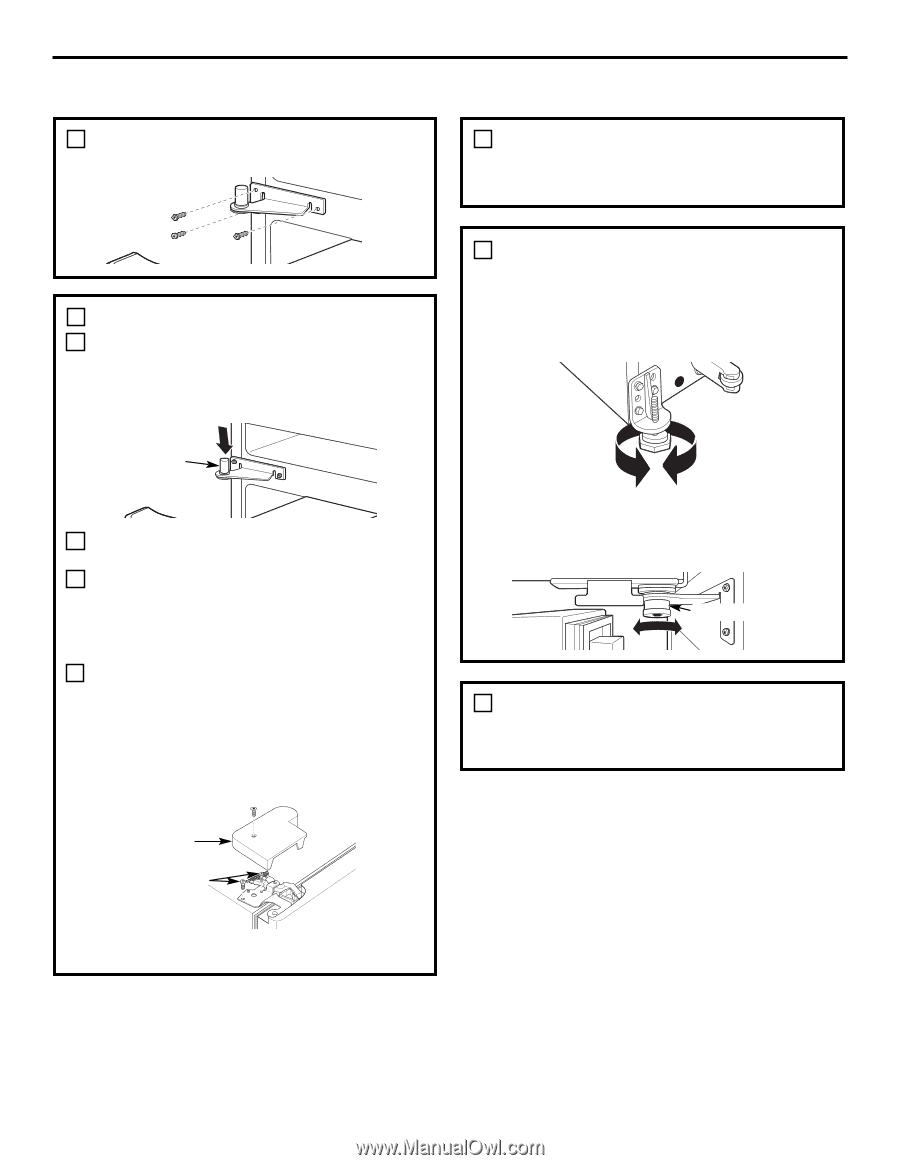
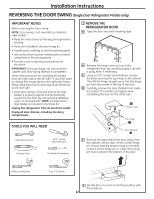
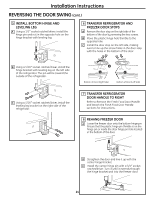
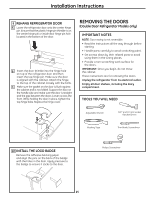
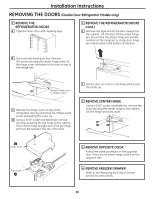
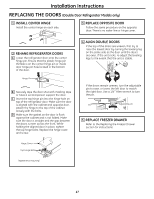
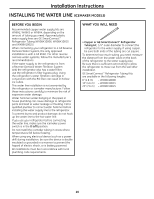
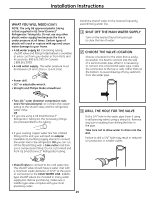
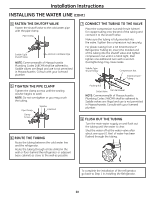
Installation Instructions REPLACING THE DOORS (Double Door Refrigerator Models only) 1 INSTALL CENTER HINGE Install the center hinge on each side. 3 REPLACE OPPOSITE DOOR Follow the same procedure on the opposite door. There is no water line or hinge cover. 2 REHANG REFRIGERATOR DOORS A Lower the refrigerator door onto the center hinge pin. Ensure that the plastic hinge pin thimble is on the center hinge pin or inside door hinge pin hole located in the bottom of the door. Hinge Pin B Securely tape the door shut with masking tape or have a second person support the door. C Insert the top hinge pin into the hinge hole on top of the refrigerator door. Make sure the door is aligned with the cabinet and opposite door. Attach the hinge to the top of the cabinet loosely with the bolts. D Make sure the gasket on the door is flush against the cabinet and is not folded. Make sure the door is straight and the gap between the doors is even across the front. While holding the aligned door in place, tighten the top hinge bolts. Replace the hinge cover and screw. 4 ALIGN DOUBLE DOORS If the top of the doors are uneven, first try to raise the lowest door by turning the leveling leg on the same side as the door until the doors are even. If the unit rocks, re-adjust the leveling legs to the extent that the unit is stable. If the doors remain uneven, turn the adjustable pin to raise, or lower, the left door to match the right door. Use a 1/4″ Allen wrench to turn the pin. Adjustable pin 5 REPLACE FREEZER DRAWER Refer to the Replacing the Freezer Drawer section for instructions. Hinge Cover Top Hinge Bolts (appearance may vary) 27
-
 1
1 -
2
-
3
-
4
-
5
-
6
-
7
-
8
-
9
-
10
-
11
-
12
-
13
-
14
-
15
-
16
-
17
-
18
-
19
-
20
-
21
-
 22
22 -
 23
23 -
 24
24 -
 25
25 -
 26
26 -
 27
27 -
 28
28 -
 29
29 -
 30
30 -
 31
31 -
 32
32 -
33
-
34
-
35
-
36
-
37
-
38
-
39
-
40
-
41
-
42
-
43
-
44
-
45
-
46
-
47
-
48
-
49
-
50
-
51
-
52
-
53
-
54
-
55
-
56
-
57
-
58
-
59
-
60
-
61
-
62
-
63
-
64
-
65
-
66
-
67
-
68
-
69
-
70
-
71
-
72
-
73
-
74
-
75
-
76
-
77
-
78
-
79
-
80
-
81
-
82
-
83
-
84
-
85
-
86
-
87
-
88
-
89
-
90
-
91
-
92
-
93
-
94
-
95
-
96
-
97
-
98
-
99
-
100
-
101
-
102
-
103
-
104
-
105
-
106
-
107
-
108
-
109
-
110
-
111
-
112
-
113
-
114
-
115
-
116
-
117
-
118
-
119
-
120
 |
 |