GE JX827BN Installation Instructions - Page 2
Installation Procedure
 |
View all GE JX827BN manuals
Add to My Manuals
Save this manual to your list of manuals |
Page 2 highlights
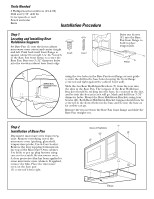
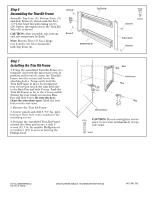
Tools Needed 2 Phillips head screwdrivers (#1 & #2) Drill and 3/32" drill bit Centerpunch or nail Pencil and ruler Knife Installation Procedure Step 1 Locating and Installing Rear Holddown Supports Set Base Pan (1) into the front cabinet microwave oven cutout and center it right and left. Push back until front flange is Screw B Screw C against cabinet front wall. Use the V-notch in the Base Pan front flange to center the Base Pan. Bore two 3/32" diameter holes into the wooden cabinet base front edge Drive two Screws (C) into the Base Pan front flange to hold in place temporarily. V Notch 120V/60 Hertz Grounded Power Outlet using the two holes in the Base Pan front flange as your guide (center the drill in the base holes keeping the front flange centered and tight against the cabinet front wall). Slide the two Rear Holddown Brackets (7) from the rear into the slots in the Base Pan. The tongues of the Rear Holddown Brackets should be sticking into the base, be centered in the slot, and be into the slot as far as it will go. Mark and drill four 3/32" diameter holes. Mount the Rear Holddown Brackets using four Screws (B). Both Rear Holddown Bracket tongues should now be centered in the slotted holes in the base and be into the base as far as they can go. Remove the two screws in the Base Pan front flange and slide the Base Pan straight out. Step 2 Installation of Base Pan Disconnect microwave oven from receptacle. Remove everything out of the microwave oven (packing, glass shelf, temperature probe, Use & Care books). Remove the four top plug buttons from the top of the Microwave Oven cabinet. Use knife to pry up plug buttons using care not to scratch the microwave oven. A clear protective film has been applied to some microwave oven cabinets. If applied, remove the film. Place the microwave oven on the base pan (1) centered left to right. Remove 4 Plug Buttons V Notch
-
 1
1 -
 2
2 -
 3
3 -
 4
4
 |
 |
