GE PSHS9PGZSS Use and Care Manual - Page 10
About crisper removal., About the crispers and pans., Crisper Removal, Fruit and Vegetable Crispers - refrigerator model
 |
UPC - 084691210627
View all GE PSHS9PGZSS manuals
Add to My Manuals
Save this manual to your list of manuals |
Page 10 highlights
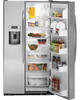
Operating Instructions Safety Instructions About the crispers and pans. Not all features are on all models. Fruit and Vegetable Crispers Excess water that may accumulate in the bottom of the drawers should be wiped dry. On some models, the bottom drawer has full extension slides that allow full access to the drawer. Adjustable Humidity Crispers HI LO Slide the control all the way to the HI setting Slide the control all the way to the LO to provide high humidity recommended for setting to provide lower humidity levels most vegetables. recommended for most fruits. About crisper removal. Not all features are on all models. Crisper Removal Crispers can easily be removed by pulling the drawer straight out and lifting the drawer up and over the stop location. If the door prevents you from taking out the drawers, first try to remove the door bins. If this does not offer enough clearance, the refrigerator will need to be rolled forward until the door opens enough to slide the drawers out. In some cases, when you roll the refrigerator out, you will need to move the refrigerator to the left or right as you roll it out. Installation Instructions Consumer Support Troubleshooting Tips 10
-
 1
1 -
2
-
3
-
4
-
 5
5 -
 6
6 -
 7
7 -
 8
8 -
 9
9 -
 10
10 -
 11
11 -
 12
12 -
 13
13 -
 14
14 -
 15
15 -
16
-
17
-
18
-
19
-
20
-
21
-
22
-
23
-
24
-
25
-
26
-
27
-
28
-
29
-
30
-
31
-
32
-
33
-
34
-
35
-
36
-
37
-
38
-
39
-
40
-
41
-
42
-
43
-
44
-
45
-
46
-
47
-
48
-
49
-
50
-
51
-
52
-
53
-
54
-
55
-
56
-
57
-
58
-
59
-
60
-
61
-
62
-
63
-
64
-
65
-
66
-
67
-
68
-
69
-
70
-
71
-
72
-
73
-
74
-
75
-
76
-
77
-
78
-
79
-
80
-
81
-
82
-
83
-
84
-
85
-
86
-
87
-
88
-
89
-
90
-
91
-
92
-
93
-
94
-
95
-
96
-
97
-
98
-
99
-
100
-
101
-
102
-
103
-
104
-
105
-
106
-
107
-
108
-
109
-
110
-
111
-
112
 |
 |
