GE WSLP1500JWW Installation Instructions - Page 11
WARNING, Installation Instructions, WASHER CONNECTIONS FOR STATIONARY MODEL WSLS1500
 |
UPC - 084691183143
View all GE WSLP1500JWW manuals
Add to My Manuals
Save this manual to your list of manuals |
Page 11 highlights
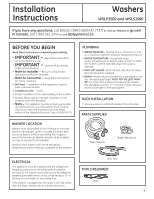
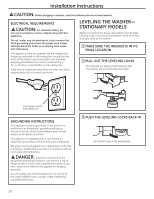
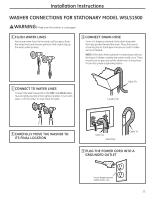
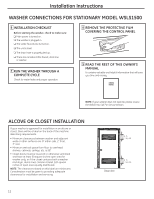
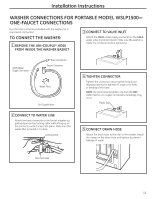
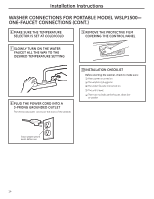
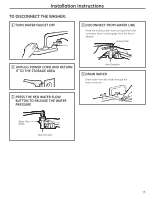
Installation Instructions WASHER CONNECTIONS FOR STATIONARY MODEL WSLS1500 WARNING: Make sure the washer is unplugged. 1 FLUSH WATER LINES Run some water from the hot and cold faucets to flush the water lines and remove particles that might clog up the water valve screens. 4 CONNECT DRAIN HOSE Form a U shape on the end of the drain hose with the hose pointed toward the drain. Place the hose in a laundry tub or stand pipe and secure it with a cable tie (not included). NOTE: If the drain hose is placed in a stand pipe without forming a U shape, a siphoning action could occur. There must be an air gap around the drain hose. A snug hose fit can also cause a siphoning action. 2 CONNECT TO WATER LINES Connect the inlet hose ends to the HOT and COLD water faucets tightly by hand, then tighten another 2⁄3 turn with pliers. Turn the water on and check for leaks. Cable Tie Laundry Tub 3 CAREFULLY MOVE THE WASHER TO ITS FINAL LOCATION Cable Tie Stand Pipe Cable Tie 5 PLUG THE POWER CORD INTO A GROUNDED OUTLET Insure proper ground exists before use 11
-
 1
1 -
2
-
3
-
4
-
5
-
 6
6 -
 7
7 -
 8
8 -
 9
9 -
 10
10 -
 11
11 -
 12
12 -
 13
13 -
 14
14 -
 15
15 -
 16
16 -
17
-
18
-
19
-
20
-
21
-
22
-
23
-
24
-
25
-
26
-
27
-
28
-
29
-
30
-
31
-
32
-
33
-
34
-
35
-
36
-
37
-
38
-
39
-
40
-
41
-
42
-
43
-
44
-
45
-
46
-
47
-
48
-
49
-
50
-
51
-
52
-
53
-
54
-
55
-
56
-
57
-
58
-
59
-
60
-
61
-
62
-
63
-
64
-
65
-
66
-
67
-
68
-
69
-
70
-
71
-
72
 |
 |
