GE WSLP1500JWW Installation Instructions - Page 12
Alcove or Closet Installation, RUN THE WASHER THROUGH A, COMPLETE CYCLE, REMOVE THE PROTECTIVE FILM - review
 |
UPC - 084691183143
View all GE WSLP1500JWW manuals
Add to My Manuals
Save this manual to your list of manuals |
Page 12 highlights
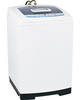
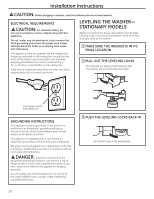
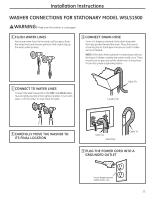
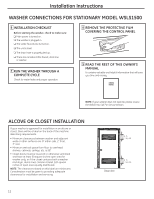
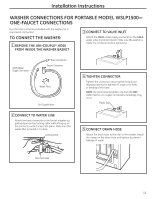
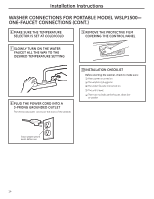
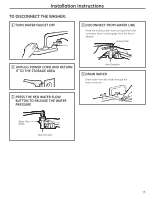
Installation Instructions WASHER CONNECTIONS FOR STATIONARY MODEL WSLS1500 6 INSTALLATION CHECKLIST Before starting the washer, check to make sure: ❏ Main power is turned on. ❏ The washer is plugged in. ❏ The water faucets are turned on. ❏ The unit is level. ❏ The drain hose is properly tied up. ❏ There are no leaks at the faucet, drain line or washer. 7 RUN THE WASHER THROUGH A COMPLETE CYCLE Check for water leaks and proper operation. 8 REMOVE THE PROTECTIVE FILM COVERING THE CONTROL PANEL 9 READ THE REST OF THIS OWNER'S MANUAL It contains valuable and helpful information that will save you time and money. NOTE: If your washer does not operate, please review the Before You Call For Service section. ALCOVE OR CLOSET INSTALLATION If your washer is approved for installation in an alcove or closet, there will be a label on the back of the machine describing requirements. • Minimum clearances between washer and adjacent walls or other surfaces are: 0" either side, 2" front, 3" rear. • Minimum vertical space from floor to overhead shelves, cabinets, ceilings, etc. is 96." • Closet doors must be louvered or otherwise ventilated and have at least 60 square inches open area for washer only, or if the closet contains both a washer and dryer, doors must contain at least 120 square inches of open area equally distributed. NOTE: The clearances stated on this label are minimums. Consideration must be given to providing adequate clearances for installation and servicing. 60 sq. in. (387.1 sq. cm) 60 sq. in. (387.1 sq. cm) Closet door 12
-
 1
1 -
2
-
3
-
4
-
5
-
6
-
 7
7 -
 8
8 -
 9
9 -
 10
10 -
 11
11 -
 12
12 -
 13
13 -
 14
14 -
 15
15 -
 16
16 -
 17
17 -
18
-
19
-
20
-
21
-
22
-
23
-
24
-
25
-
26
-
27
-
28
-
29
-
30
-
31
-
32
-
33
-
34
-
35
-
36
-
37
-
38
-
39
-
40
-
41
-
42
-
43
-
44
-
45
-
46
-
47
-
48
-
49
-
50
-
51
-
52
-
53
-
54
-
55
-
56
-
57
-
58
-
59
-
60
-
61
-
62
-
63
-
64
-
65
-
66
-
67
-
68
-
69
-
70
-
71
-
72
 |
 |
