GE WSLP1500JWW Installation Instructions - Page 6
Consumer Support, Troubleshooting Tips, Safety Instructions, Installation, Instructions - portable washer
 |
UPC - 084691183143
View all GE WSLP1500JWW manuals
Add to My Manuals
Save this manual to your list of manuals |
Page 6 highlights
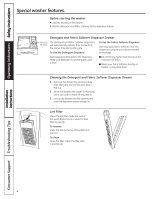
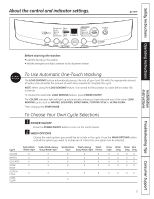
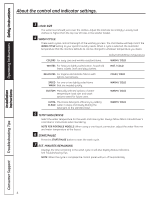
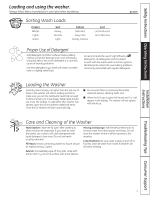
Operating Instructions Safety Instructions About the control and indicator settings. 3 LOAD SIZE The water level should just cover the clothes. Adjust the load size accordingly. Loosely load clothes no higher than the top row of holes in the washer basket. 4 WASH CYCLE These wash cycles control the length of the washing process. The chart below will help match the WASH CYCLE setting to your specific laundry needs. When a cycle is selected, the automatic temperature that the machine defaults to can be changed to whatever temperature you desire. Default Wash/Rinse Temperatures COLORS For easy care and wrinkle-resistant items. WARM / COLD WHITES For heavy to lightly soiled cotton, household linens, towels, work and play clothes. HOT / COLD DELICATES For lingerie and delicate fabrics with light to normal soils. COLD / COLD SPEED For one or two lightly soiled items WASH that are needed quickly. WARM / COLD CUSTOM Manually selected options of water temperature, load size, and wash options saved for future uses. WARM / COLD ULTRA Maximizes detergent efficiency by adding CLEAN water in steps and slowly diluting the detergent to the standard level. WARM / COLD 5 TEMP WASH/RINSE Select the water temperature for the wash and rinse cycles. Always follow fabric manufacturer's care label or instructions when laundering. NOTE FOR PORTABLE MODELS: When using a one-faucet connection, adjust the water flow mix and water temperature at the faucet. 6 START/PAUSE Press the START/PAUSE button to start the wash cycle. 7 EST. MINUTES REMAINING Displays the time remaining in the wash cycle. It will also display Status Indicators. See Troubleshooting Tips. NOTE: When the cycle is complete the control panel will turn off automatically. Installation Instructions Consumer Support Troubleshooting Tips 6
-
 1
1 -
 2
2 -
 3
3 -
 4
4 -
 5
5 -
 6
6 -
 7
7 -
 8
8 -
 9
9 -
 10
10 -
 11
11 -
 12
12 -
13
-
14
-
15
-
16
-
17
-
18
-
19
-
20
-
21
-
22
-
23
-
24
-
25
-
26
-
27
-
28
-
29
-
30
-
31
-
32
-
33
-
34
-
35
-
36
-
37
-
38
-
39
-
40
-
41
-
42
-
43
-
44
-
45
-
46
-
47
-
48
-
49
-
50
-
51
-
52
-
53
-
54
-
55
-
56
-
57
-
58
-
59
-
60
-
61
-
62
-
63
-
64
-
65
-
66
-
67
-
68
-
69
-
70
-
71
-
72
 |
 |