Genie PowerLift Owner's Manual - Page 16
Electrical Warning
 |
View all Genie PowerLift manuals
Add to My Manuals
Save this manual to your list of manuals |
Page 16 highlights
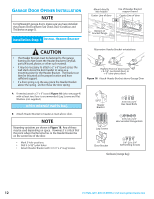
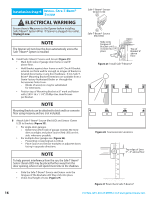
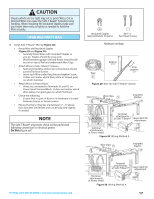
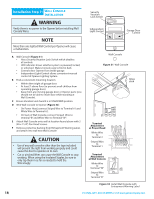
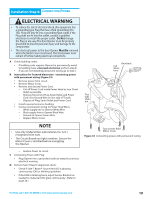
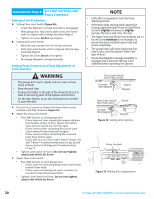
Installation SteCpH6: INSTALL SAFE-T-BEAM® SYSTEM ELECTRICAL WARNING Ensure there is No power to the Opener before installing Safe-T-Beam® System Wires. If Opener is plugged into outlet, Unplug it now. NOTE The Opener will not close the door automatically unless the Safe-T-Beam® System is installed. A Install Safe-T-Beam® Source and Sensor (Figure 25): • Mark both sides of garage door frame or wall 6" above floor. • Hold Bracket against door frame or wall. Check if Bracket extends out from wall far enough so tongue of Bracket is beyond door, tracks, or any door hardware. If not, Safe-TBeam® Mounting Bracket Extensions are available from a Genie Factory Authorized Dealer or through the Accessories Order Form. - Blocks of wood, etc. may be substituted for extensions. • Position top of Mounting Bracket at 6" mark and fasten with 2 (#10-16 x 1-1/4") Phillips Hex Head Screws per Bracket. NOTE Mounting Brackets can be attached to brick walls or concrete floor using masonry anchors (not included). B Attach Safe-T-Beam® Source (Red LED) and Sensor (Green LED) to Brackets (Figure 25): • For single-door garages. - Determine which side of garage receives the most direct sunlight, and place Source (Red LED) on this side whenever possible. • For multiple-door garages see (Figure 26). - Preventing crossed signals is critical. - Place Source and Sensor modules on adjacent doors facing in opposite directions. NOTE To help prevent interference from the sun, the Safe-T-Beam® Sensor (Green LED) may be placed further away from the door opening, where it will spend more time in the shadows. • Slide the Safe-T-Beam® Source and Sensor onto the tongues of the Brackets until they click into place. • Check final height of Lens (Figure 27). Safe-T-Beam® Sensor (Green LED) Safe-T-Beam® Source (Red LED) Slide onto tongue of Bracket until it clicks into place Top of 6" Bracket 6" above floor Figure 25 Install Safe-T-Beams® SUN RED LED GREEN LED GREEN LED RED RED LED LED GREEN LED ONE DOOR GARAGE TWO DOOR GARAGE GREEN LED RED RED LED LED GREEN GREEN LED LED RED LED THREE DOOR GARAGE Figure 26 Source/sensor Locations Top edge of Lens 5" - 6" above floor Figure 27 Final Check Safe-T-Beams® 16 For Help, call 1-800-35-GENIE or visit www.geniecompany.com
-
 1
1 -
2
-
3
-
4
-
5
-
6
-
7
-
8
-
9
-
10
-
 11
11 -
 12
12 -
 13
13 -
 14
14 -
 15
15 -
 16
16 -
 17
17 -
 18
18 -
 19
19 -
 20
20 -
 21
21 -
22
-
23
-
24
-
25
-
26
-
27
-
28
-
29
-
30
-
31
-
32
 |
 |
