Gigabyte G1.Sniper M3 User Manual - Page 85
Installing the SATA RAID/AHCI Driver and Operating System
 |
View all Gigabyte G1.Sniper M3 manuals
Add to My Manuals
Save this manual to your list of manuals |
Page 85 highlights
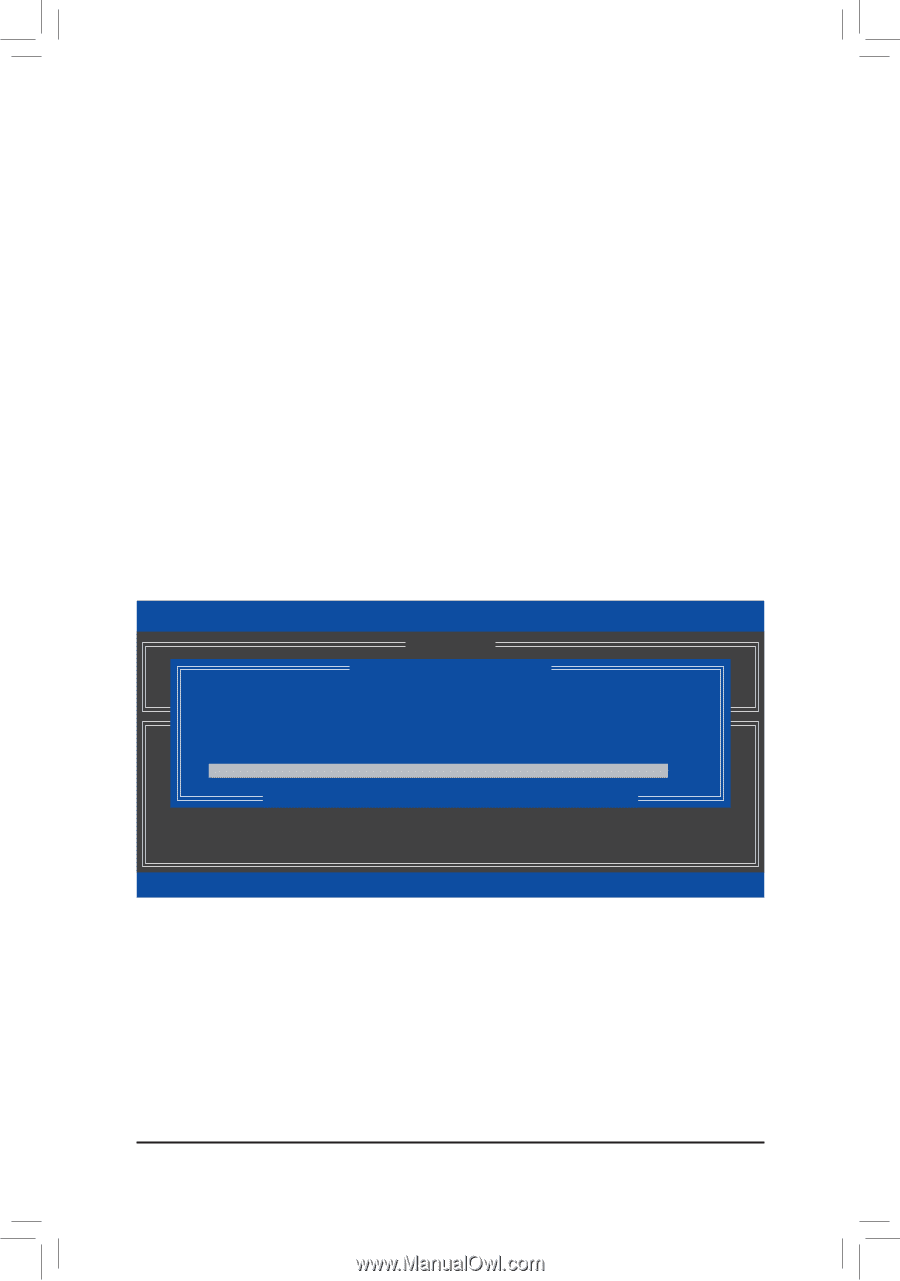
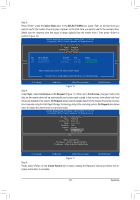
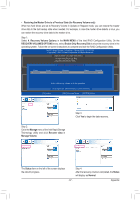
5-1-2 Installing the SATA RAID/AHCI Driver and Operating System With the correct BIOS settings, you are ready to install Windows 7. A. Installing Windows 7 As Windows 7 already include Intel SATA RAID/AHCI driver, you do not need to install separate RAID/AHCI driver during the Windows installation process. After the operating system is installed, we recommend that you install all required drivers from the motherboard driver disk using "Xpress Install" to ensure system performance and compatibility. B. Rebuilding an Array Rebuilding is the process of restoring data to a hard drive from other drives in the array. Rebuilding applies only to fault-tolerant arrays such as RAID 1, RAID 5 or RAID 10 arrays. The procedures below assume a new drive is added to replace a failed drive to rebuild a RAID 1 array. (Note: The new drive must have equal or greater capacity than the old one.) Turn off your computer and replace the failed hard drive with a new one. Restart your computer. •• Enabling Automatic Rebuild Step 1: When the message "Press to enter Configuration Utility" appears, press + to enter the RAID Configuration Utility. The following screen appears after you enter the RAID Configuration Utility. Intel(R) Rapid Storage Technology - Option ROM - 11.0.0.1339 Copyright(C) 2003-11 Intel Corporation. All Rights Reserved. [ MAIN MENU ] 1. Create RAID Volume[ DEGRADED VOLUME DETECTED3]. Reset Disks to Non-RAID "Degrad2e.d DvoeluetmeeRaAnIdDdVisokluamvaeilable for rebuilding detected. Selecting4. Exit a disk initiates a rebuild. Rebuild completes in the operating system. Select the port of the destination d[isDkISfoKr/rVebOuLilUdiMngE(IENSFCOtRoMexAitT):ION ] RAID Volumes : None definedID. Drive Model 1 WDC WD800JD-22LS Serial # WD-WMAM9W736333 Physical Disks : ID Drive Model [h i]-Previous/NextSerial # [ENTER]-SelectSize 0 ST3120026AS 3JT354CP 111.7GB 1 WDC WD800JD-22LS WD-WMAM9W736333 111.7GB Size 111.7GB T[yEpSeC/S]t-aEtxuist(Vol ID) Member Disk (0) Non-RAID Disk [hi]-Select [ESC]-Exit [ENTER]-Select Menu - 85 - Appendix
-
 1
1 -
2
-
3
-
4
-
5
-
6
-
7
-
8
-
9
-
10
-
11
-
12
-
13
-
14
-
15
-
16
-
17
-
18
-
19
-
20
-
21
-
22
-
23
-
24
-
25
-
26
-
27
-
28
-
29
-
30
-
31
-
32
-
33
-
34
-
35
-
36
-
37
-
38
-
39
-
40
-
41
-
42
-
43
-
44
-
45
-
46
-
47
-
48
-
49
-
50
-
51
-
52
-
53
-
54
-
55
-
56
-
57
-
58
-
59
-
60
-
61
-
62
-
63
-
64
-
65
-
66
-
67
-
68
-
69
-
70
-
71
-
72
-
73
-
74
-
75
-
76
-
77
-
78
-
79
-
 80
80 -
 81
81 -
 82
82 -
 83
83 -
 84
84 -
 85
85 -
 86
86 -
 87
87 -
 88
88 -
 89
89 -
 90
90 -
91
-
92
-
93
-
94
-
95
-
96
-
97
-
98
-
99
-
100
-
101
-
102
-
103
-
104
 |
 |