Gigabyte GA-8I915G Pro Manual
Gigabyte GA-8I915G Pro Manual
 |
View all Gigabyte GA-8I915G Pro manuals
Add to My Manuals
Save this manual to your list of manuals |
Gigabyte GA-8I915G Pro manual content summary:
- Gigabyte GA-8I915G Pro | Manual - Page 1
GA-8I915G Pro Intel® Pentium® 4 LGA775 Processor Motherboard User's Manual Rev. 1002 12ME-8I915GP-1002 - Gigabyte GA-8I915G Pro | Manual - Page 2
Motherboard GA-8I915G Pro Jun.11, 2004 Motherboard GA-8I915G Pro Jun. 11, 2004 - Gigabyte GA-8I915G Pro | Manual - Page 3
product. n For detailed productinformation and specifications, please carefully read the "Prod uct User Ma nual". n For detailed information related to Gigabyte's unique features, please go to Gigabyte's website under "Technology Guid e" where information can be download ed in .pdf format. Fore more - Gigabyte GA-8I915G Pro | Manual - Page 4
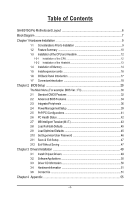
Table of Contents GA-8I915G Pro Motherboard Layout 6 Block Diagram ...7 Chapter 1 Hardware Installation 9 1-1 Considerations Priorto Installation 9 1-2 Feature Summary 10 1-3 Installation of the CPU and Heatsink 12 1-3-1 Installation of the CPU 12 1-3-2 Installation of the Heatsink 13 1-4 - Gigabyte GA-8I915G Pro | Manual - Page 5
4-1 Unique Software Utilities 55 4-1-1 Xpress Recovery Introduction 56 4-1-2 Flash BIOS Method Introduction 59 4-1-4 2 / 4 / 5.1 / 7.1 Channel Audio Function Introduction 70 4-2 Troubleshooting ...76 - 5 - - Gigabyte GA-8I915G Pro | Manual - Page 6
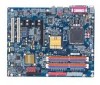
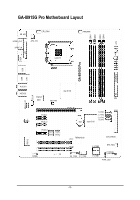
DDR1 DDR2 DDR3 DDR4 ATX GA-8I915G Pro Motherboard Layout KB_MS SP DIF_O UT SPDI F_IN C PU _FAN ATX_12V LGA 775 PWR_FAN VGA LPT GA-8I915G Pro USB LAN USB AUDIO1 AUDIO2 I ntel 915G M arv ell IDE 8001 N B_ FAN AZALIA_FP CD_IN C ODEC PCI E_1 PCI E_2 PC IE_16 FDD S_ ATA4 S_ ATA3 - Gigabyte GA-8I915G Pro | Manual - Page 7
Diagram VGA LGA775 Pr oce ss or CPU CLK+ /-(2 00/1 33M H z) P CI-E CL K (100M Hz) 3 PCI E xpressx 1 Ports P CI-E CL K (100M Hz) PCI Express x16 PCI Express x1 Bus PCI Bus Marvell TSB43AB23 8001 RJ45 2 PCI Ho st Interfa ce DDR 400/333MHz DIMM In te l 915G GMCH Dual Channel Memory GMCHCLK - Gigabyte GA-8I915G Pro | Manual - Page 8
- 8 - - Gigabyte GA-8I915G Pro | Manual - Page 9
instructions below: 1. Please turn off the computer and unplug its power cord. 2. When handling the motherboard, avoid touching any metal leads or connectors. 3. It is best to wear an electrostatic discharge (ESD) cuff when handling electronic components (CPU, RAM motherboard a problem related manual. - Gigabyte GA-8I915G Pro | Manual - Page 10
In (Note 1) Due to standard PC architecture, a certain amount of memory is reserved for system usage and therefore the actual memory size is less than the stated amount. For example, 4 GB of memory size will instead be shown as 3.xxGB memory during system startup. GA-8I915G Pro Motherboard - 10 - - Gigabyte GA-8I915G Pro | Manual - Page 11
detection w System voltage detection w CPU / System / Power fan failure warning w CPU Smart FAN Control w Use of licensed AWARD BIOS w Supports Dual BIOS/Q-Flash w Supports @BIOS w Supports EasyTune w Over Voltage via BIOS (CPU/DDR/PCI-E) w Over Clock via BIOS (CPU/DDR) w ATX form factor; 30 - Gigabyte GA-8I915G Pro | Manual - Page 12
specifications, please do so according to your hardware specifications including the CPU, graphics card, socket in a straight and downwards m otion. Avoid twisting or bending motions that might cause damage to the CPU during installation.) GA-8I915G Pro Motherboard - 12 - Fig. 4 Once the CPU - Gigabyte GA-8I915G Pro | Manual - Page 13
face inwards before installation. (This instruction is only for Intel boxed fan) Fig. 3 Place the heatsink atop the CPU and m ake sure the push pins (fo r de tail ed i nsta llation instructions, please refer to the heatsink installation section of the user manual) Fig. 5 Please check the back of - Gigabyte GA-8I915G Pro | Manual - Page 14
fitin one direction. Insert the DIMM memory module vertically into the DIMM socket. Then push it down. Fig.2 Close the plastic clip at both edges of the DIMM sockets to lock the DIMM module. Reverse the installation steps when you wish to remove the DIMM m odule. GA-8I915G Pro Motherboard - 14 - - Gigabyte GA-8I915G Pro | Manual - Page 15
/s. GA-8I915G Pro includes 4 DIMM sockets, and each Channel has two DIM M sockets as following: Channel A : DDR 1, DDR 2 Channel B : DDR 3, DDR 4 If you want to operate the Dual Channel Technology, please note the following explanations due to the limitation of Intel chipset specifications. 1. One - Gigabyte GA-8I915G Pro | Manual - Page 16
bar at the end of the PCI Express x 16 slot when you try to install/ Uninstall the VGA card. Please align the VGA card to the onboard PCI Express x 16 slot and press firm ly down on the slot .M ake sure your VGA card is locked by the small white-drawable bar. GA-8I915G Pro Motherboard - 16 - - Gigabyte GA-8I915G Pro | Manual - Page 17
SPDIF output is capable of providing digital audio to external speakers or compressed AC3 data to output function. VGA Port M onitor can be connected to VGA port. LAN Port The supports USB controller. If your OS does not support USB controller, please contact OS ven dor for possible patch or driver - Gigabyte GA-8I915G Pro | Manual - Page 18
English You can use audio software to configure 2-/4-/5.1-/7.1-channel audio functioning. 1-7 Connectors Introduction 13 5 2 6 8 13 12 9 7 19 18 4 17 16 15 14 10 11 1) ATX_12V 2) ATX ( / F_USB2 15) F1_1394 / F2_1394 16) IR 17) COMA 18) CLR_CMOS 19) BAT GA-8I915G Pro Motherboard - 18 - - Gigabyte GA-8I915G Pro | Manual - Page 19
all components and devices are properly installed. Align the power connector with its proper location on the motherboard and connect tightly. The ATX_12V power connector mainly supplies power to the CPU. If the ATX_12V power connector is not connected, the system will not start. Caution! Please use - Gigabyte GA-8I915G Pro | Manual - Page 20
to prevent system overheating and fa ilur e. Caution! Please remember to connect the power to the CPU fan to prevent CPU overheating and failure. 1 CPU_ FAN 1 PWR_ FAN Pin No. 1 2 3 4 Definition GND black cable is GND) Pin No. Definition 1 1 +12V 2 GND GA-8I915G Pro Motherboard - 20 - - Gigabyte GA-8I915G Pro | Manual - Page 21
cable while the other end of the cable connects to the FDD drive. The types of FDD drives supported are:360KB, 720KB, 1.2MB, 1.44MB and 2.88MB. Please connect the red power connector wire to , please refer to the instructions located on the IDE device). 40 39 2 1 - 21 - Hardware Installation - Gigabyte GA-8I915G Pro | Manual - Page 22
by ICH6) Serial ATA can provide 150M B/s transfer r ate. Please refer to the BIOS setting for the Serial ATA and install the proper driver in order to work properly. 7 1 S_ATA (Control by ICH 6) Pin No. mode. Pin No. Definition 1 MPD+ 1 2 MPD- 3 MPD- GA-8I915G Pro Motherboard - 22 - - Gigabyte GA-8I915G Pro | Manual - Page 23
English 11) F_PANEL (Front Panel Jumper) Please connect the power LED, PC peaker, reset switch and power switch etc of your chassis front panel to the F_PANEL connector according to the pin assignment below. Me ssa ge LED/ Po we r/ Sle ep L ED Pow er Sw itch Spe aker C onnector MSG+ MSG- PW+ - Gigabyte GA-8I915G Pro | Manual - Page 24
ent on the M B header. To find out ifthe chassis you are buying support front audio panel connector, please contact your dealer. 10 9 2 1 Pin No. 1 Connect CD-ROM or DVD-ROM audio out to the connector. Pin No. Definition 1 CD-L 2 GND 1 3 GND 4 CD-R GA-8I915G Pro Motherboard - 24 - - Gigabyte GA-8I915G Pro | Manual - Page 25
wor k or even dam age it. For optional front USB cable, please contact your local dealer. The "USB Device Wake up From S3" is only supported by rear USB ports. 2 10 1 9 Pin No. 1 2 3 4 5 6 7 8 9 10 Definition Power Power USB0 DXUSB1 DyUSB0 DX+ USB1 Dy+ GND GND No Pin NC 15) F1_1394/F2_1394 - Gigabyte GA-8I915G Pro | Manual - Page 26
connect the COMA cable. Please contact your nearest dealer for optional COMA cable. 2 10 1 9 Pin No. 1 2 3 4 5 6 7 8 9 10 Definition NDCDANSINA NSOUTA NDTRAGND NDSRANRT SANCT SANRIANo Pin GA-8I915G Pro Motherboard - 26 - - Gigabyte GA-8I915G Pro | Manual - Page 27
if batteryis incorrectly replaced. Replace only with the same or equivalent type recommended bythe manufacturer. Dispose of used batteries according to the manufacturer's instructions. If you want to erase CM OS... 1.Turn OFF the computer and unplug the power cord. 2.Remove the battery, wait for 30 - Gigabyte GA-8I915G Pro | Manual - Page 28
English GA-8I915G Pro Motherboard - 28 - - Gigabyte GA-8I915G Pro | Manual - Page 29
its original settings. If y ou w ish to upgrade to a new BIOS, either Gigaby te's Q-Flash or @BIOS utility can be used. Q-Flash allow s the user toquickly and easily update or backup BIOS without entering the operating sy stem. @BIOS is a Window s-based utility that does not require users to boot to - Gigabyte GA-8I915G Pro | Manual - Page 30
This setup page includes all theitems in standard compatible BIOS. n Advanced BI OS Features This setup page includes fan, speed. n MB Intelligent Tweaker(M. I.T.) This setup page is control CPU clock and frequency ratio. n Load Fail -Safe Defaults Fail-Safe Defaults GA-8I915G Pro Motherboard - 30 - - Gigabyte GA-8I915G Pro | Manual - Page 31
the system. n Save & Exit S etup Sav e CMOS v alue settings to CMOS and ex itsetup. n Exit Without S aving Abandonall CMOS v aluechanges and ex it setup. - 31 - BIOS Setup - Gigabyte GA-8I915G Pro | Manual - Page 32
. You can use one of three methods: Auto None Allow s BIOS to automatically detect IDE dev ices during POST(default) Select this if step and allow for faster sy stem start up. Manual User can manually input the correct settings Access Mode Use this toset the GA-8I915G Pro Motherboard - 32 - - Gigabyte GA-8I915G Pro | Manual - Page 33
3 Mode Support (for memory installed on the motherboard, or 640K for sy stems w ith 640K or more memory installed on themotherboard. Extended Memory The BIOS determines how much ex tended memory is present during the POST. This is the am ount of memory located abov e 1 MB in the CPU 's memory - Gigabyte GA-8I915G Pro | Manual - Page 34
the Intel® Pentium® 4 processor w ithHT Technology. Hard Disk Boot Priority Select boot sequence for onboard(or add-on cards) SCSI, RAID, etc. Use < > or < > to select a device, then press tomov e it up, or please just press ENTER to make [SETUP] empty . GA-8I915G Pro Motherboard - 34 - - Gigabyte GA-8I915G Pro | Manual - Page 35
Please note that this feature is only working for operating sy stem w ith multi processors mode supported. (Default v alue) Disabled Disables CPU Hy per Threading. Limit CPUID Max. to 3 Enab led Limit CPUID Max imum v alue size to 16MB. Set On-chip frame buffer size to 32MB. - 35 - BIOS Setup - Gigabyte GA-8I915G Pro | Manual - Page 36
USB K ey board Su pport USB M ouse Sup port Azalia Codec Onbo ard H/W 1394 Onbo ard H/W LAN Onboa rd LAN Boo t ROM Onboar d Serial P ort 1 Onboa rd IrDA Port UART Mode Se lect UR2 Duplex Mode Onboar (Default v alue) Disabled Disable onboard 1st channel IDE port. GA-8I915G Pro Motherboard - 36 - - Gigabyte GA-8I915G Pro | Manual - Page 37
USB M ouse Support. (Default v alue) Azalia Codec Auto Auto detect Azalia audio function. (Default v alue) Disa bled Disable Azalia audio func tion. Onboard H/W 1394 Enab led Enable onboard IEEE 1394 function. (Default v alue) Disa bled Disable this function. Onboard H/W LAN Enab led - Gigabyte GA-8I915G Pro | Manual - Page 38
boot ROM of the onboard LAN chip. Enab led Enable this func tion. Disabled Disable this function. (Default v alue) Onboard Serial P ort 1 Au to 3F8/ IRQ4 2F8/IRQ3 BIOS w ill automatically setup the Use DMA to 3. (Default v alue) 1 Set ECP ModeUse DMA to 1. GA-8I915G Pro Motherboard - 38 - - Gigabyte GA-8I915G Pro | Manual - Page 39
Mouse Disa bled Disable this function. (Default v alue) Double Click Double click on PS/2 m ouse left button to pow er on the sy stem. - 39 - BIOS Setup - Gigabyte GA-8I915G Pro | Manual - Page 40
stem w ill be in "Off"state. (Default v alue) Full-On WhenAC-pow erback to the sy stem, the sy stem alw ay s in "On" state. Memory When AC-pow er back to the sy stem, the sy stem w ill return to the Last state before AC-pow er off. GA-8I915G Pro Motherboard - 40 - - Gigabyte GA-8I915G Pro | Manual - Page 41
IRQ 3,4,5,7,9,10,11,12,14,15 to PCI 1. Auto assign IRQ to PCI 2. (Default v alue) Set IRQ 3,4,5,7,9,10,11,12,14,15 to PCI 2. - 41 - BIOS Setup - Gigabyte GA-8I915G Pro | Manual - Page 42
, CPU fan w ill run at full speed. b. The speed of CPU fan w ill increase linearly depand onthe temperature if the temperature is more than 41 degree and less than 65 degree. c. Whenthe CPU temperature is lower than 40 degrees Celsius, CPU fanw ill be disable. GA-8I915G Pro Motherboard - 42 - Gigabyte GA-8I915G Pro | Manual - Page 43
198 4-2004 Award Software MB In telligent Tweaker(M. I.T.) CPU Clock Ratio C.I. A.2 CPU Host Clock Control ø CPU Ho st Frequency (Mhz) Memory Frequency For Memory Frequency (Mhz) DIMM O verVoltage Control PCI-E O verVoltage Control CPU Voltage Co ntrol NormalCPU Vcore [15X] [Disabled] [Disabled - Gigabyte GA-8I915G Pro | Manual - Page 44
damage to the memory may occur. CPU Voltage Co ntrol Supports adjustable CPU Vcore from 0.8375V to 1.6000V. (Default v alue: Normal) Warning: CPU may be damaged orreduce CPU life-cy cle w hen CPU is ov er-v oltage. Normal CPU Vcore Display y our CPU Vcore Voltage. GA-8I915G Pro Motherboard - Gigabyte GA-8I915G Pro | Manual - Page 45
telligent Tweaker(M. I.T.) ESC: Qu it F8:Q- Flash higf:Selec t Item F10: Save & Exit Setup Load Optimized Defaults Selecting this field loads the factory defaults for BIOS and Chipset Features w hich the sy stem automatically detects. - 45 - Gigabyte GA-8I915G Pro | Manual - Page 46
ance BIOS Features Menu, y ou w illbe prompted for the passw ord ev ery time the system is rebooted or any time y ou try to enter SetupMenu. If you select "Setup" at"Password Check" inAdv ance BIOSFeatures Menu, y ou w ill be prompted only w hen y ou try to enter Setup. GA-8I915G Pro Motherboard - Gigabyte GA-8I915G Pro | Manual - Page 47
F10: Save & Exit Setup Abandon allData Ty pe "Y" w ill quitthe Setup Utility w ithoutsav ing to RTC CMOS. Ty pe "N" will return to Setup Utility. - 47 - BIOS Setup - Gigabyte GA-8I915G Pro | Manual - Page 48
English GA-8I915G Pro Motherboard - 48 - - Gigabyte GA-8I915G Pro | Manual - Page 49
will continue to install other drivers. System will reboot automatically after install the drivers, afterward you can install others application. For USB2.0 driver support under Windows XP operating system, please use Windows Service Pack. After install Windows Service Pack, it will show a question - Gigabyte GA-8I915G Pro | Manual - Page 50
Applications This page displays all the tools that Gigabyte developed and some free software, you can choose anyone you want and press "install" to install them. 3-3 Driver CD Information This page lists the contents of software and drivers in this CD-title. GA-8I915G Pro Motherboard - 50 - - Gigabyte GA-8I915G Pro | Manual - Page 51
English 3-4 Hardware Information This page lists all device you have for this motherboard. 3-5 Contact Us Please see the last page for details. - 51 - Drivers Installation - Gigabyte GA-8I915G Pro | Manual - Page 52
English GA-8I915G Pro Motherboard - 52 - - Gigabyte GA-8I915G Pro | Manual - Page 53
information as well as displaying a detailed list of all new drivers with the option for download. C.O.M. (Corporate Online Management) A web-based system management tool that allows system hardware information such as CPU, memory, graphics card, etc. to be monitored and controlled via the Internet - Gigabyte GA-8I915G Pro | Manual - Page 54
on. . . Verifying DMI Pool Data Boot from CD: Boot from CD: Xpress Recovery V1.0 (C) Copy Right 2003. GIGABYTE Technology CO. , Ltd. 1. Execute Backup Utility 2. Execute Restore Utility 3. Remove Backup Image 4. Set Password 5. Exit and Restart Build 2011 GA-8I915G Pro Motherboard - 54 - - Gigabyte GA-8I915G Pro | Manual - Page 55
BIOS for 8IPE1000MT F1 Check System Health OK . . . Press DEL to enter SETUP / Q-Flash, F9 For Xpress Recovery 08/16/2002-I845GE-6A69YG01C-00 F9 For Xpress Recovery Xpress Recovery V1.0 (C) Copy Right 2003. GIGABYTE and all required driver and software installations are complete. - 55 - Appendix - Gigabyte GA-8I915G Pro | Manual - Page 56
your system and back up data as a backup image in your hard drive. Not all systems support access to Xpress Recovery by pressing the F9 key during computer power on. If this is the case password requirement. 5. Exit and Restart: Exit and restart your computer. GA-8I915G Pro Motherboard - 56 - - Gigabyte GA-8I915G Pro | Manual - Page 57
Enable Copy Main ROM Data to Backup Load Default Settings Save Settings to CMOS Q-Flash Utility Update Main BIOS from Floppy Update Backup BIOS from Floppy Save Main BIOS to Floppy Save Backup BIOS to Floppy PgDn/PgUp: Modify hi: Move ESC: Reset 512K 512K F10: Power Off - 57 - Appendix - Gigabyte GA-8I915G Pro | Manual - Page 58
the Backup BIOS works normally and could automatically recover the Main BIOS. (This auto recovery utility is set by system automatically and can't be changed by user.) Load Default Settings Load dual BIOS default value. Save Settings to CMOS Save revised setting. GA-8I915G Pro Motherboard - 58 - Gigabyte GA-8I915G Pro | Manual - Page 59
Part One. If your motherboard has single-BIOS, please refer to Part Two. Part One: Updating BIOS with Q-FlashTM Utility on Dual BIOS Motherboards. Some of Gigabyte motherboards are equipped with dual BIOS. In the BIOS menu of the motherboards supporting Q-Flash and Dual BIOS, the Q-Flash utility and - Gigabyte GA-8I915G Pro | Manual - Page 60
Set User Password Save & Exit Setup Exit Without Saving ESC: Quit F8: Dual BIOS/Q-Flash F3: Change Language F10: Save & Exit Setup Time, Date, Hard Disk the Q-Flash/Dual BIOS utility. Pressing the buttons mentioned on your keyboards to perform these actions. GA-8I915G Pro Motherboard - 60 - - Gigabyte GA-8I915G Pro | Manual - Page 61
flash and press Enter. In this example, we only download one BIOS file to the floppy disk so only one BIOS file, 8KNXPU.Fba, is listed. Please confirm again you have the correct BIOS file for your motherboard. Dual BIOS Utility Boot From Main Bios Main ROM Type/Size SST 49LF004A Backup ROM Type - Gigabyte GA-8I915G Pro | Manual - Page 62
Primary Master : FUJITSU MPE3170AT ED-03-08 Primary Slave : None Secondary Master : CREATIVEDVD-RM DVD1242E BC101 Secondary Slave : None Press DEL to enter SETUP / Dual BIOS / Q-Flash / F9 For Xpress Recovery 09/23/2003-i875P-6A79BG03C-00 GA-8I915G Pro Motherboard - 62 - - Gigabyte GA-8I915G Pro | Manual - Page 63
, Hard Disk Type... Press Y on your keyboard to save and exit. Part Two: Updating BIOS with Q-FlashTM Utility on Single-BIOS Motherboards. This part guides users of single-BIOS motherboards how to update BIOS using the Q-FlashTM utility. CMOS Setup Utility-Copyright (C) 1984-2004 Award Software - Gigabyte GA-8I915G Pro | Manual - Page 64
:tRemeset F10:Power Off Do not trun off power or reset your system at this stage!! After BIOS file is read, you'll see a confirmation dialog box asking you "Are you sure to update BIOS?" Please do not take out the floppy disk when it begins flashing BIOS. GA-8I915G Pro Motherboard - 64 - - Gigabyte GA-8I915G Pro | Manual - Page 65
file becomes F4 after updating Award Modular BIOS v6.00PG, An Energy Star Ally Copyright (C) 1984-2003, Award Software, Inc. Intel 845GE AGPSet BIOS for 8GE800 F4 Check System Health OK Main Processor : Intel Pentium(R) 4 1.7GHz (100x17.0) Memory Testing : 122880K OK - Gigabyte GA-8I915G Pro | Manual - Page 66
b. Click "Update New BIOS" c. Please select "All Files" in dialog box while opening the old file. d. Please search for BIOS unzip file, downloading from internet or any other methods (such as: 8I915G Pro.F1). e. Complete update process following the instruction. GA-8I915G Pro Motherboard - 66 - - Gigabyte GA-8I915G Pro | Manual - Page 67
II, be sure that motherboard's model name in BIOS unzip file are the same as your motherboard's. Otherwise, your system won't boot. III. In method I, if the BIOS file you need cannot be found in @BIOSTM server, please go onto Gigabyte's web site for downloading and updating it according to method - Gigabyte GA-8I915G Pro | Manual - Page 68
audio driver, you'll find an icon in the system area. Double click the icon to select the function. If the icon can not be found, go to the control panel from the system menu and double click the C-Media CPL icon. Open "CMI Audio output devices are configured.) GA-8I915G Pro Motherboard - 68 - - Gigabyte GA-8I915G Pro | Manual - Page 69
Out STEP 2: After installation of the audio driver, you'll find an icon in the system area. audio mode is displayed in "Audio System Status". "Smart Jack" would auto-detect the speaker type you connect and gives you the functions to manually modify the speaker settings. The function to manually - Gigabyte GA-8I915G Pro | Manual - Page 70
current audio mode is display in "Audio System Status". "Smart Jack" would auto-detect the speaker type you connect and gives you the functions to manually modify speaker the settings. The function to manually modify speaker setting. The function to adjust speaker volume. GA-8I915G Pro Motherboard - Gigabyte GA-8I915G Pro | Manual - Page 71
Speaker Out". STEP 2: After installation of the audio driver, you find an icon in the system area. audio mode is display in "Audio System Status". "Smart Jack" would auto-detect the speaker type you connect and gives you the functions to manually modify speaker the settings. The function to manually - Gigabyte GA-8I915G Pro | Manual - Page 72
current audio mode is display in "Audio System Status". "Smart Jack" would auto-detect the speaker type you connect and gives you the functions to manually modify speaker the settings. The function to manually modify speaker setting. The function to adjust speaker volume. GA-8I915G Pro Motherboard - Gigabyte GA-8I915G Pro | Manual - Page 73
, Environment size, and parameters of Equalizer here. Device Setting Check "Enable Multiple Streaming" and restart the system to enable support for multiple audio output function. Defaults: The defaults for both "Sound Playback "and"Sound Recording " are "C-Media Azalia Rear Panel". After you - Gigabyte GA-8I915G Pro | Manual - Page 74
later. Question 8: How do I disable onboard VGA card in order to add an external VGA card? Answer: Gigabyte motherboards will auto-detect the external VGA card after it is plugged in, so you don't need to change any setting manually to disable the onboard VGA. GA-8I915G Pro Motherboard - 74 - - Gigabyte GA-8I915G Pro | Manual - Page 75
Question 12:How to set in the BIOS to bootup from the IDE/ SCSI/ RAID card ? Answer:Please set in the BIOS as follow: 1. Advanced BIOS features-->(SATA)/RAID/SCSI boot order: "SCSI" 2. Advanced BIOS features--> First boot device: "SCSI" Then it depends on the mode(RAID or ATA) that you need to set - Gigabyte GA-8I915G Pro | Manual - Page 76
English GA-8I915G Pro Motherboard - 76 - - Gigabyte GA-8I915G Pro | Manual - Page 77
- 77 - Appendix English - Gigabyte GA-8I915G Pro | Manual - Page 78
English GA-8I915G Pro Motherboard - 78 - - Gigabyte GA-8I915G Pro | Manual - Page 79
Bletchley Milton Keynes, MK1 1DR, UK, England TEL: +44-1908-362700 FAX: +44-1908-362709 Tech. Support : http://uk.giga-byte.com/TechSupport/ServiceCenter.htm Non-Tech. Support(Sales/Marketing) : http://ggts.gigabyte.com.tw/nontech.asp WEB address : http://uk.giga-byte.com - The Netherlands GIGA-BYTE - Gigabyte GA-8I915G Pro | Manual - Page 80
www.gigabyte.ru - Poland Representative Office Of Giga-Byte Technology Co., Ltd. POLAND Tech. Support : http://tw.giga-byte.com/TechSupport/ServiceCenter.htm Non-Tech. Support(Sales/Marketing) : http://ggts.gigabyte.com.tw/nontech.asp WEB address : http://www.gigabyte.pl GA-8I915G Pro Motherboard
-
 1
1 -
 2
2 -
 3
3 -
 4
4 -
 5
5 -
 6
6 -
 7
7 -
8
-
9
-
10
-
11
-
12
-
13
-
14
-
15
-
16
-
17
-
18
-
19
-
20
-
21
-
22
-
23
-
24
-
25
-
26
-
27
-
28
-
29
-
30
-
31
-
32
-
33
-
34
-
35
-
36
-
37
-
38
-
39
-
40
-
41
-
42
-
43
-
44
-
45
-
46
-
47
-
48
-
49
-
50
-
51
-
52
-
53
-
54
-
55
-
56
-
57
-
58
-
59
-
60
-
61
-
62
-
63
-
64
-
65
-
66
-
67
-
68
-
69
-
70
-
71
-
72
-
73
-
74
-
75
-
76
-
77
-
78
-
79
-
80
 |
 |

GA-8I915G Pro
Intel
®
Pentium
®
4 LGA775 Processor Motherboard
User's Manual
Rev. 1002
12ME-8I915GP-1002