Gigabyte GA-8I915G Pro Manual - Page 14
Installation of Memory - d pro
 |
View all Gigabyte GA-8I915G Pro manuals
Add to My Manuals
Save this manual to your list of manuals |
Page 14 highlights
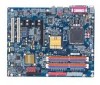
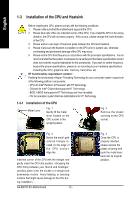
English 1-4 Installation of Memory Before installing the memory modules, please comply with the following conditions: 1. Please make sure that the memory used is supported by the motherboard. It is recommended that memory of si mi lar capaci ty , speci fi cati ons and brand be used. 2 . Before i ns tall ing or remov ing memory modules, pleas e mak e sure that the computer power i s s wi tc hed off to prevent hardware damage. 3 . Memory modul es hav e a foolproof inserti on des i gn. A memory module c an be ins talled in only one direction. If you are unable to insert the modul e, pl ease s witch the di rection. The m otherboard has 4 dual inline m emory module (DIMM) sockets. The BIOS will automatically detects memory type and size. To install the memory module, just push it vertically into the DIMM socket. The DIMM module can only fit in one direction due to the notch. Memory size can vary between sockets. Notch DDR Fig.1 The DIMM socket has a notch, so the DIMM memory module can only fitin one direction. Insert the DIMM memory module vertically into the DIMM socket. Then push it down. Fig.2 Close the plastic clip at both edges of the DIMM sockets to lock the DIMM module. Reverse the installation steps when you wish to remove the DIMM m odule. GA-8I915G Pro Motherboard - 14 -
-
 1
1 -
2
-
3
-
4
-
5
-
6
-
7
-
8
-
 9
9 -
 10
10 -
 11
11 -
 12
12 -
 13
13 -
 14
14 -
 15
15 -
 16
16 -
 17
17 -
 18
18 -
 19
19 -
20
-
21
-
22
-
23
-
24
-
25
-
26
-
27
-
28
-
29
-
30
-
31
-
32
-
33
-
34
-
35
-
36
-
37
-
38
-
39
-
40
-
41
-
42
-
43
-
44
-
45
-
46
-
47
-
48
-
49
-
50
-
51
-
52
-
53
-
54
-
55
-
56
-
57
-
58
-
59
-
60
-
61
-
62
-
63
-
64
-
65
-
66
-
67
-
68
-
69
-
70
-
71
-
72
-
73
-
74
-
75
-
76
-
77
-
78
-
79
-
80
 |
 |