Gigabyte GA-A75-UD4H User Manual - Page 14
Hardware Installation, Align the APU pin one small triangle marking with the triangle mark
 |
View all Gigabyte GA-A75-UD4H manuals
Add to My Manuals
Save this manual to your list of manuals |
Page 14 highlights
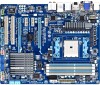
B. Follow the steps below to correctly install the APU into the motherboard APU socket. • Before installing the APU, make sure to turn off the computer and unplug the power cord from the power outlet to prevent damage to the APU. • Do not force the APU into the APU socket. The APU cannot fit in if oriented incorrectly. Adjust the APU orientation if this occurs. APU Socket Locking Lever Step 1: Completely lift up the APU socket locking lever. Step 2: Align the APU pin one (small triangle marking) with the triangle mark on the APU socket and gently insert the APU into the socket. Make sure that the APU pins fit perfectly into their holes. Once the APU is positioned into its socket, place one finger down on the middle of the APU, lowering the locking lever and latching it into the fully locked position. Hardware Installation - 14 -
-
 1
1 -
2
-
3
-
4
-
5
-
6
-
7
-
8
-
 9
9 -
 10
10 -
 11
11 -
 12
12 -
 13
13 -
 14
14 -
 15
15 -
 16
16 -
 17
17 -
 18
18 -
 19
19 -
20
-
21
-
22
-
23
-
24
-
25
-
26
-
27
-
28
-
29
-
30
-
31
-
32
-
33
-
34
-
35
-
36
-
37
-
38
-
39
-
40
-
41
-
42
-
43
-
44
-
45
-
46
-
47
-
48
-
49
-
50
-
51
-
52
-
53
-
54
-
55
-
56
-
57
-
58
-
59
-
60
-
61
-
62
-
63
-
64
-
65
-
66
-
67
-
68
-
69
-
70
-
71
-
72
-
73
-
74
-
75
-
76
-
77
-
78
-
79
-
80
-
81
-
82
-
83
-
84
-
85
-
86
-
87
-
88
-
89
-
90
-
91
-
92
-
93
-
94
-
95
-
96
 |
 |
