Gigabyte GA-SBC7100 User Manual - Page 8
Installing the Memory, 1-4 Installing an Expansion Card, 1-5 Back Panel Connectors, USB 3.0 Port
 |
View all Gigabyte GA-SBC7100 manuals
Add to My Manuals
Save this manual to your list of manuals |
Page 8 highlights
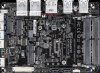
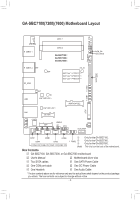
1-3 Installing the Memory Read the following guidelines before you begin to install the memory: •• Make sure that the motherboard supports the memory. (Go to GIGABYTE's website for the latest supported memory speeds and memory modules.) •• Always turn off the computer and unplug the power cord from the power outlet before installing the memory to prevent hardware damage. •• Memory modules have a foolproof design. A memory module can be installed in only one direction. If you are unable to insert the memory, switch the direction. 1-4 Installing an Expansion Card Read the following guidelines before you begin to install an expansion card: •• Make sure the motherboard supports the expansion card. Carefully read the manual that came with your expansion card. •• Always turn off the computer and unplug the power cord from the power outlet before installing an expansion card to prevent hardware damage. Do not disassemble the onboard SoC by yourself to avoid damage to these components. 1-5 Back Panel Connectors USB 3.0 Port The USB 3.0 port supports the USB 3.0 specification and is compatible to the USB 2.0 specification. Use this port for USB devices. DisplayPort DisplayPort delivers high quality digital imaging and audio, supporting bi-directional audio transmission. DisplayPort can support both DPCP and HDCP 2.3 content protection mechanisms. It provides improved visuals supporting Rec. 2020 (Wide Color Gamut) and High Dynamic Range (HDR) for Blu-ray UHD playback. You can use this port to connect your DisplayPort-supported monitor. Note: The DisplayPort Technology can support a maximum resolution of 4096x2304@60 Hz but the actual resolutions supported depend on the monitor being used. HDMI Port The HDMI port is HDCP compliant and supports Dolby TrueHD and DTS HD Master Audio formats. It also supports up to 192KHz/24bit 7.1-channel LPCM audio output. You can use this port to connect your HDMI-supported monitor. The maximum supported resolution is 4096x2304@24 Hz, but the actual resolutions supported are dependent on the monitor being used. After installing the HDMI/DisplayPort device, make sure to set the default sound playback device to HDMI/DisplayPort. (The item name may differ depending on your operating system.) Dual-Display Configurations for the Onboard Graphics: Dual-display configurations are supported after you install motherboard drivers in OS. - 8 -
-
 1
1 -
2
-
 3
3 -
 4
4 -
 5
5 -
 6
6 -
 7
7 -
 8
8 -
 9
9 -
 10
10 -
 11
11 -
 12
12 -
 13
13 -
14
-
15
-
16
-
17
-
18
-
19
-
20
-
21
-
22
-
23
-
24
-
25
-
26
-
27
-
28
-
29
-
30
-
31
 |
 |
