Gigabyte GA-VM900M Manual - Page 59
A. Create Array, Create Array, Array Mode, for performance, RAID 1 for data protection, RAID SPAN - v1 0
 |
View all Gigabyte GA-VM900M manuals
Add to My Manuals
Save this manual to your list of manuals |
Page 59 highlights
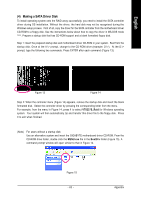
English A. Create Array: In Main Menu, select Create Array and press ENTER, a screen similar to Figure 5 below will appear. VIA VT8237S V-RAID Utility V1.20 X Auto Setup For Data Security X Array Mode RAID 1 (Mirroring) X Select Disk Drives X Start Create Process Dev. Posi. Channel0 Master Channel1 Master Drive Name ST3120026AS ST3120026AS Create a RAID array with the hard disks attached to VIA RAID controller F1 : K, L : Enter : ESC : View Array/disk Status Move to next item Confirm the selection Exit Array Name Mode SATA SATA Size(GB) Status 111.79 Hdd 111.79 Hdd Figure 5 The first step to create a RAID array is to set the RAID mode. Select Array Mode and press ENTER. And the RAID mode selection menu will appear (Figure 6). The supported RAID modes include RAID 0 for performance, RAID 1 for data protection, and RAID SPAN for capacity. Use the UP or DOWN ARROW key to select a RAID mode, then press ENTER. The following procedure uses RAID 0 creation as as example. VIA VT8237S V-RAID Utility V1.20 X X X X AASSeturRRRalrterAAAoactytIIISCDDDDMertiS10uesokPapdfftAooeDFerrNRroPdpirAvrfaeoeDoIrtrsaDcfaoectprs0aarsmp(oSSaateectncrcicutitepyrioiitnnyg) Dev. Posi. Channel0 Master Channel1 Master Drive Name ST3120026AS ST3120026AS Create a RAID array with the hard disks attached to VIA RAID controller F1 : K, L : Enter : ESC : View Array/disk Status Move to next item Confirm the selection Exit Array Name Mode SATA SATA Size(GB) Status 111.79 Hdd 111.79 Hdd Figure 6 - 59 - Appendix
-
 1
1 -
2
-
3
-
4
-
5
-
6
-
7
-
8
-
9
-
10
-
11
-
12
-
13
-
14
-
15
-
16
-
17
-
18
-
19
-
20
-
21
-
22
-
23
-
24
-
25
-
26
-
27
-
28
-
29
-
30
-
31
-
32
-
33
-
34
-
35
-
36
-
37
-
38
-
39
-
40
-
41
-
42
-
43
-
44
-
45
-
46
-
47
-
48
-
49
-
50
-
51
-
52
-
53
-
 54
54 -
 55
55 -
 56
56 -
 57
57 -
 58
58 -
 59
59 -
 60
60 -
 61
61 -
 62
62 -
 63
63 -
 64
64 -
65
-
66
-
67
-
68
-
69
-
70
-
71
-
72
-
73
-
74
-
75
-
76
-
77
-
78
-
79
-
80
 |
 |
