Gigabyte GA-Z68XP-UD5 Manual - Page 105
BGA Rebuild, Information, Status, Functional, Resume the Stopped Rebuild Process, BGA Resume
 |
UPC - 818313013033
View all Gigabyte GA-Z68XP-UD5 manuals
Add to My Manuals
Save this manual to your list of manuals |
Page 105 highlights
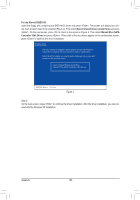
Step 3: The BGA Rebuild item in the Information block will display the current rebuild progress. After the rebuild is complete, the Status will display as Functional. Please note the rebuild will be stopped if you exit the RAID BIOS screen before the rebuild is complete. Marvell BIOS Setup (c) 2009 Marvell Technology Group Ltd. Topology HBA 0 : Marvell 0 Virtual Disks New_VD HDD 0: WDC WD800JD-22L HDD 1: WDC WD800JD-22L Free Physical Disks Information ID : 0 Name : New_VD Status : Degrade Stripe Size : 64K RAID Mode : RAID1 Size : 75776MB BGA Status : Running BGA Rebuild : 27% Number of PDs : 2 Numbers : 01 Help Virtual Disk: A set of disk blocks presented to an operating environment as a range of consecutively numbered logical blocks with disk-like storage. ENTER: Operation F10: Exit/Save ESC: Return Resume the Stopped Rebuild Process To resume the stopped rebuild process, enter the eSATA3 RAID Configuration menu in BIOS Setup again. Move the selection bar to the array to be rebuilt (for example, VD 0: New_VD). Press on this array and select BGA Resume. Press again to continue the rebuild process. Marvell BIOS Setup (c) 2009 Marvell Technology Group Ltd. Topology HBA 0 : Marvell 0 Virtual Disks New_VD HDD 0: WDC WD8[D00eJlDet-e2]2L HDD 1 8: WDC WD[B8G00AJRDe-s2u2mLe] Free Physical Disks Information ID : 0 Name : New_VD Status : Degrade Stripe Size : 64K RAID Mode : RAID1 Size : 75776MB BGA Status : Paused BGA Rebuild : 20% Number of PDs : 2 Numbers : 01 Help Resume BGA on this virtual disk ENTER: Operation F10: Exit/Save ESC: Return - 105 - Appendix
-
 1
1 -
2
-
3
-
4
-
5
-
6
-
7
-
8
-
9
-
10
-
11
-
12
-
13
-
14
-
15
-
16
-
17
-
18
-
19
-
20
-
21
-
22
-
23
-
24
-
25
-
26
-
27
-
28
-
29
-
30
-
31
-
32
-
33
-
34
-
35
-
36
-
37
-
38
-
39
-
40
-
41
-
42
-
43
-
44
-
45
-
46
-
47
-
48
-
49
-
50
-
51
-
52
-
53
-
54
-
55
-
56
-
57
-
58
-
59
-
60
-
61
-
62
-
63
-
64
-
65
-
66
-
67
-
68
-
69
-
70
-
71
-
72
-
73
-
74
-
75
-
76
-
77
-
78
-
79
-
80
-
81
-
82
-
83
-
84
-
85
-
86
-
87
-
88
-
89
-
90
-
91
-
92
-
93
-
94
-
95
-
96
-
97
-
98
-
99
-
 100
100 -
 101
101 -
 102
102 -
 103
103 -
 104
104 -
 105
105 -
 106
106 -
 107
107 -
 108
108 -
 109
109 -
 110
110 -
111
-
112
-
113
-
114
-
115
-
116
-
117
-
118
-
119
-
120
 |
 |
