Gigabyte GSmart G1310 Quick Guide - GSmart G1310 English Version
Gigabyte GSmart G1310 Manual
 |
View all Gigabyte GSmart G1310 manuals
Add to My Manuals
Save this manual to your list of manuals |
Gigabyte GSmart G1310 manual content summary:
- Gigabyte GSmart G1310 | Quick Guide - GSmart G1310 English Version - Page 1
turn off 6 P-sensor automatically when taking the device close to face on call. Adjust the brightness of the 7 Light sensor screen according to the environment. G1310│ 1 - Gigabyte GSmart G1310 | Quick Guide - GSmart G1310 English Version - Page 2
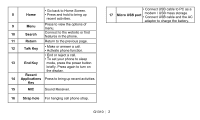
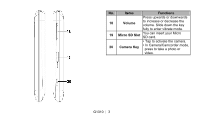
. • Connect USB cable to PC as a 17 Micro USB port modem / USB mass storage. • Connect USB cable and the AC adapter to charge the battery. G1310│ 2 - Gigabyte GSmart G1310 | Quick Guide - GSmart G1310 English Version - Page 3
You can insert your Micro SD card. • Tap to activate the camera. 20 Camera Key • In Camera/Camcorder mode, press to take a photo or video. G1310│ 3 - Gigabyte GSmart G1310 | Quick Guide - GSmart G1310 English Version - Page 4
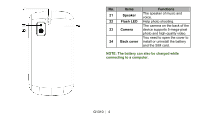
Functions 21 Speaker The speaker of music and voice. 22 Flash LED Help photo shooting. The camera on the back of the 23 Camera device supports 5-mega-pixel photo and high-quality video. You need to open the cover to 24 Back cover install or uninstall the battery and the - Gigabyte GSmart G1310 | Quick Guide - GSmart G1310 English Version - Page 5
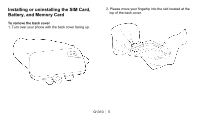
Installing or uninstalling the SIM Card, Battery, and Memory Card To remove the back cover 1. Turn over your phone with the back cover facing up. 2. Please move your fingertip into the slot located at the top of the back cover. G1310│ 5 - Gigabyte GSmart G1310 | Quick Guide - GSmart G1310 English Version - Page 6
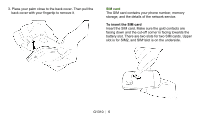
the back cover. Then pull the back cover with your fingertip to remove it. SIM card The SIM card contains your phone number, memory storage, and the details of the network service. To insert the SIM card Insert the SIM card. Make sure the gold contacts are facing down and the cut-off corner is - Gigabyte GSmart G1310 | Quick Guide - GSmart G1310 English Version - Page 7
card 1. Remove battery. 2. Use your finger to slide the SIM card from the card slot. Battery Your phone comes with a rechargeable battery. Battery life varies depending on the network, the battery. Make sure the contact of the battery is aligned with the connector on the battery slot. G1310│ 7 - Gigabyte GSmart G1310 | Quick Guide - GSmart G1310 English Version - Page 8
risk of fire: • Use only the original battery designated for the phone. • Do not store the battery in temperatures below -10ºC or higher than 45ºC G1310│ 8 - Gigabyte GSmart G1310 | Quick Guide - GSmart G1310 English Version - Page 9
2. With your right and left thumbs, press the middle of the back cover. 3. Then, press the top of the back cover until it clicks into place. G1310│ 9 - Gigabyte GSmart G1310 | Quick Guide - GSmart G1310 English Version - Page 10
the computer. • To ensure safety, do not remove the battery from the phone while the AC adapter is connected or while it is being charged. G1310│ 10 - Gigabyte GSmart G1310 | Quick Guide - GSmart G1310 English Version - Page 11
. Flashing red light Battery is low. Turning the Phone On or Off After installing the SIM card and charging the battery, you are now ready to turn on your phone. To as it may damage your hearing. • The following instructions are only provided with the original headset of the original manufacturer - Gigabyte GSmart G1310 | Quick Guide - GSmart G1310 English Version - Page 12
. The icons located at the bottom of the home page have different functions: Icons Descriptions Tap to launch Application Drawer Tap and hold it to review the five home screens at the same time. Tap to launch Contacts. Tap to launch Call log. Status Bar Icons The icons of the status - Gigabyte GSmart G1310 | Quick Guide - GSmart G1310 English Version - Page 13
Battery is full. Battery is low. Battery is very low. Connection Battery is charging. No network signal / No SIM card inserted. Maximum signal strength. Fewer bars indicate lower signal strength. G1310│ 13 Airplane mode. Call is in progress. Your call is on hold. Wi-Fi is connected. Wi-Fi - Gigabyte GSmart G1310 | Quick Guide - GSmart G1310 English Version - Page 14
download Android Manager from GSmart's official website to install it in your PC. NOTE: Only Windows XP, Windows Vista, and Windows 7 (32/64 bit) support PC Sync on your phone. 3. Android Manager will synchronize with your phone automatically. 4. Android Manager's connection status: : Connection - Gigabyte GSmart G1310 | Quick Guide - GSmart G1310 English Version - Page 15
Allows you to manage the downloaded applications. Files: Allows you device will connect and access Android Manager. Android Manager on your PC will 3. Pop up the installing windows of GSmart Driver. Wait for a few seconds for Service Pack 3 and higher versions support the installation. G1310│ 15 - Gigabyte GSmart G1310 | Quick Guide - GSmart G1310 English Version - Page 16
Rechargeable Power Adapter AC input DC output Standby time Android 2.2 Qualcomm MSM 7225-1 at 528 MHz ROM and the individual usage.) Radio Band & Standard GSM/GPRS/EDGE 850 / 900 / 1800 /1900 supports up to 32GB Temperature Operating -15°C to 55°C SIM Card Slot Dual SIM card slot. G1310│ 16 - Gigabyte GSmart G1310 | Quick Guide - GSmart G1310 English Version - Page 17
when making phone call or internet browsing. Network supporting: (a) SIM 1: 3G (WCDMA), (b) SIM 2: 2G (GSM). If this document is modified, please download the latest version on GSmart's official website. You can also download user manual on GSmart's official website. GIGA-BYTE COMMUNICATIONS INC. B2
-
 1
1 -
 2
2 -
 3
3 -
 4
4 -
 5
5 -
 6
6 -
 7
7 -
8
-
9
-
10
-
11
-
12
-
13
-
14
-
15
-
16
-
17
 |
 |
G1310
│
1
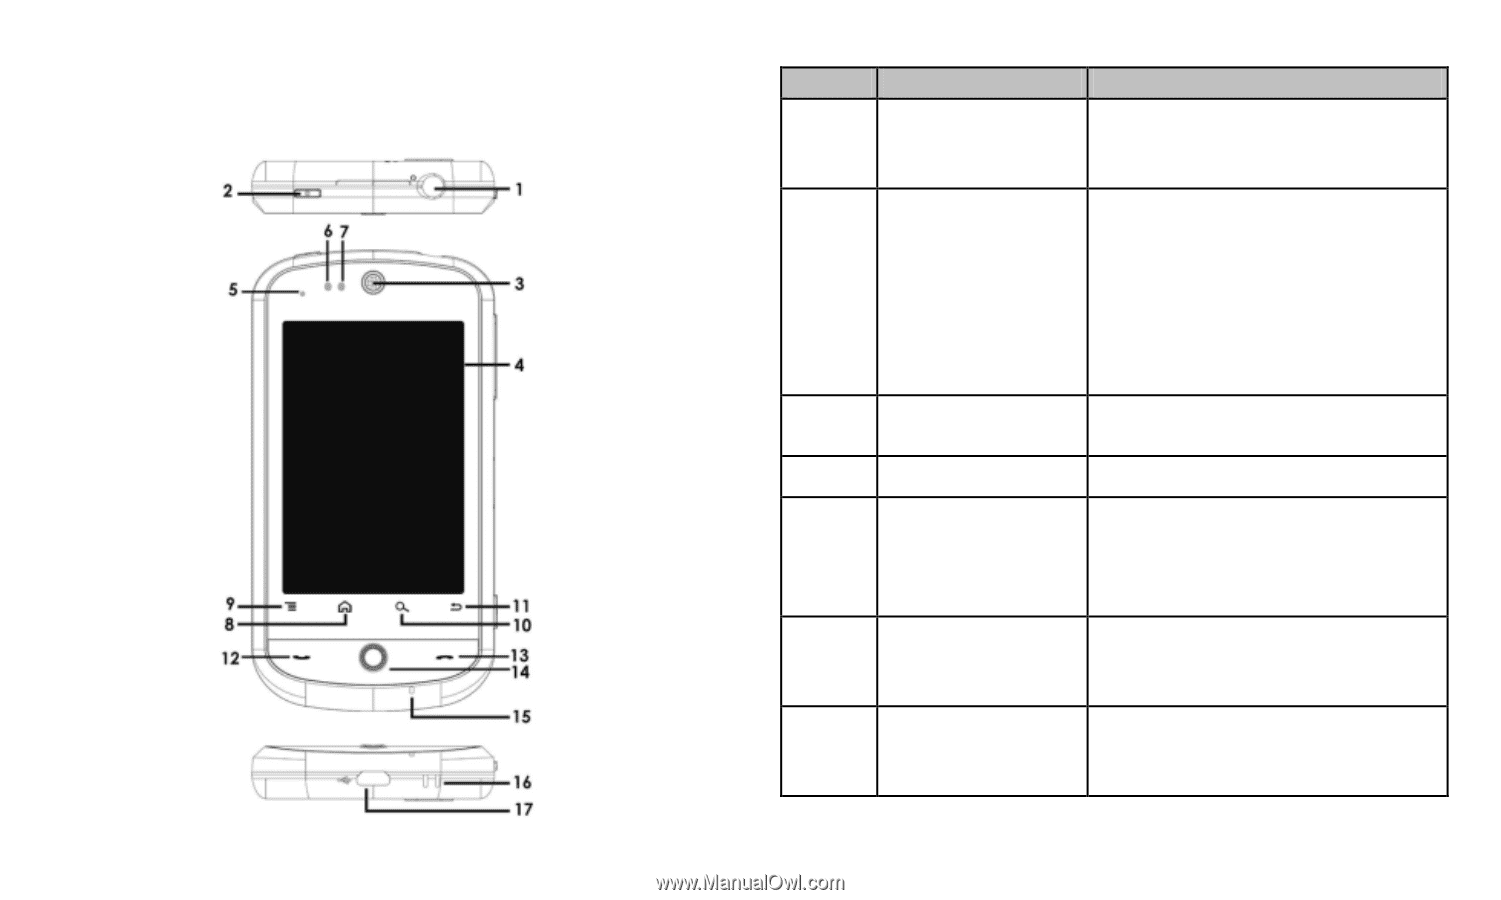
Your Phone
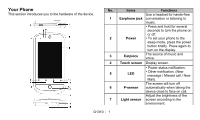
This section introduces you to the hardware of the device.
No.
Items
Functions
1
Earphone jack
Use a headset for hands-free
conversation or listening to
music.
2
Power
• Press and hold for several
seconds to turn the phone on
or off.
•
To set your phone to the
sleep mode, press the power
button briefly. Press again to
turn on the display.
3
Earpiece
The source of music and
voice.
4
Touch screen
Display screen.
5
LED
• Power status notification.
• Other n
otification. (New
message / Missed call / New
Mail).
6
P-sensor
The screen will turn off
automatically when taking the
device close to face on call.
7
Light sensor
Adjust the brightness of the
screen according to the
environment.