HTC Touch US Cellular Quick Start Guide
HTC Touch US Cellular Manual
 |
View all HTC Touch US Cellular manuals
Add to My Manuals
Save this manual to your list of manuals |
HTC Touch US Cellular manual content summary:
- HTC Touch US Cellular | Quick Start Guide - Page 1
Quick Start Guide DA - HTC Touch US Cellular | Quick Start Guide - Page 2
of your device. INTELLECTUAL PROPERTY RIGHT INFORMATION Copyright © 2007 High Tech Computer Corp. All Rights Reserved. , , and ExtUSB are trademarks and/or service marks of High Tech Computer Corp. Microsoft, MS-DOS, Windows, Windows NT, Windows Server, Windows Mobile, Windows XP, Windows Vista - HTC Touch US Cellular | Quick Start Guide - Page 3
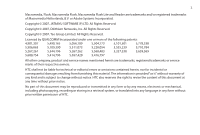
. Copyright © 2007, JATAAYU SOFTWARE (P) LTD. All Rights Reserved All Rights Reserved. Licensed by QUALCOMM Incorporated under one or more of the following patents: 4,901,307 service names mentioned herein are trademarks, registered trademarks or service marks of their respective owners. HTC - HTC Touch US Cellular | Quick Start Guide - Page 4
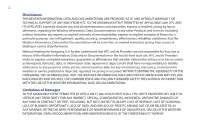
WITHOUT WARRANTY OR TECHNICAL SUPPORT OF ANY KIND FROM HTC. TO THE MAXIMUM EXTENT PERMITTED BY APPLICABLE LAW, HTC AND ITS AFFILIATES expressly EXTENT PERMITTED BY APPLICABLE LAW, IN NO EVENT SHALL HTC OR ITS PROVIDERS BE LIABLE TO USER OR ANY THIRD PARTY FOR ANY INDIRECT, SPECIAL, CONSEQUENTIAL - HTC Touch US Cellular | Quick Start Guide - Page 5
5 Contents 1. What's in the Box 6 2. The PDA Phone ...7 3. Getting Ready ...11 4. HTC Home...16 5. Making a Call ...17 6. Text Messages...18 7. E-mail...19 8. Synchronizing Outlook Information 21 9. Browsing the Internet 23 10. Using the Camera 24 11. Using - HTC Touch US Cellular | Quick Start Guide - Page 6
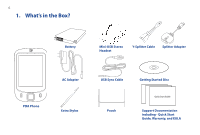
6 1. What's in the Box? Battery Mini-USB Stereo Headset Y-Splitter Cable Splitter Adapter PDA Phone AC Adapter Extra Stylus USB Sync Cable Pouch Getting Started Disc QuicQk uSitcaQkrutSiGtcaukritSdGteauritdGeuide Support Documentation including - Quick Start Guide, Warranty, and EULA - HTC Touch US Cellular | Quick Start Guide - Page 7
LEDs Earpiece Listen to a phone call from here. Touch Screen 7 Left LED: powered up and ready to transmit Bluetooth radio signal, or an Amber light for GPS status. TALK Press to answer an incoming call or dial a number. END instructions; carry out the selection by pressing the center button. - HTC Touch US Cellular | Quick Start Guide - Page 8
upward to remove it. EARMAERA .E0GMAEPIGXAEPLISXECLASMC Speaker 2 Megapixel Camera Microphone Sync Connector/Earphone Jack Connect the supplied USB cable to synchronize information or plug for listening to audio media. RESET With the stylus, press the RESET button to soft-reset your device. - HTC Touch US Cellular | Quick Start Guide - Page 9
Top, left, and right panels POWER Press to turn off the display temporarily. To turn off the power, press and hold for about 5 seconds. Volume Slider • Slide up or down to adjust the speaker volume. • During a call, slide up or down to adjust the earpiece volume. Lanyard/Strap holder 9 Stylus - HTC Touch US Cellular | Quick Start Guide - Page 10
10 Accessories 1 2 3 4 5 6 7 8 No. Accessory 1 AC adapter 2 USB Sync cable 3 Stereo headset 4 Battery 5 Pouch 6 Stylus 7 Y-Splitter Cable 8 Splitter Adapter Function Recharges the battery. Connects your device to a PC and synchronizes data. Provides a volume control - HTC Touch US Cellular | Quick Start Guide - Page 11
11 3. Getting Ready Install and charge the battery New batteries are shipped partially charged. Before you start using your device, it is recommended that you install and charge the battery. To install the battery 1. Slide the back cover upward to remove it. 2. Insert the battery by inserting it - HTC Touch US Cellular | Quick Start Guide - Page 12
one of the following ways: • Connect your device directly to an electrical outlet using the AC adapter. • Plug the sync cable to the USB port on your PC and to the sync for the first time, a Quick Start Wizard will guide you through the calibration process and setup of device password. When - HTC Touch US Cellular | Quick Start Guide - Page 13
back cover. 2. Pry open the cover that houses the storage card slot, and then flip your device so that the touch screen faces upward. 3. Hold open the slot cover with one hand, and insert the storage card with its gold contacts facing down and its cut-off corner facing toward the inside - HTC Touch US Cellular | Quick Start Guide - Page 14
hands-free conversation or for listening to music. 2. Connect the AC adapter to the splitter adapter's power connector. 1. Connect the Splitter Adapter to your device's Sync connector. 3. Connect the supplied USB stereo headset to the splitter adapter's audio connector. - HTC Touch US Cellular | Quick Start Guide - Page 15
hands-free conversation or for listening to music. 2. Connect the AC adapter to the splitter cable's power connector. 1. Connect the Y-Splitter Cable to your device's Sync connector. 3. Connect a 2.5mm stereo headset (sold separately) to the splitter cable's audio jack. - HTC Touch US Cellular | Quick Start Guide - Page 16
16 4. HTC Home HTC Home is a Today screen plug-in that gives you up-to-date local information at a glance, such as time, day and weather information, and shows new messages and missed calls. It also has a customizable launcher where you can add your favorite applications for one-touch access. Home - HTC Touch US Cellular | Quick Start Guide - Page 17
, you can access Call History, Speed Dial, and Phone settings. To open the Phone screen, do one of the following: • Tap Start > Phone. • Press the TALK button on the device. Phone screen Make a call from the Phone screen 1. On the Phone screen, simply touch the keys with your finger or tap the keys - HTC Touch US Cellular | Quick Start Guide - Page 18
and send a text message 1. Tap Start > Messaging > Text Messages. 2. Tap Menu > New. 3. Enter the mobile phone number of one or more recipients, separating them with a semicolon. To access mobile phone numbers from Contacts, tap Menu > Add Recipient. 4. Enter your message. • To quickly add common - HTC Touch US Cellular | Quick Start Guide - Page 19
and work e-mail accounts. You can add an e-mail account from an Internet Service Provider (ISP) or other e-mail provider as well as Web-based accounts such Server. For information about setting up ActiveSync synchronization, refer to the User Manual. Set up a POP3/IMAP4 e-mail account Set up a POP3 - HTC Touch US Cellular | Quick Start Guide - Page 20
login name if it does not show automatically in the User name field. Also enter your password, and select the Save Menu > New. 4. Enter the e-mail address of one or more recipients, separating them with a semicolon. To access addresses and phone numbers from Contacts, tap Menu > Add Recipient. 5. - HTC Touch US Cellular | Quick Start Guide - Page 21
21 8. Synchronizing Outlook Information To synchronize Outlook e-mails and other information between your device and your PC, use Windows Mobile Device Center if you have a Windows Vista® PC or use ActiveSync if you have Windows XP®. Set up Windows Mobile Device Center for Windows Vista® Microsoft - HTC Touch US Cellular | Quick Start Guide - Page 22
Disc into the disc drive on your PC. 2. Follow the on-screen instructions to install ActiveSync to your PC. 3. Connect your device to your PC. The Synchronization Setup Wizard automatically starts and guides you to create a synchronization partnership. Click Next to proceed. 4. To synchronize your - HTC Touch US Cellular | Quick Start Guide - Page 23
URL address of the desired Web site in the address bar that appears at the top of the screen. Tap the down arrow ( ) to choose one Web site from previously entered addresses. 3. Tap the Go icon ( ) to go to the Web address you entered. 4. Tap Back to go back to the - HTC Touch US Cellular | Quick Start Guide - Page 24
10. Using the Camera Taking photos and recording video clips along with audio is easy with your device's built-in camera. Launch the camera Do one of the following: • Press the CAMERA button on your device; or • Tap Start > Programs > Camera. To exit the camera, tap the Exit icon ( ) on the - HTC Touch US Cellular | Quick Start Guide - Page 25
a video clip, you can immediately send it by e-mail: 1. On the Review screen where it shows a preview of the photo or video that you have just captured, tap . 2. Select Send via E-mail then tap Send. 3. If you have more than one e-mail account on your device, the Select an account screen will - HTC Touch US Cellular | Quick Start Guide - Page 26
26 11. Using Pictures & Videos The Pictures & Videos program allows you to organize and view images, GIF animations, and video clips on your device. You can also view pictures as a slide show, beam them, send them via e-mail, edit them, or set an image as the background on the Today screen. View - HTC Touch US Cellular | Quick Start Guide - Page 27
27 Play videos 1. Tap Start > Programs > Pictures & Videos. By default, the contents of the My Pictures folder will be shown. 2. To find the video clips that you captured, tap the down arrow ( ) next to the My Pictures folder and tap My Documents. Next, tap My Videos. Video clips are displayed as - HTC Touch US Cellular | Quick Start Guide - Page 28
the Input Panel icon. Note Input Panel (Keyboard) Input Selector arrow Input Panel icon Icon Input method On-screen Keyboard Letter Recognizer or Block Recognizer Touch Keyboard Touch Keypad Transcriber Some text input methods may not be available in certain language versions of the device. - HTC Touch US Cellular | Quick Start Guide - Page 29
29 13. Status Indicators The Today screen displays important information, such as upcoming appointments and status indicators. Following are some of the status icons that you may see on your device: Icons that appear in this area Vibration mode Sound on Sound off Icons that appear in this area - HTC Touch US Cellular | Quick Start Guide - Page 30
progress Icons that appear in this area Data connection is active but idle Data connection is active and transmitting data Maximum signal strength No signal Phone is turned off No phone service. Searching for phone service Voice call in progress - HTC Touch US Cellular | Quick Start Guide - Page 31
31 14. Customizing Your PDA Phone You can customize the look and feel of your device and set the time and date according to the current time zone. Customize the Today - HTC Touch US Cellular | Quick Start Guide - Page 32
32 15. Securing Your PDA Phone You can prevent unauthorized access to any part of your device by specifying a device password. Protect your device with a password 1. Tap Start > Settings > Personal tab > - HTC Touch US Cellular | Quick Start Guide - Page 33
33 16. More Information For more instructions, refer to the User Manual on the CD or contact your authorized dealer for assistance. - HTC Touch US Cellular | Quick Start Guide - Page 34
12 MONTH LIMITED WARRANTY UTStarcom Personal Communications (the Company) warrants to the original retail purchaser of this UTStarcom handheld portable cellular telephone, that should this product or any part thereof during normal consumer usage and conditions, be proven defective in material - HTC Touch US Cellular | Quick Start Guide - Page 35
software contained on your device before submitting it for repair or service. This includes all contact lists, downloads (i.e. third-party software applications, ringtones phone number and/or fax number and complete description of the problem, LIABILITY EXCEED THE PURCHASE PRICE PAID BY PURCHASER FOR - HTC Touch US Cellular | Quick Start Guide - Page 36
36 No person or representative is authorized to assume for the Company any liability other than expressed herein in connection with the sale of this product. Some states or provinces do not allow limitations on how long an implied warranty lasts or the exclusion or limitation of incidental or - HTC Touch US Cellular | Quick Start Guide - Page 37
are not sure of the type of power source required, consult your authorized service provider or local power company. For a product that operates from battery power or other sources, refer to the operating instructions that are included with the product. • Handle battery packs carefully This product - HTC Touch US Cellular | Quick Start Guide - Page 38
or dispose of used batteries according to the local regulations or reference guide supplied with your product. • Take extra precautions • Keep the battery Do not use a battery that appears damaged, deformed, or discolored, or the one that has any rust on its casing, overheats, or emits a foul odor. - HTC Touch US Cellular | Quick Start Guide - Page 39
aircraft, remember to turn off the phone by switching to Flight Mode. ENVIRONMENT user should obey all signs and instructions. Sparks in such areas could cause an explosion or fire resulting in bodily injury or even death. Users are advised not to use the equipment at refueling points such as service - HTC Touch US Cellular | Quick Start Guide - Page 40
drivers in motion are not permitted to use telephony services with handheld devices, except in the case of emergency assist you in obtaining this information. Turn the phone OFF in health care facilities when any regulations posted in these areas instruct you to do so. Hospitals or health care - HTC Touch US Cellular | Quick Start Guide - Page 41
safety of the interference. As with other mobile radio transmitting equipment, users are advised that for satisfactory operation of the equipment and for the use 2.0 M2 position. Do not touch or hold the antenna area unnecessarily when placing or receiving a phone call. Contact with the antenna - HTC Touch US Cellular | Quick Start Guide - Page 42
service technician or provider. • Damage requiring service Unplug the product from the electrical outlet and refer servicing to an authorized service . • The product does not operate normally when you follow the operating instructions. • Avoid hot areas The product should be placed away from heat - HTC Touch US Cellular | Quick Start Guide - Page 43
not use the product on an unstable table, cart, stand, tripod, or bracket. Any mounting of the product should follow the manufacturer's instructions, and should use a mounting accessory recommended by the manufacturer. • Avoid unstable mounting Do not place the product with an unstable base. • Use - HTC Touch US Cellular | Quick Start Guide - Page 44
maintained between a handheld wireless phone and a pacemaker to avoid phone more than six inches from their pacemaker when the phone is turned ON. • Should not carry the phone is taking place, turn the phone OFF immediately. Hearing Aids Some digital wireless phones may interfere with some hearing - HTC Touch US Cellular | Quick Start Guide - Page 45
information. Turn the phone OFF in health care facilities when any regulations posted in these areas instruct you to do so at the time of disposal will allow us to help conserving natural resources. Moreover, local city center, household waste disposal service, shop from where you purchased the - HTC Touch US Cellular | Quick Start Guide - Page 46
safety information in addition to the information at the beginning of the user manual. When Driving Do Not Use The PC Functions Of Your Pocket by inattention to automobile traffic or other pedestrian hazards. Using The Phone Function Of Your Pocket PC While Driving Is Extremely Dangerous Talking on - HTC Touch US Cellular | Quick Start Guide - Page 47
or one-touch, speed dialing, and auto answer modes. • Pull off the road and park before making or answering a call. WARNING: Failure to follow these instructions could six (6") inches be maintained between a handheld wireless phone and a pacemaker to avoid potential interference with the pacemaker - HTC Touch US Cellular | Quick Start Guide - Page 48
phones may interfere with some hearing aids. In the event of such interference, you may want to consult your service provider, or call the customer service OFF in health care facilities when any regulations posted in these areas instruct you to do so. Hospitals or health care facilities may be using - HTC Touch US Cellular | Quick Start Guide - Page 49
Off Your Device Before Flying AIRCRAFT FCC regulations prohibit using the transmitting and phone functions of your device while in the air. In addition, most airline using your device aboard an aircraft. Always follow the instructions of the airline representative whenever using your device aboard - HTC Touch US Cellular | Quick Start Guide - Page 50
equipment. Before operating, read all instructions and cautionary markings on the cellular service center. If the unit is disassembled, the risk of electric shock or fire may result. Never allow metallic objects, such as staples and paper clips, to get into the inside of your device. Never touch - HTC Touch US Cellular | Quick Start Guide - Page 51
down before using. • Completely drain the battery before recharging. It may take one to four days to completely drain. • Store the discharged battery in a cool attempt to disassemble the battery - it is a sealed unit with no serviceable parts. • Don't expose the battery terminals to any other metal - HTC Touch US Cellular | Quick Start Guide - Page 52
call RBRC at (800) 822-8837 for proper disposal tips. Never touch any fluid that might leak from the built-in battery. Such liquid service provider or local power company. For a product that operates from battery power or other sources, refer to the operating instructions cellular phone or battery. - HTC Touch US Cellular | Quick Start Guide - Page 53
53 Never attempt to connect or disconnect the AC adapter/charger with wet hands. Always unplug the AC adapter/ charger from the power source before attempting any cleaning. Always use a soft cloth dampened with water to clean the equipment, after it has been unplugged. Handling the cord on this - HTC Touch US Cellular | Quick Start Guide - Page 54
54
-
 1
1 -
 2
2 -
 3
3 -
 4
4 -
 5
5 -
 6
6 -
 7
7 -
8
-
9
-
10
-
11
-
12
-
13
-
14
-
15
-
16
-
17
-
18
-
19
-
20
-
21
-
22
-
23
-
24
-
25
-
26
-
27
-
28
-
29
-
30
-
31
-
32
-
33
-
34
-
35
-
36
-
37
-
38
-
39
-
40
-
41
-
42
-
43
-
44
-
45
-
46
-
47
-
48
-
49
-
50
-
51
-
52
-
53
-
54
 |
 |

PDA
Quick Start Guide