Haier DW9-CBE7 User Manual - Page 7
Installation cont..
 |
View all Haier DW9-CBE7 manuals
Add to My Manuals
Save this manual to your list of manuals |
Page 7 highlights
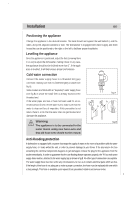
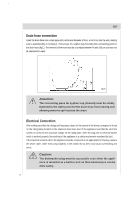
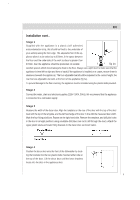
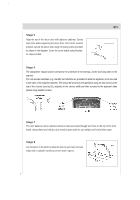
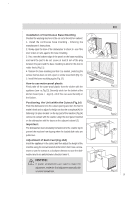
en Installation cont.. Stage 1 Supplied with the appliance is a plastic (self adhesive) anticondensation strip, this should be fixed to the underside of your worktop along the front edge. The adjustable feet of the appliance allow it to be raised up to 870mm, if the space between the floor and the underside of the work surface is greater than 870mm, then the appliance should be positioned on suitable fig 1a wooden spacers which should always be fixed to the floor. Always use a spirit level to make sure that the appliance is level left to right and front to back.(If the appliance is installed on a carpet, ensure there is clearance beneath the appliance). The four adjustable feet should be adjusted to the correct height; the rear feet are adjustable via studs at the front of the appliance (fig 1a). To prevent damage to the floor covering, the appliance must be installed using the plastic skids provided. Stage 2 Connect the water, drain and electrical supplies (220V~240V, 50Hz). We recommend that the appliance is connected to a cold water supply. Stage 3 Measure the width of the decor door.Align the template on the rear of the door with the top of the door level with the top of the template, and the left hand edge of the door in line with the measured door width. Mark the four fixing poisitions. Repeat on the right hand side. Remove the template, and drill pilot holes in the door in all eight positions using a suitable drill (take care not to drill through the door). Attach the upper plastic studs and lower fixing brackets to the decor door as shown below. Stage 4 Position the decor door onto the front of the dishwasher by locating the brackets into the two plastic studs mounted either side on the top of the door. Lift the decor door until the lower brackets locate into the slots in the appliance door. 6
-
 1
1 -
 2
2 -
 3
3 -
 4
4 -
 5
5 -
 6
6 -
 7
7 -
 8
8 -
 9
9 -
 10
10 -
 11
11 -
 12
12 -
13
-
14
-
15
-
16
-
17
-
18
-
19
-
20
-
21
-
22
-
23
-
24
-
25
-
26
-
27
-
28
-
29
-
30
-
31
-
32
-
33
-
34
-
35
 |
 |
