Haier HNS1000TVE User Manual - Page 14
Automatic, Front, Loading
 |
View all Haier HNS1000TVE manuals
Add to My Manuals
Save this manual to your list of manuals |
Page 14 highlights
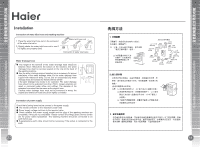
Haier 4. SIMMS Miaiii , SAIMICEIN "-" bUigit ; Miina , tilLIAMMIMASOMA 'Aft (*ValfrgfihRgbriMIUNA-4211.fftfC#IMZNAIN*) . 5. BO AA liiiiMRITIDAMMVAIII ( IlfllafFNIJAIllE) - 6. AN WHOM/WM , AZillW*2&14;-Iglibtf5- . IIM 7. ROHM VffiZAWFAUNe** , *V60111*±IfF , MNEUMNIMITgROMMV* , MM*MM , M4XXWM , RTWAMR. 0 O affital li U_ C) • AiAWNWaffiraTO*0* 1 . Vitti11)3tifO 2. 134V' AltA- V& . 3. ifiNiAeNV4t*SFJ-int , 4t/LAW L:Vit-NA ° 4 . ItIgTMNAMILTMCC->>1310IIJARAMM21)3tWrf, ° 5 . MIXIMMOtag : RV4,44IRMEITM-SAAM60°COM•itg 0 6 . itfllr.EANNIAJEIIMINTAggi,MAZI*AMAM3k1NN ° 7. itAMJNYM :V402111Mtt , V-SM* , TDDAMAH4111. Installation • As shown in Figure 1 remove all the packing materials (including the foam base). 0000.0 Figure 1 • Remove the packing screws as shown in Figure 2. The packing bolts protect the appliance from shock during transportation The steps below should be followed before using the appliance. 1. Remove the rear panel of the washing machine; 2. Remove the three packing bolts from the rear panel of the washing machine, the rubber hose and then the shock absorption channel steel; 3. Reinstall the back plate; 4. Fill the holes left by the packing bolts with plastic plugs. (Attention: the packing bolts and rubber hose should be kept in a safe place for later use) co • Adjusting the position of the washing machine. There are adjustable feet under the bottom of the washing machine. Before use, the washing machine should be adjusted, as shown in Figure 3, so that it is balance. Figure 2 Figure 3 FullyAutomatic Front Loading Was
-
 1
1 -
2
-
3
-
4
-
5
-
6
-
7
-
8
-
 9
9 -
 10
10 -
 11
11 -
 12
12 -
 13
13 -
 14
14 -
 15
15 -
 16
16 -
 17
17 -
 18
18
 |
 |
