Haier XQG65-11 User Manual - Page 7
Washing, Procedure, Installation
 |
View all Haier XQG65-11 manuals
Add to My Manuals
Save this manual to your list of manuals |
Page 7 highlights
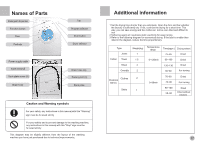
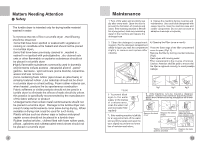
Washing Procedure 4. Setting drying options 1)The range is 1-120 for hign temperature drying; the range is 0-80 for low temperature drying. 2)When the washing machine is loaded in excess of its drying capacity set the drying dial at the position o. Then sort the laundry after washing and carry out drying in batches. 3)Avoid drying woollen goods. 4)Keep the water source connected to condense vapour from the drying process. 5. Selecting the function button Select the function buttons as required (refer to the indications printed on the control panel), otherwise leave all the buttons released. 6. Washing Press the ON/OFF button: the washing machine will automatically start the selected wash cycle. 7. End Wait for 2-3 minutes after the wash cycle has finished. Press the ON/OFF button again to cut off the power supply. Open the door and unload the laundry. Turn off the tap and unplug the washing machine. Additional information Energy and water saving tips 1. Collect clothes for one full wash load. 2. Do not overload the washing machine. 3. Pre-wash heavily soiled clothes. 4. Reduce the amount of detergent or choose fast or minimal wash programs for lightly soiled clothes 5. Do not use more detergent than required. 6. Softening agents make clothes softer and easier to iron. 12 Installation • Remove all the packing materials as shown in figure 1 (including the foam base) le, Ill 4-1 ao O • Check attachments and materials ame Qty Model Operational Quality manual certificate Water hose XQG65-11 1 1 2 Drain holder 1 Fig.1 Plastic plugs 3 • Remove the packing screws as shown in figure 2. The packing bolts protect the appliance from impact damage during transportation. Follow the steps below before using the appliance. 1. Remove the rear panel of the washing machine; 2. remove the three packing bolts from the rear panel of the washing machine, the rubber hose and then the shock absorption steel channel; 3. refit the back plate; 4. fill the holes left by the packing bolts with plastic plugs. (Attention: the packing bolts and rubber hose should be kept in a safe place for later use) • Adjusting the position of the washing machine. The washing machine is provided with adjustable feet. Before use, adjust the feet until the appliance is level, as shown in figure 3. Jim_ =, 7F-6 ME =WA illiko.... -t-i4p1 rill ;W, LI \ ill a' \ Fig.2 II ,-- 1. Li \z -ti Fig.3 5
-
 1
1 -
 2
2 -
 3
3 -
 4
4 -
 5
5 -
 6
6 -
 7
7 -
 8
8 -
 9
9 -
 10
10
 |
 |
