Haier XQG65-11 User Manual - Page 8
Underwe
 |
View all Haier XQG65-11 manuals
Add to My Manuals
Save this manual to your list of manuals |
Page 8 highlights
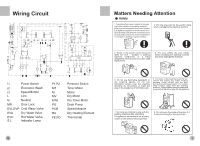
Installation Connection of water inlet hose and washing machine • Please connect the straight terminal of the inlet hose to the water tap and make sure to fasten it. • Please connect the bended terminal of the inlet hose to the solenoid valve and make sure to fasten it. NOTE: • Please be sure that the COLD inlet hose is connected with the solenoid valve for cold water (marked with "C"), the HOT inlet hose is connected with the solenoid valve for hot water (marked with "H"). • In order to be recognised easily, there is a Red line on the HOT inlet hose, Water drainage hose • The height of the terminal of the water drainage hose should be between 80cm-100cm, the water drainage hose must be securely placed on the clip on the back of the washing machine. • Use the water drainage support supplied as an accessory for proper installation of the water drainage hose .fix the water drainage hose support with waterproof sting.Do not use an excessively long waters drainage hose and contract the authorized technician if the water drain-F age hose needs to be extended.the water drainage hose should not be extended more than250cm.(longer extension will result in concurrent water inflow and outflow).The diameter of the extension hose should be the same as the original hose. caution:water drainage hose must not be immersed in water, the original and extension hoses should be tightly connected. Connection of power supply Check the following items before connection to the power supply. • The socket conforms to the maximun power load(The maximum current load of the socket and power supply cable should not be less than 10A). • Power supply voltage conforms to the required value. • The power supply socket and the plug of the washing machine compatible,if they are compatible ,Refer to a washing machine technician or a Haler designated service point for power cable replacement. The washing machine should be connected to an earth before use. • Supplementary earth cable should net be necessary if the socket is connected to the earth. • Supplementary earth cable should be installed on the upper back of the washing machine andconnected to an earth if the power supply socket has no earth connection. • Washing Procedure 1. Laden van de wasmachine Load the laundry into the washing machine and the close the door. Note: 1) When using the washing machine for the first time, let it run unloaded for one program to prevent the laundry from being spotted by oil or dirty water from the washing machine. 2) Do not overload the washing machine. Reference load • Overalls (contton 950g) • Jeans (800 g) • Blended fabric clothes (800g) • Pyjamas (200 g) • shirts 300 g) • shirts (cotton 300 g) ,.....Underwe ',,,p (blended fabrics 70g) • Single bed sheets (cotton 800g) c:!:/).1Socks (blended fabrics 50g) • Jackets (cotton 800g) • Woollen blankets (3000g) 2. How to fill the detergent dispenser Open the detergent drawer, put the required detergent, softening agent and bleaching agent into the corresponding compartments. Gently close the drawer. 0 Caution: 1) Do not add liquid detergent into compartments 1 and 2 2) For the pre-wash program, detergent should be added to both compartments 1 and 2; for other programs, do not put detergent into compartment 1 3) Do not use too much softening agent as this may damage synthetic fabrics. 3. Selecting the wash program Set the wash program correctly depending on the laundry loaded. The wash programs are indicated on the front the detergent dispenser. Turn the program selector clockwise to the desired program. Caution: Turn off the power before setting the wash program. 11
-
 1
1 -
2
-
 3
3 -
 4
4 -
 5
5 -
 6
6 -
 7
7 -
 8
8 -
 9
9 -
 10
10
 |
 |
