Hannspree ST42DMSB User Manual - Page 35
Adjusting Setup Settings
 |
View all Hannspree ST42DMSB manuals
Add to My Manuals
Save this manual to your list of manuals |
Page 35 highlights
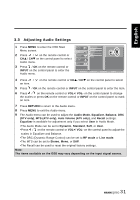
English 3.6 Adjusting Setup Settings 1 Press MENU to enter the OSD Main Menu screen. Picture Audio Setup Wizard OSD Language OSD Time 2 Press / on the remote control or CHS / CHT on the control panel to select Setup menu. Channel V-CHIP Setup Clock Mode Clock Set Time Zone Sleep Time Vivid Motion 3 Press / OK on the remote control or INPUT on the control panel to enter the Setup menu. Move CC Mode Next Page OK Enter Return Return Menu Exit 4 Press / an item. on the remote control or CHS / CHT on the control panel to select 5 Press / OK on the remote control or INPUT on the control panel to enter the item. 6 Press / on the remote control or VOL+/ VOL- on the control panel to change the scales or press OK on the remote control or INPUT on the control panel to mark an item. 7 Press RETURN to return to the Setup menu. 8 Press MENU to exit the Setup menu. 9 The Setup menu can be used to adjust the Setup Wizard, OSD Language, OSD TIme, Clock Mode, Clock Set, Time Zone, Sleep Time, Vivid Motion, CC Mode, Analog CC, and CC Style settings. Clock Set is only available for adjustments when Clock Mode is set to Manual; Clock Mode can be set to Auto or Manual. • Setup Wizard can be used to set up OSD Language, Clock Mode, Time Zone, TV RF Source, and Channel Scan. • The five available OSD languages are: English, Spanish, French, Traditional Chinese, and Simplified Chinese. • OSD Time can be set to 10 secs, 20 secs, 30 secs, and 60 secs. • The Time Zone can be set to Eastern, Central, Mountain, Pacific, Alaska, and Hawaii. • The Sleep Time can be set to Sleep Off, 15 mins, 30 mins, 45 mins, 60 mins, 90 mins, and 120 mins. • The Vivid Motion can be set to Off, Low, Medium, and High. • To change settings in CC Mode, Analog CC, and CC Style, press / on the remote control to select the items and press / OK to activate the item. Note: The items available on the OSD may vary depending on the input signal source. 34
-
 1
1 -
2
-
3
-
4
-
5
-
6
-
7
-
8
-
9
-
10
-
11
-
12
-
13
-
14
-
15
-
16
-
17
-
18
-
19
-
20
-
21
-
22
-
23
-
24
-
25
-
26
-
27
-
28
-
29
-
 30
30 -
 31
31 -
 32
32 -
 33
33 -
 34
34 -
 35
35 -
 36
36 -
 37
37 -
 38
38 -
 39
39 -
 40
40 -
41
-
42
-
43
-
44
-
45
-
46
-
47
-
48
-
49
-
50
-
51
-
52
-
53
 |
 |
