Harman Kardon AVR 146 Owners Manual - Page 18
Antennas - hdmi receiver
 |
View all Harman Kardon AVR 146 manuals
Add to My Manuals
Save this manual to your list of manuals |
Page 18 highlights
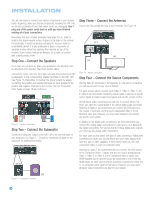
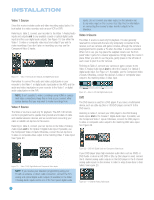
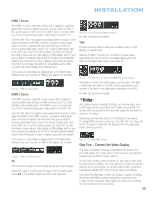
CONNECTIONS AVR 146 processing any of the data. Although this enables the AVR 146 to be compatible with virtually any HDMI-capable source device and video display, it requires a separate audio connection for each source since the AVR 146 doesn't have access to the audio data in the HDMI stream. The AVR 146 has been tested and is Simplay HD™-verified, which guarantees compatibility via the HDMI connection with other products that also bear the Simplay HD logo. The AVR 146 will not convert analog video signals to the HDMI format, and the on-screen displays are not visible when using an HDMI source. Therefore, you will need to connect the composite or S-video monitor output to your video display (or both, depending on which video connections your sources use) to view the on-screen menus. The physical HDMI connection is simple. The connector is shaped for easy plug-in (see Figure 9). If your video display has a DVI input, you may use an HDMI-to-DVI adapter (not included) to connect it to the AVR's HDMI Output. Component video cable Figure 12 - Component Video If it's available on your video display, HDMI is recommended as the best quality connection, followed by component video, S-video and then composite video. NOTE: A composite or S-video connection to your TV is required to view the AVR's on-screen displays. Antennas The AVR146 uses separate terminals for the included FM and AM antennas that provide proper reception for the tuner. The FM antenna uses a 75-ohm F-connector. See Figure 13. Figure 9 - HDMI Connection Analog Video There are three types of analog video connections: composite video, S-video and component video. Composite video is the basic connection most commonly available. The jack is usually color-coded yellow, and looks like an analog audio jack, although it is important never to confuse the two. Do not plug a composite video cable into an analog or coaxial digital audio jack, or vice versa. Both the chrominance (color) and luminance (intensity) components of the video signal are transmitted using a single cable. See Figure 10. Composite video cable Figure 10 - Composite Video S-video, or "separate" video, transmits the chrominance and luminance components using separate wires contained within a single cable. The plug on an S-video cable contains four metal pins, plus a plastic guide pin. Be careful to line up the plug correctly when you insert it into the jack on the receiver, source or video display. See Figure 11. Figure 13 - FM Antenna The AM loop antenna needs to be assembled. Then connect the two leads to the screw terminals on the receiver. See Figure 14. Figure 14 - AM Antenna S-video cable Figure 11 - S-Video Component video separates the video signal into three components - one luminance ("Y") and two subsampled color signals ("Pb" and "Pr") - that are transmitted using three separate cables. The "Y" cable is color-coded green, the "Pb" cable is colored blue and the "Pr" cable is colored red. See Figure 12. 18 18
-
 1
1 -
2
-
3
-
4
-
5
-
6
-
7
-
8
-
9
-
10
-
11
-
12
-
 13
13 -
 14
14 -
 15
15 -
 16
16 -
 17
17 -
 18
18 -
 19
19 -
 20
20 -
 21
21 -
 22
22 -
 23
23 -
24
-
25
-
26
-
27
-
28
-
29
-
30
-
31
-
32
-
33
-
34
-
35
-
36
-
37
-
38
-
39
-
40
-
41
-
42
-
43
-
44
-
45
-
46
-
47
-
48
-
49
-
50
-
51
-
52
-
53
-
54
-
55
-
56
-
57
-
58
-
59
-
60
 |
 |
