Harman Kardon AVR 146 Owners Manual - Page 8
Front-panel Controls - harman
 |
View all Harman Kardon AVR 146 manuals
Add to My Manuals
Save this manual to your list of manuals |
Page 8 highlights
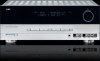
FRONT-PANEL CONTROLS Main Power Switch: This mechanical switch turns the power supply on or off. It is usually left pressed in (On position), and cannot be turned on using the remote control. Standby/On Switch: This electrical switch turns the receiver on for playback, or leaves it in Standby mode for quick turn-on using this switch or the remote control. Power Indicator: This LED has three possible modes. When main power is turned off, the LED is dark and the receiver won't respond to any button presses. When main power is turned on, but before the Standby/On Switch is used, the LED turns amber to indicate that the receiver is in standby mode and ready to be turned on. When the receiver is turned on, the LED turns blue. Source Select: Press this button to select a source device, which is a component where a playback signal originates, e.g. DVD, CD, cable TV, satellite or HDTV tuner. Source Indicators: The name of the current source input lights up. The indicated input changes each time the Source Select button is pressed. Volume Knob: Turn this knob to raise or lower the volume, which will be shown in decibels (dB) in the Message Display. Message Display: Various messages appear in this two-line display in response to commands and changes in the incoming signal. When the on-screen display menu system (OSD) is in use, the message OSD ON will appear to remind you to check the video display. Tuner Band: Press this button to select the tuner as the source, or to switch between the AM and FM bands. Tuning: Press either side of this button to tune a radio station. Tuning Mode: This button toggles between manual (one frequency step at a time) and automatic (seeks frequencies with acceptable signal strength) tuning mode. It also toggles between stereo and mono modes when an FM station is tuned. Preset Stations: Press this button to select a preset radio station. Headphone Jack: Plug a 1/4" headphone plug into this jack for private listening. Surround Mode: Press this button to select a surround sound (e.g., multichannel) mode group. Choose from the Dolby modes, DTS modes, Logic 7 modes, DSP modes or Stereo modes. Surround Select: After you have selected the desired surround mode group, press this button to select a specific mode. Surround Mode Indicators: One or more of these icons may light up as you select different surround modes. The Message Display also indicates the surround mode. Analog Audio, Video and Digital Audio Inputs: Connect a source component that will only be used temporarily, such as a camera or game console to these jacks. Remember to use only one type of audio and one type of video connection. Speaker/Channel Input Indicators: The box icons indicate which speaker positions you have configured, and the size (frequency range) of each speaker. When a digital audio input is used, letters will light inside the boxes to indicate which channels are present in the incoming signal. Remote IR Sensor: This sensor receives infrared (IR) commands from the remote control. It is important to ensure that it is not blocked. If covering the sensor is unavoidable, such as when the AVR 146 is placed inside a cabinet, you may use an optional Harman Kardon HE 1000, or other infrared receiver, with an IR emitter ("blaster") placed directly over this sensor. 8
-
 1
1 -
2
-
 3
3 -
 4
4 -
 5
5 -
 6
6 -
 7
7 -
 8
8 -
 9
9 -
 10
10 -
 11
11 -
 12
12 -
 13
13 -
14
-
15
-
16
-
17
-
18
-
19
-
20
-
21
-
22
-
23
-
24
-
25
-
26
-
27
-
28
-
29
-
30
-
31
-
32
-
33
-
34
-
35
-
36
-
37
-
38
-
39
-
40
-
41
-
42
-
43
-
44
-
45
-
46
-
47
-
48
-
49
-
50
-
51
-
52
-
53
-
54
-
55
-
56
-
57
-
58
-
59
-
60
 |
 |
