Harman Kardon AVR 146 Owners Manual - Page 32
Step Five - Con Sources
 |
View all Harman Kardon AVR 146 manuals
Add to My Manuals
Save this manual to your list of manuals |
Page 32 highlights
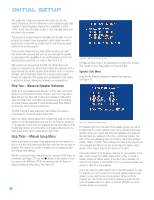
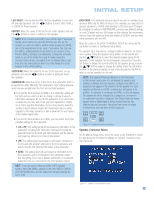
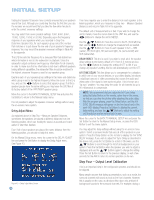
INITIAL SETUP TEST TONE SEQ: When this setting reads AUTO, the test tone will automatically circulate to all channels, pausing for a few moments at each channel and then moving to the next channel several seconds later, as indicated by the blinking cursor. You may adjust the level for any channel when the test tone is paused there by using the ‹/› Buttons. You may also use the⁄/¤ Buttons at any time to move the cursor to another line, and the test tone will follow the cursor. When this setting reads MANUAL, the test tone will not move to the next channel until you use the ⁄/¤ Buttons to move it. TEST TONE: This line determines whether the test tone is active or not. To begin the process of setting the levels, use the ‹/› Buttons to change the setting to ON. Any time you manually move the cursor out of the channel listings area of the screen, this setting will automatically change to OFF, ending the test tone. NOTE: Setting the channel levels while one surround mode is active does not necessarily carry over to all other modes. We recommend that after you have set the levels satisfactorily in one mode, you note the results and change to other surround modes. For those modes that don't reflect your level settings, you may either copy the settings you obtained as a short cut, or re-do the procedure to determine the correct settings for those surround modes. Press the ‹ Button to view the next source. The sources will be selected in the following order: Tape, 6-Channel Inputs, DMP/The Bridge, Video 1, Video 2, Video 3, DVD and CD. Pressing the › Button selects the sources in the reverse order. For each of these sources, you may adjust the following settings. At a minimum, you should make sure that sources connected to any of the component video or digital audio inputs have the correct settings. Other settings are optional, and you may adjust them at a later time when you have more experience with the AVR. Refer to the Table A4 worksheet in the appendix that you filled out during installation as you assign inputs to each source. TITLE: You may change the display name for any source (except the tuner). Not only does this enable you to customize your system; it helps you to select the correct source device even when you have forgotten which physical connections you used. Move the cursor down to the TITLE line and press the Set Button. A block cursor will blink. See Figure 47. Step Five - Configure Sources This is the last step in the configuration process. In the Installation section, you physically connected various cables between your source devices and the AVR. In this section, you will assign the various audio and video inputs to their sources, ensuring that the AVR uses the correct connections each time you select a source. Press the OSD Button to view the Master Menu. The cursor will be pointing to the INPUT SETUP line, and you need only press the Set Button to display the Input Setup menu. See Figure 46. Figure 46 - Input Setup Menu Screen The first line indicates that the receiver is currently set to the tuner source. In fact, you may hear static if the tuner is set to an unused frequency. You will not be able to make any changes to the tuner, other than selecting a component video input or adjusting the tone controls. It is not recommended that you make either of these changes for the tuner at this time. Figure 47 - Retitling a Source Input Now you may use the ⁄/¤ Buttons to scroll through the alphabet in upper and lower case, as well as numbers and a variety of punctuation marks. When you have selected the desired character, press the › Button to move to the next space. You may also press the › Button to leave a blank. Press the Set Button when you have finished spelling out the new display name for the source. COMPONENT IN: If you connected the source to one of the two component video inputs, make sure the correct set of inputs is displayed at this line. If it isn't, move the cursor to this line, and then press the › Button to change the setting. AUDIO IN: By default, the analog audio inputs are assigned to all sources at the factory other than the DVD and Video 2 sources, which default to Coax 1 and Optical 1, respectively, and the HDMI 1 and 2 source, which default to the Coaxial 2 and Optical 2 inputs. See Table A1 in the appendix. If you used a digital audio connection for another source, you will need to change this setting to assign the correct digital audio input to the source, even if you also connected the analog audio outputs of the source to the receiver. Move the cursor to this line, and press the ‹/› Buttons until the correct digital input appears. 32
-
 1
1 -
2
-
3
-
4
-
5
-
6
-
7
-
8
-
9
-
10
-
11
-
12
-
13
-
14
-
15
-
16
-
17
-
18
-
19
-
20
-
21
-
22
-
23
-
24
-
25
-
26
-
 27
27 -
 28
28 -
 29
29 -
 30
30 -
 31
31 -
 32
32 -
 33
33 -
 34
34 -
 35
35 -
 36
36 -
 37
37 -
38
-
39
-
40
-
41
-
42
-
43
-
44
-
45
-
46
-
47
-
48
-
49
-
50
-
51
-
52
-
53
-
54
-
55
-
56
-
57
-
58
-
59
-
60
 |
 |
