Harman Kardon AVR 347 Owners Manual - Page 59
System Settings
 |
View all Harman Kardon AVR 347 manuals
Add to My Manuals
Save this manual to your list of manuals |
Page 59 highlights
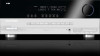
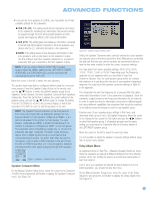
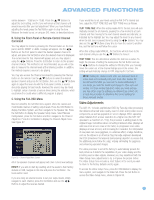
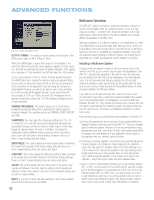
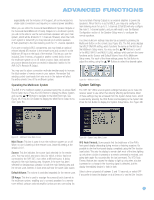
ADVANCED FUNCTIONS expandability and the inclusion of IR support, all communicated via single-cable connections and requiring no external power amplifiers. When you use either the Surround Back/Multiroom Speaker Outputs or the Surround Back/Multiroom Preamp Outputs for a multiroom system, you will not be able to use the surround back speakers with your main system, which will be limited to 5.1 channels. However, when the multiroom system is turned off, you may relocate your remote speakers (if that's practical) to the main listening room for 7.1-channel operation. If you are not using A-BUS components, you may install an optional remote infrared (IR) receiver in the remote room and connect it to the Multiroom IR Input on the back of the receiver. This lets you use the included Zone II remote, a keypad or another control device to turn the multiroom system on or off, select a source input, and operate any source devices that are connected in daisychain fashion to the AVR 347's Remote IR Output. You may use the above connection methods simultaneously to increase the total number of remote rooms in your system. Remember that sending control commands from one room in the system will affect the entire remote zone of the multiroom system. Operating the Multiroom System The AVR 347's multiroom system is accessed using the on-screen Multi Room Setup menu. Press the OSD Button to display the Menu System, and use the ⁄/¤ Buttons to navigate to the Multi Room tab. See Figure 48. Press the Set Button to display the Multi Room Setup menu. See Figure 94. Surround Back Preamp Outputs to an external amplifier to power the speakers). When this line is set to MULTI, you may only configure the main listening room for up to 5.1 channels. EzSet/EQ will only configure the main 5.1-channel system, and you will need to use the Manual Configuration section of the Speaker Setup menu to configure the remote speakers. The three multiroom settings may also be accessed by pressing the Multiroom Button on the remote (see Figure 95). The first press displays the MULTI ON/OFF setting, which functions the same as the first line of the Multiroom Setup menu. You may use the ⁄/¤ Buttons to scroll to the MULTI INPUT and MULTI LEVEL settings, which perform the same functions as the Source and Default Volume lines of the Multiroom Setup menu. For each of the three settings, press the Set Button to adjust the setting, using the ⁄/¤ Buttons to select the desired option. Figure 95 - Multiroom Button System Settings The AVR 347 offers several system settings that allow you to make the receiver easier to use rather than directly affecting performance. Most of these settings may be accessed from the System Setup menu, which is selected by pressing the OSD Button and navigating to the System tab. Press the Set Button to display the System Setup Menu. See Figure 96. Figure 94 - Multiroom Setup Menu Screen Multi Room: This line is used to turn the multiroom system on or off. When no one is listening in the remote room, leave this setting at the default of OFF. Source: This line indicates the source input selected for the remote zone. You may select any source input for which a device has been connected to the AVR 347, even when a different source is being enjoyed in the main listening area. However, if the tuner has been selected for simultaneous operation in both the main listening area and the remote zone, listeners in both areas will hear the same radio station. Default Volume: The volume is controlled separately for the remote zone. SB Amps: This line is used to reassign the surround back channels to the multiroom system, enabling you to connect speakers for a remote room without using an external amplifier (unless you are connecting the Figure 96 - System Setup Menu Screen VFD Fade Timeout: Some people find the brightness of the AVR's front-panel display distracting during movies or listening sessions. It's possible to dim the front-panel display completely using the Dim function (see below). This sets the display to remain dark most of the time, lighting up only when a button is pressed or a remote command is received, and going dark again five seconds after the last command. The VFD Fade Timeout feature also causes the display to light up only when a button is pressed or a change in the incoming signal is detected, but the display immediately begins to fade to dark. Select a time-out period of between 3 and 10 seconds, or select OFF if you prefer to leave the displays on at all times or to use the Dim function. 59
-
 1
1 -
2
-
3
-
4
-
5
-
6
-
7
-
8
-
9
-
10
-
11
-
12
-
13
-
14
-
15
-
16
-
17
-
18
-
19
-
20
-
21
-
22
-
23
-
24
-
25
-
26
-
27
-
28
-
29
-
30
-
31
-
32
-
33
-
34
-
35
-
36
-
37
-
38
-
39
-
40
-
41
-
42
-
43
-
44
-
45
-
46
-
47
-
48
-
49
-
50
-
51
-
52
-
53
-
 54
54 -
 55
55 -
 56
56 -
 57
57 -
 58
58 -
 59
59 -
 60
60 -
 61
61 -
 62
62 -
 63
63 -
 64
64 -
65
-
66
-
67
-
68
-
69
-
70
-
71
-
72
-
73
-
74
-
75
-
76
 |
 |