Harman Kardon AVR30 Owners Manual - Page 9
Subwoofer, Wired, Remote, Control
 |
View all Harman Kardon AVR30 manuals
Add to My Manuals
Save this manual to your list of manuals |
Page 9 highlights
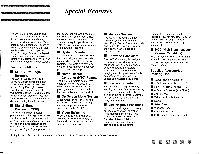
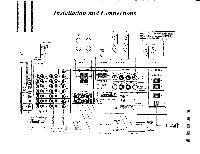
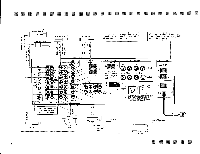
1. Note the difference between the two conductors in each cable: different colored insulation, ridged insulation, or colored yarn. 2. Connect the front right-hand speaker to the receiver, being sure to connect the positive terminal on the speaker to the terminal marked "Front Speakers" "Right" on the receiver, and the negative or ground terminal on the speaker to the corresponding "GND" terminal on the receiver. 3. Connect terminals on the front left-hand speaker to the "Front Speakers" "Left" and corresponding "GND" terminals on the receiver, again being careful to maintain correct polarity. To connect a second set of speakers: IMPORTANT: When connecting pairs of front speakers to speaker systems "A" and "B," determine the impedance of each pair by looking on the back of the speakers, or in your owner's manual, or by contacting your dealer or manufacturer. Speaker pairs A and B can be played simultaneously only when the impedance of speakers A and B are 1252 or greater. WARNING: Do not play both sets of front speakers simultaneously except as recommended above. Receiver may overheat. 4. Connect terminals on the Center Speaker to the "Center" and corresponding "GND" terminals on the Receiver. 5. Connect terminals on the Rear Left and Right Speakers to the corresponding Rear "Left," "Right" and "GND" terminals on the Receiver. Subwoofer Out Connect a powered subwoofer to these jacks. This output may also be used for any external component requiring a full bandwidth line-level input. Wired Remote Control To control your AVR30 with an external infrared remote sensor, connect the wire from the remote sensor to the "Remote In" jack on the back panel. Or, if you have a stereo component with a built-in infrared remote sensor and a "Remote Output" jack, it may be possible to connect this jack to the "Remote In" jack of your AVR30. All Harman Kardon products with "Remote In" and "Remote Out" jacks are compatible with one another, except for the HD7400 CD Player, Citation 22, Citation 24 and Citation 25. Other manufacturers' remote sensors may not be compatible, but it will not hurt to experiment. A second wire may be used to connect your AVR30's "Remote Out" jack to the "Remote Input" of another stereo component. Continue this process to include additional components (if compatible). To control your AVR30, you may use one of the remote controls supplied with the AVR30. You may use the HTC to control other components, such as TVs, VCRs, laser disc players, etc. 8
-
 1
1 -
2
-
3
-
 4
4 -
 5
5 -
 6
6 -
 7
7 -
 8
8 -
 9
9 -
 10
10 -
 11
11 -
 12
12 -
 13
13 -
 14
14 -
15
-
16
-
17
-
18
-
19
-
20
-
21
-
22
 |
 |
