Harman Kardon HK 3390 Owners Manual - Page 7
Front-panel Controls - stereo receiver video
 |
View all Harman Kardon HK 3390 manuals
Add to My Manuals
Save this manual to your list of manuals |
Page 7 highlights
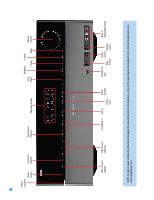
FRONT-PANEL CONTROLS Power Indicator: This LED has two modes. When power is turned off, the LED is amber to indicate that the receiver is plugged in and ready to be turned on. When the receiver is turned on, the LED turns white. Power Switch: This electrical switch turns the receiver on for playback, or leaves it in Standby mode for quick turn-on using the remote control. Phono Source Selector: Press this button to select a turntable connected to the Phono Inputs as the source. CD Source Selector: Press this button to select the device connected to the CD Inputs as the source. Video Source Selectors: Press any of these buttons to select the device connected to the corresponding Audio and Video Inputs for playback. Remember to turn on the source device, to connect the Video Monitor Output to your video display and to turn on your video display and select the correct Video Input. NOTE: The Video 3 source device may be connected to either the front- or rear-panel connectors. To select the desired device, press the Video 3 Source Selector repeatedly. The VIDEO 3 message indicates that the rear-panel inputs are active, and the The VIDEO F message indicates the front-panel inputs have been selected. Tape Source Selector: Press this button to select the device connected to the Tape/CDR Audio Inputs as the source. If you are making a recording using a three-head tape deck or another unit with off-head playback, you will be able to monitor the recording as it is being made. Speaker 1/2: Press the left side of this button to enable the HK 3390 to output audio to the speakers connected to the Speaker 1 Outputs, and press the right side of the button to enable the Speaker 2 Outputs. You may enable or disable both sets of speaker outputs simultaneously. This feature is a convenient way of hearing audio in more than one room at a time, although the same source material will be played through both sets of speakers. Message Display: Various messages appear in this display in response to commands. Tuning: Press either side of this button to tune a radio station. Tap the button briefly to tune one frequency step at a time, or press and hold the button to seek the next frequency with an acceptably strong signal. Preset Scan: Press this button once to scan through the stations you have previously programmed as presets. Each station will play for five seconds before the tuner skips to the next preset station. Press the button a second time to select the current station. If no presets have been programmed, the 0 PRESET message will be displayed. Preset Stations: Press this button to select a preset radio station. If no presets have been programmed, the 0 PRESET message will be displayed. Tuner Band: Press this button to select the tuner as the source, or to select the AM (left side of button) or FM (right side of button) band. FM Mode: This button toggles between Stereo and Mono modes when an FM station is tuned. Mono mode may improve reception of weaker signals. Sleep: Press this button to activate the sleep timer, which shuts off the receiver after a programmed period of time up to 90 minutes. Dimmer: Some people find the front-panel display distracting. Press this button once to dim the displays to half-brightness, and a second time to turn the displays completely off. The Power Indicator will always remain lit to remind you that the receiver is turned on. Press the button a third time to return the display to normal brightness. This setting is canceled when the unit is turned off. Mute: Press this button to mute the HK 3390's speaker and headphone outputs temporarily. To end the muting, press this button or adjust the volume. Muting is also canceled when the receiver is turned off. Volume Control: Turn this knob to raise or lower the volume, which will be shown in decibels (dB) in the Message Display. Headphone Jack: Plug a 1/4" headphone plug into this jack for private listening. Bass Control: Turn the knob clockwise to boost low-frequency output by up to 10dB, or counterclockwise to cut low-frequency output by up to 10dB. Set the control to suit your taste and room acoustics. Treble Control: Turn the knob clockwise to boost high-frequency output by up to 10dB, or counterclockwise to cut high-frequency output by up to 10dB. Set the control to suit your taste and room acoustics. Balance Control: Turn the knob to adjust the relative volume of the left and right channels, which affects imaging and can compensate for room characteristics. NOTE: To use the Bass, Treble or Balance Controls, gently press the knob until it unlatches. When finished, press the knob again to lock it. Video 3 A/V Inputs: Connect a source component that will only be used temporarily to these jacks, such as a camera or game console, or connect an iPod using the supplied audio/video cable. 7
-
 1
1 -
 2
2 -
 3
3 -
 4
4 -
 5
5 -
 6
6 -
 7
7 -
 8
8 -
 9
9 -
 10
10 -
 11
11 -
 12
12 -
13
-
14
-
15
-
16
-
17
-
18
-
19
-
20
-
21
-
22
-
23
-
24
-
25
-
26
-
27
-
28
 |
 |
