Hayward ColorLogic 2.5 Model: Series SP0522 SP0523 SP0530 SP0531 - Page 5
Conecte El Cable De ConexiÓn A Tierra Con El
 |
View all Hayward ColorLogic 2.5 manuals
Add to My Manuals
Save this manual to your list of manuals |
Page 5 highlights
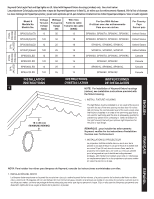
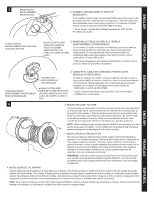
ENGLISH 3 ENCAPSULATE RECOUVREMENT ENCAPSULADO 3. CONNECT GROUND WIRE TO NICHE (IF NECESSARY) If non-metallic conduit is used, connect the #8 AWG copper ground wire to the grounding connector inside the fixture housing (niche). This termination must be encapsulated using a listed potting compound* to a thickness of at least 1/8 inch (4 mm) in accordance with Article 680 of the NEC. * 3M Inc. Scotch Cast Wet Niche Potting Compound No. 2135 (UL File E130394) or equivalent. FRANÇAIS ESPAÑOL ENGLISH PLASTIC NICHES ENFONCEMENTS EN PLASTIQUE NICHOS PLÁSTICOS #8 AWG COPPER WIRE CÂBLE DE CUIVRE DE 3. BRANCHEZ LE CÂBLE DE MISE À LA TERRE À L'ENFONCEMENT (SI NÉCESSAIRE) TAILLE 8 (CALIBRE Si vous utilisez un cordon conducteur non métallique, branchez le câble de AMÉRICAIN DE FILS) mise à la terre de taille 8 au connecteur de mise à la terre situé dans CABLE DE COBRE CALIBRE l'enfoncement. Ce raccordement doit être recouvert d'une pâte* de 8 AWG remplissage approuvée d'une épaisseur d'au moins 1/8 pouce (4 mm) conformément à l'article 680 du NEC. * Pâte de remplissage pour enfoncement submergé 3M Inc. Scotch Cast no 2135 (no dossier UL E130394) ou équivalent. 2 STAINLESS NICHES ENFONCEMENTS INOXYDABLES NICHOS INOXIDABLES ENCAPSULATE RECOUVREMENT ENCAPSULADO #8 AWG COPPER WIRE CÂBLE DE CUIVRE DE TAILLE 8 (CALIBRE AMÉRICAIN DE FILS) CABLE DE COBRE CALIBRE 8 AWG 3. CONECTE EL CABLE DE CONEXIÓN A TIERRA CON EL NICHO (SI ES NECESARIO) Si utiliza un conducto no metálico, coloque el cable de cobre de conexión a tierra calibre 8 AWG, al conector a tierra en el interior del nicho de la lámpara. Esta terminación debe encapsularse con un compuesto para encapsular* aprobado, con un grosor de 1/8 pulgada (4 mm) como mínimo, en conformidad con el Artículo 680 de NEC. * Scotch Cast Wet Niche Potting Compound No. 2135 de 3M (registro E130394 de UL) o equivalente. 4 4. MOUNT THE LIGHT FIXTURE Coil up the extra cord and insert it in the fixture housing (niche) behind the light fixture. To mount the light fixture, insert the fixture into the niche with the mounting screw at the top (12 o'clock position). Place the bottom hook in first (6 o'clock position), then tilt the top of the fixture up and secure it with the mounting screw. Be sure the hook on the bottom catches on the niche. When removing the fixture from the niche, unscrew the mounting screw, tilt the top of the fixture out, and lift it up and out. NOTE: When installing the light into the Hayward SP0607U fixture housing, you must use the brass spacer (included). The mounting screw must pass through the spacer before threading into the mounting hole in the fixture housing. 4. INSTALLATION DU PROJECTEUR Enroulez la longueur de câble en trop et mettez-la dans l'enfoncement derrière le projecteur. Pour installer le projecteur, insérez-le dans l'enfoncement à l'aide de la vis dans la partie supérieure (position 12 heures). Insérez d'abord le crochet inférieur (position 6 heures), inclinez la partie supérieure du projecteur et fixez-le avec une vis. Assurez-vous que le crochet inférieur s'accroche à l'enfoncement. Pour enlever le projecteur de l'enfoncement, dévissez la vis, inclinez la partie supérieure du projecteur vers vous, soulevez-le et sortez-le. REMARQUE: Vous devez utiliser la pièce d'espacement en cuivre (fournie) lorsque vous installez l'ampoule dans le projecteur Hayward SP0607U. La vis de montage doit passer dans la pièce d'espacement avant de se visser dans le trou de montage du projecteur. 4. INSTALACIÓN DE LA LÁMPARA Doble el cable sobrante e insértelo en el nicho detrás de la lámpara. Para instalar la lámpara, insértela en el nicho con el tornillo de montaje de la parte superior (la posición de las 12 en el reloj). Coloque primero el gancho de la parte inferior (la posición de las 6 en el reloj), y a continuación incline la parte superior de la lámpara y fíjela con el tornillo de montaje. Cerciórese de que el gancho de la parte inferior encaje en el nicho. Al retirar la lámpara del nicho, desatornille el tornillo de montaje, incline la parte superior de la lámpara hacia afuera, y levántela hacia arriba y hacia afuera. NOTA: Para instalar la lámpara en el nicho del modelo Hayward SP0607U, utilice la arandela metálica que acompaña al producto. Introduzca el tornillo de montaje en la arandela y, a continuación, encájelo en el orificio del nicho correspondiente. FRANÇAIS ESPAÑOL
-
 1
1 -
 2
2 -
 3
3 -
 4
4 -
 5
5 -
 6
6 -
 7
7 -
 8
8 -
 9
9 -
 10
10 -
 11
11 -
12
 |
 |
