HealthRider Hotel Fitness Rb9700 Bike English Manual - Page 6
Tip: Loosen the four M6 x 38mm Button Screws
 |
View all HealthRider Hotel Fitness Rb9700 Bike manuals
Add to My Manuals
Save this manual to your list of manuals |
Page 6 highlights
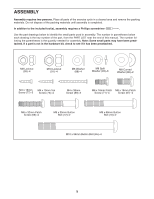
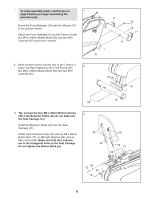
1. To make assembly easier, read the tips on 1 page 5 before you begin assembling the exercise cycle. Orient the Front Stabilizer (15) with the Wheels (17) in the position shown. Attach the Front Stabilizer (15) to the Frame (1) with two M10 x 96mm Button Bolts (65) and two M10 Locknuts (91) (only one is shown). 17 65 1 91 17 15 2. While another person lifts the rear of the Frame (1), attach the Rear Stabilizer (16) to the Frame with 2 two M10 x 96mm Button Bolts (65) and two M10 Locknuts (91). 65 91 91 1 16 3. Tip: Loosen the four M6 x 38mm Button Screws (25) if the Backrest Tubes (52) do not slide into 3 the Seat Carriage (41). Insert the Backrest Tubes (52) into the Seat Carriage (41). Attach each Backrest Tube (52) with an M8 x 35mm Button Bolt (72), an M8 Split Washer (93), and an M8 Locknut (99). Make sure that the Locknuts are in the hexagonal holes in the Seat Carriage. Do not tighten the Button Bolts yet. 25 52 25 52 41 99 93 72 99 93 72 6
-
 1
1 -
 2
2 -
 3
3 -
 4
4 -
 5
5 -
 6
6 -
 7
7 -
 8
8 -
 9
9 -
 10
10 -
 11
11 -
 12
12 -
13
-
14
-
15
-
16
-
17
-
18
-
19
-
20
-
21
-
22
-
23
-
24
 |
 |
