HP 1210 HP PSC 1200 series all-in-one - (English) Reference Guide - Page 16
HP Photo Paper and HP Photo Paper, Glossy, 4-by-6, are not, HP Matte Greeting Cards, or HP Felt - psc manual
 |
UPC - 844844844303
View all HP 1210 manuals
Add to My Manuals
Save this manual to your list of manuals |
Page 16 highlights
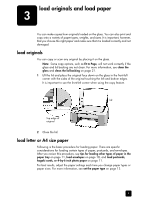
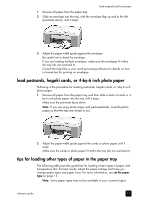
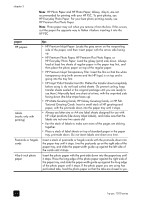
chapter 3 Note: HP Photo Paper and HP Photo Paper, Glossy, 4-by-6, are not recommended for printing with your HP PSC. To print photos, use HP Everyday Photo Paper. For your best photo printing needs, use HP Premium Plus Photo Paper. Note: Photo paper may curl when you remove it from the box. If this occurs, curl the paper the opposite way to flatten it before inserting it into the HP PSC. paper HP papers Labels (works only with printing) Postcards or hagaki cards 4-by-6 inch photo paper tips • HP Premium Inkjet Paper: Locate the gray arrow on the nonprinting side of the paper, and then insert paper with the arrow side facing up. • HP Premium Photo Paper, HP Premium Plus Photo Paper, or HP Everyday Photo Paper: Load the glossy (print) side down. Always load at least five sheets of regular paper in the paper tray first, and then place the photo paper on top of the regular paper. • HP Premium Inkjet Transparency Film: Insert the film so that the white transparency strip (with arrows and the HP logo) is on top and is going into the tray first. • HP Inkjet T-Shirt Transfer Iron-On: Flatten the transfer sheet completely before using it; do not load curled sheets. (To prevent curling, keep transfer sheets sealed in the original package until you are ready to use them.) Manually feed one sheet at a time, with the unprinted side facing down (the blue stripe faces up). • HP Matte Greeting Cards, HP Glossy Greeting Cards, or HP FeltTextured Greeting Cards: Insert a small stack of HP greeting-card paper, with the print-side down into the paper tray until it stops. • Always use letter-size or A4-size label sheets designed for use with HP inkjet products (like Avery Inkjet Labels), and make sure that the labels are not over two years old. • Fan the stack of labels to make sure none of the pages are sticking together. • Place a stack of label sheets on top of standard paper in the paper tray, print-side down. Do not insert labels one sheet at a time. Insert a stack of postcards or hagaki cards with the print-side down into the paper tray until it stops. Line the postcards up on the right side of the paper tray, and slide the paper-width guide up against the left side of the cards until it stops. Insert the photo paper with the print-side down into the paper tray until it stops. Place the long edge of the photo paper against the right side of the paper tray, and slide the paper-width guide up against the long edge of the photo paper until it stops. If the photo paper you are using has perforated tabs, load the photo paper so that the tabs are closest to you. 12 hp psc 1200 series
-
 1
1 -
2
-
3
-
4
-
5
-
6
-
7
-
8
-
9
-
10
-
 11
11 -
 12
12 -
 13
13 -
 14
14 -
 15
15 -
 16
16 -
 17
17 -
 18
18 -
 19
19 -
 20
20 -
 21
21 -
22
-
23
-
24
-
25
-
26
-
27
-
28
-
29
-
30
-
31
-
32
-
33
-
34
-
35
-
36
-
37
-
38
-
39
-
40
-
41
-
42
-
43
-
44
-
45
-
46
-
47
-
48
 |
 |
