HP 3310 Setup Guide - Page 11
Locate wireless settings - windows 8
 |
UPC - 829160970424
View all HP 3310 manuals
Add to My Manuals
Save this manual to your list of manuals |
Page 11 highlights
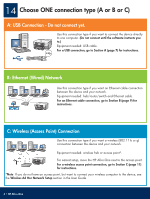
Section C: Wireless (Access Point) Network C1 Locate wireless settings You must have your wireless settings to add the HP All-in-One to your wireless network. If you have Connect Now Technology or SecureEZSetup, see the next section on this page. If you do not have Connect Now Technology or SecureEZSetup or are unfamiliar with these terms, follow these steps: a Locate and write down your settings. Network Name (also called SSID WEP key/WPA Passphrase (if needed b Continue to step C2 on the next page. If you do not know your settings, see the documentation that came with your wireless access point. Shortcut methods (See requirements below.) Connect Now Technology (Windows XP Service Pack 2 or newer) Requirements: You must have a Connect Now compatible access point, Windows XP Service Pack 2, and saved settings to use this option. If you set up your wireless network using the Windows Connect Now option with a USB flash drive, you can use that USB flash drive to add the HP Allin-One to your wireless network. (If you saved your settings to a memory device, you can also use that device.) Steps: a Insert the USB flash drive into the front USB port on the HP All-in-One. (For memory devices, insert the card into the matching card slot on the front of the HP All-in-One.) Or b A prompt appears on the HP All-in-One. Press OK to accept. Skip the next page and continue to step C4 on page 13. SecureEasySetup Requirements: You must have an access point with SecureEasySetup logo. Important: You have a limited time to complete the next step after starting the SecureEasySetup. Steps: a Put the access point in SecureEasySetup mode. See the documentation that came with the access point if you questions. b Continue to step C2 on the next page. HP All-in-One • 11
-
 1
1 -
2
-
3
-
4
-
5
-
 6
6 -
 7
7 -
 8
8 -
 9
9 -
 10
10 -
 11
11 -
 12
12 -
 13
13 -
 14
14 -
 15
15 -
 16
16
 |
 |
