HP 3310 Setup Guide - Page 12
Start the Wireless Setup Wizard, Follow the display instructions - photosmart wireless all in one
 |
UPC - 829160970424
View all HP 3310 manuals
Add to My Manuals
Save this manual to your list of manuals |
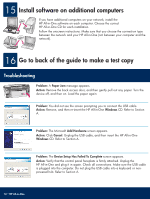
Page 12 highlights
C2 Start the Wireless Setup Wizard Setup a On the control panel of the HP All-in-One, press the Setup button. b Press 7 for the Network menu. c When the Network menu appears, press 4 for the Wireless Setup Wizard. C3 Follow the display instructions A list of detected networks appears on the display. The networks with the strongest signals appear first. Note: If you are using Connect Now Technology or SecureEasySetup, you can skip this step. a Highlight the name of the network that you wrote down in Step C1, and then press OK. (If your network is not listed, select Enter a New Network Name (SSID) and enter your Network Name (SSID). Make sure there are no obstructions between the access point and your HP All-in-One.) b If your network is encrypted, a prompt appears for the WEP key or WPA passphrase. Both are case sensitive. See Display keyboard tips at the bottom of this page. c Follow the prompts on the display. If the connection is successful, go to the next step. Display keyboard tips: To Select: Use Arrow keys to highlight, and then press OK. For mistakes: Select Clear For lowercase: Select abc For numbers: Select 123 When you are finished: Highlight Done, and then press OK. HP Photosmart 2600/2700 series all-in-one User Guide If you have problems connecting to the network, see the User Guide for additional setup information. 12 • HP All-in-One
-
 1
1 -
2
-
3
-
4
-
5
-
6
-
 7
7 -
 8
8 -
 9
9 -
 10
10 -
 11
11 -
 12
12 -
 13
13 -
 14
14 -
 15
15 -
 16
16
 |
 |
