HP 353803-B22 HP StorageWorks 1000 Modular Smart Array installation guide (254 - Page 36
Step 5: Install the hard drives
 |
UPC - 808736781619
View all HP 353803-B22 manuals
Add to My Manuals
Save this manual to your list of manuals |
Page 36 highlights
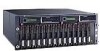
Step 5: Install the hard drives After the storage enclosures are secured in the rack, install the hard drives into the drive bays. For a list of supported hard drives, see the compatibility guide, located on the Technical documentation page of the MSA1000 website: http://www.hp.com/go/msa1000 . 15414 CAUTION: Follow industry-standard practices when handling hard drives. Internal storage media can be damaged when drives are shaken, dropped, or roughly placed on a work surface. When installing a hard drive, make sure it is fully seated in the drive bay. To remove a hard drive, press the release button and pull the drive only slightly out of the enclosure.Then, to allow time for the internal disk to stop rotating, wait approximately 10 seconds before completely removing the drive from the enclosure. NOTE: HP recommends installing hard drives in bay-number sequence. Locate this information for your storage enclosure in the enclosure documentation. For information about installing hard drives, see the instructions that came with the hard drive and the enclosure. Go to Table 13: "Hard drive information" on page 112 to record information about your hard drives. 36 Installation procedures-All deployments
-
 1
1 -
2
-
3
-
4
-
5
-
6
-
7
-
8
-
9
-
10
-
11
-
12
-
13
-
14
-
15
-
16
-
17
-
18
-
19
-
20
-
21
-
22
-
23
-
24
-
25
-
26
-
27
-
28
-
29
-
30
-
 31
31 -
 32
32 -
 33
33 -
 34
34 -
 35
35 -
 36
36 -
 37
37 -
 38
38 -
 39
39 -
 40
40 -
 41
41 -
42
-
43
-
44
-
45
-
46
-
47
-
48
-
49
-
50
-
51
-
52
-
53
-
54
-
55
-
56
-
57
-
58
-
59
-
60
-
61
-
62
-
63
-
64
-
65
-
66
-
67
-
68
-
69
-
70
-
71
-
72
-
73
-
74
-
75
-
76
-
77
-
78
-
79
-
80
-
81
-
82
-
83
-
84
-
85
-
86
-
87
-
88
-
89
-
90
-
91
-
92
-
93
-
94
-
95
-
96
-
97
-
98
-
99
-
100
-
101
-
102
-
103
-
104
-
105
-
106
-
107
-
108
-
109
-
110
-
111
-
112
-
113
-
114
-
115
-
116
-
117
-
118
-
119
-
120
-
121
-
122
-
123
 |
 |
