HP 5600 TFT5600 Rackmount Keyboard and Monitor (RKM) Model M5FAE Maintenance a - Page 29
Removing the Keyboard Assembly, Turn the unit over and remove the four screws securing the palm rest
 |
UPC - 720591607586
View all HP 5600 manuals
Add to My Manuals
Save this manual to your list of manuals |
Page 29 highlights
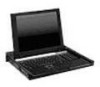
4-10 Compaq TFT5600 Rackmount Keyboard and Monitor (RKM) Maintenance and Service Guide Removing the Keyboard Assembly IMPORTANT: You must remove the clutch covers, rear cover, and AC brick before you remove the keyboard assembly. To remove the keyboard assembly: 1. Disconnect all cables from their source. 2. Turn the unit over and remove the four screws securing the palm rest and the five screws securing the keyboard assembly to the metal tray. Figure 4-7. Removing screws from bottom of unit
-
 1
1 -
2
-
3
-
4
-
5
-
6
-
7
-
8
-
9
-
10
-
11
-
12
-
13
-
14
-
15
-
16
-
17
-
18
-
19
-
20
-
21
-
22
-
23
-
 24
24 -
 25
25 -
 26
26 -
 27
27 -
 28
28 -
 29
29 -
 30
30 -
 31
31 -
 32
32 -
 33
33 -
 34
34 -
35
-
36
-
37
-
38
-
39
-
40
-
41
-
42
-
43
-
44
-
45
-
46
-
47
-
48
-
49
-
50
-
51
-
52
-
53
-
54
-
55
-
56
-
57
-
58
-
59
-
60
-
61
-
62
 |
 |

4-10
Compaq TFT5600 Rackmount Keyboard and Monitor (RKM) Maintenance and Service Guide
Removing the Keyboard Assembly
IMPORTANT:
You must remove the clutch covers, rear cover, and AC brick before you
remove the keyboard assembly.
To remove the keyboard assembly:
1.
Disconnect all cables from their source.
2.
Turn the unit over and remove the four screws securing the palm rest
and the five screws securing the keyboard assembly to the metal tray.
Figure 4-7.
Removing screws from bottom of unit