HP C5280 Setup Guide - Page 1
HP C5280 - Photosmart All-in-One Color Inkjet Manual
 |
UPC - 883585060276
View all HP C5280 manuals
Add to My Manuals
Save this manual to your list of manuals |
Page 1 highlights
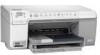
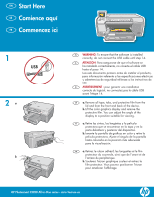
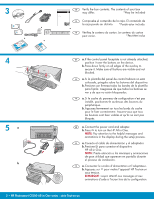
EN Start Here ES Comience aquí FR Commencez ici 1 2a b EN WARNING: To ensure that the software is installed correctly, do not connect the USB cable until step 14. ES ATENCIÓN: Para asegurarse de que el software se ha instalado correctamente, no conecte el cable USB hasta el paso 14. Lea este documento primero antes de instalar el producto, para información referente a las especificaciones eléctricas y advertencias de seguridad refiérase a los instructivos de uso. FR AVERTISSEMENT : pour garantir une installation correcte du logiciel, ne connectez pas le câble USB avant l'étape 14. EN a. Remove all tape, tabs, and protective film from the lid and from the front and back of the device. b. Lift the color graphics display and remove the protective film. You can adjust the angle of the display to a position suitable for viewing. ES a. Retire las cintas, las lengüetas y la película protectora que se encuentran en la tapa y en la parte delantera y posterior del dispositivo. b. Levante la pantalla de gráficos en color y retire la película protectora. Ajuste el ángulo de la pantalla hasta colocarla en la posición más adecuada para la visualización. FR a. Retirez le ruban adhésif, les languettes et le film protecteur du couvercle, ainsi que de l'avant et de l'arrière du périphérique. b. Soulevez l'écran graphique couleur et retirez le film protecteur. Vous pouvez positionner l'écran pour améliorer l'affichage. HP Photosmart C5200 All-in-One series - série Tout-en-un
-
 1
1 -
 2
2 -
 3
3 -
 4
4 -
 5
5 -
 6
6 -
 7
7 -
8
-
9
-
10
-
11
-
12
 |
 |