HP Color LaserJet CM2320 HP Color LaserJet CM2320 MFP - Scan Tasks - Page 2
How do I?, Steps to perform - mfp series software
 |
View all HP Color LaserJet CM2320 manuals
Add to My Manuals
Save this manual to your list of manuals |
Page 2 highlights
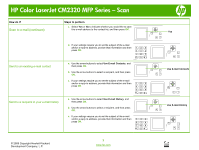
HP Color LaserJet CM2320 MFP Series - Scan How do I? Add destinations (continued) Delete destinations Steps to perform 3 Do one of the following: • For folders, select Save it to my computer, and then click Next. • For e-mail, select Attach to a new e-mail, and then click Next. • For programs, select Open it in another software application, and then click Next. 4 Enter the file destination name or check to set up the destination on the product. Name the default destination, and then click Next. 5 Select the quality and click Next. 6 Verify the selections, and then click Save. 1 From the Set up the list for the All-in-One, select one of the Available Destinations on this PC and click Delete. The Delete Destination dialog box displays. 2 From the Delete Destination dialog box, highlight the destination to delete and click Next. The Confirmation dialog box displays. 3 Click Delete to perform the deletion, or click Cancel to choose another destination. © 2008 Copyright Hewlett-Packard Development Company, L.P. 2 www.hp.com
-
 1
1 -
 2
2 -
 3
3 -
 4
4 -
 5
5 -
 6
6 -
 7
7 -
 8
8 -
9
 |
 |
