HP DeskJet Ink Advantage Ultra 4800 User Guide - Page 94
Network and connection issues, Fix wireless connection
 |
View all HP DeskJet Ink Advantage Ultra 4800 manuals
Add to My Manuals
Save this manual to your list of manuals |
Page 94 highlights
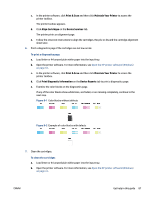
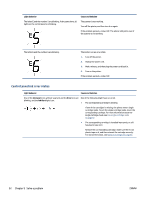
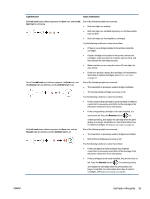
c. In the printer software, click Print & Scan and then click Maintain Your Printer to access the printer toolbox. d. Click Clean Cartridges on the Device Services tab. Follow the onscreen instructions. Network and connection issues ● Fix wireless connection ● Fix Wi-Fi Direct connection Fix wireless connection Choose one of the following troubleshooting options. ● Verify that the printer and the wireless router are turned on and have power, Also, make sure that the wireless radio in the printer is turned on. The light next to the Wireless button ( ) should be steady blue, indicating that the printer is connected. (If the light is blinking, the printer is in setup mode or attempting to connect). ● Check the Signal Bars icon ( ) on the control panel display. If only one or two bars are showing, the wireless signal is weak. Verify that the printer is within the range of the wireless network. For most networks, the printer must be within 30 m (100 ft) of the wireless access point (wireless router). ● From the printer control panel, press the Wireless button ( ) and the Information button ( ) at the same time to print the Wireless Network Test Report and Network Configuration Page. Check the top of the wireless network test report to see if something failed during the test. - See the DIAGNOSTICS RESULTS section for all tests that were performed, to determine whether or not your printer passed. If there are issues, perform the recommended steps listed in the report, and then try using your printer again. - From the CURRENT CONFIGURATION section, find out the Network Name (SSID) to which your printer is currently connected. Make sure that the printer is connected to the same network as your computer or mobile devices. ● Restore network settings and then reconnect the printer. See Connect using the HP Smart app on page 20. ● From HP Smart help center, find printer connection help, and then follow onscreen instructions. ● If you are printing from a Windows computer, try using the HP Print and Scan Doctor utility to diagnose and fix the issue automatically. ● To determine if a firewall or antivirus program is preventing your computer from connecting to the printer and find resolutions, use the HP online firewall troubleshooter . ● For more information about troubleshooting wireless network connection issues, visit the following website: www.hp.com/go/wirelessprinting. 88 Chapter 9 Solve a problem ENWW
-
 1
1 -
2
-
3
-
4
-
5
-
6
-
7
-
8
-
9
-
10
-
11
-
12
-
13
-
14
-
15
-
16
-
17
-
18
-
19
-
20
-
21
-
22
-
23
-
24
-
25
-
26
-
27
-
28
-
29
-
30
-
31
-
32
-
33
-
34
-
35
-
36
-
37
-
38
-
39
-
40
-
41
-
42
-
43
-
44
-
45
-
46
-
47
-
48
-
49
-
50
-
51
-
52
-
53
-
54
-
55
-
56
-
57
-
58
-
59
-
60
-
61
-
62
-
63
-
64
-
65
-
66
-
67
-
68
-
69
-
70
-
71
-
72
-
73
-
74
-
75
-
76
-
77
-
78
-
79
-
80
-
81
-
82
-
83
-
84
-
85
-
86
-
87
-
88
-
 89
89 -
 90
90 -
 91
91 -
 92
92 -
 93
93 -
 94
94 -
 95
95 -
 96
96 -
 97
97 -
 98
98 -
 99
99 -
100
-
101
-
102
-
103
-
104
-
105
-
106
-
107
-
108
-
109
-
110
-
111
-
112
-
113
-
114
-
115
-
116
-
117
-
118
-
119
-
120
-
121
-
122
-
123
-
124
 |
 |
