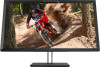
HP DreamColor Z31x User Guide
HP DreamColor Z31x Manual
 |
View all HP DreamColor Z31x manuals
Add to My Manuals
Save this manual to your list of manuals |
HP DreamColor Z31x manual content summary:
- HP DreamColor Z31x | User Guide - Page 1
User Guide - HP DreamColor Z31x | User Guide - Page 2
© Copyright 2017 HP Development Company, L.P. HDMI, the HDMI Logo and High-Definition Multimedia for HP products and services are set forth in the express warranty statements accompanying such products and services. Nothing herein should be construed as constituting an additional warranty. HP shall - HP DreamColor Z31x | User Guide - Page 3
About This Guide This guide provides information on display features, setting up the display, using the software and technical specifications. WARNING! Indicates a hazardous situation that, if not avoided, could result - HP DreamColor Z31x | User Guide - Page 4
iv About This Guide - HP DreamColor Z31x | User Guide - Page 5
device to the rear of the display 8 Installing a security cable ...8 Connecting the cables ...9 Adjusting the display ...13 Turning on the display ...14 HP watermark and image retention policy 15 Connecting USB devices ...15 Removing the display stand ...16 2 Using the display ...17 Software and - HP DreamColor Z31x | User Guide - Page 6
28 Set mask opacity 28 Working with markers ...29 Film aspect ratio markers ...29 16:9 aspect ratio markers ...30 4:3 aspect ratio markers ...31 Crosshair markers ...32 Marker color ...32 Custom markers ...32 Marker element ...32 Marker info element ...33 Marker position element 33 Marker style - HP DreamColor Z31x | User Guide - Page 7
display menus ...43 Color settings menu ...43 Video input menu ...45 Image adjustment menu ...46 Split/PIP control menu ...47 Load/save user preset ...49 Calibration ...49 Language menu ...50 Management menu ...51 Menu and message control menu ...55 Information ...56 Auto EDID update ...57 3 Display - HP DreamColor Z31x | User Guide - Page 8
63 Gamma/EOTF ...63 Luminance ...63 StudioCal XML calibration ...64 Calibration automation ...64 Scheduling automated calibrations 64 Viewing the calibration schedule ...65 Using a StudioCal XML file for automation 65 Accessing automatic calibration validation information 65 Aligning the internal - HP DreamColor Z31x | User Guide - Page 9
Upload LUT child element 81 Upload LUT example ...82 LUT folder structure ...82 Using non-supported measurement equipment 83 Making measurements with non-supported measurement equipment 84 Non-calibration elements ...85 Custom video input names ...85 Video input element ...85 Input info element - HP DreamColor Z31x | User Guide - Page 10
the different dashboard sections 93 Logging out of the dashboard ...93 6 Support and troubleshooting ...94 Solving common problems ...94 Button lockouts ...94 Product support ...95 Preparing to call technical support ...95 7 Maintaining the display ...96 Maintenance guidelines ...96 Cleaning the - HP DreamColor Z31x | User Guide - Page 11
of serious injury, read the Safety & Comfort Guide. It describes proper workstation setup, and proper posture, health, and work habits for computer Use the appropriate and correctly sized furniture designed to properly support your HP LCD display. WARNING! LCD displays that are inappropriately situated - HP DreamColor Z31x | User Guide - Page 12
-in support for the X-Rite i1Display Pro, X-Rite i1 Pro, Klein Instruments K10-A, Photo Research PR-6xx/7xx, Colorimetry Research CR-100/CR-250, and Konica Minolta CA-310 measurement devices ● Updatable display firmware to enable HP to quickly and easily provide solutions to identified problems and - HP DreamColor Z31x | User Guide - Page 13
the user guide for your product, go to http://www.hp.com/support. Select Find your product, and then follow the on-screen instructions. Front NOTE: To view an OSD menu simulator, visit the HP Customer Self Repair Services Media Library at http://www.hp.com/go/sml. NOTE: You can adjust the bezel - HP DreamColor Z31x | User Guide - Page 14
Connects a keyboard to the display. RJ-45 network connector Connects a network cable to the display. DreamColor USB ports Connect a measurement instrument or a USB flash drive for color calibration or firmware update. USB Type-C upstream port Connects a host device with a Type-C connector. (for - HP DreamColor Z31x | User Guide - Page 15
Component 14 15 Function USB 3.0 downstream ports Connect optional USB devices to the display. USB 3.0 downstream ports Connect optional USB devices to the display. (side panel) Setting up the display Use caution when setting up the display CAUTION: To prevent damage to the display, do not touch - HP DreamColor Z31x | User Guide - Page 16
they may damage the display. It is important to verify that the manufacturer's mounting solution is compliant with the VESA standard and is rated to support the weight of the display panel. For best performance, it is important to use the power and video cables provided with the display. 1. Remove - HP DreamColor Z31x | User Guide - Page 17
The serial number and product number are located on a label on the rear panel of the display head. You may need these numbers when contacting HP about the display. NOTE: You may need to partially pivot the display head to read the label. Setting up the display 7 - HP DreamColor Z31x | User Guide - Page 18
holes aligned, and then install the screws. Installing a security cable You can secure the display to a fixed object with an optional security cable available from HP. 8 Chapter 1 Getting Started - HP DreamColor Z31x | User Guide - Page 19
the Open Menu button to open the OSD. In the OSD, select Video Input and choose the desired input source. IMPORTANT: USB-C input must be manually selected for a video input. Once USB-C is selected for the video input, auto-scanning of the HDMI and DisplayPort inputs is disabled. ● For DisplayPort - HP DreamColor Z31x | User Guide - Page 20
● For HDMI digital operation, connect the HDMI signal cable to the HDMI port on the rear of the display and the other end to the HDMI port on the computer (cable provided). NOTE: There are two HDMI ports on the rear of the display allowing you to connect two video devices to the display. 10 Chapter - HP DreamColor Z31x | User Guide - Page 21
USB downstream port on the rear panel of the computer, and the other end to the upstream USB connector on the display. NOTE: The display supports USB 3.0. For optimal performance, connect the USB cable to a USB 3.0 port on the computer, if available. Setting up the display 11 - HP DreamColor Z31x | User Guide - Page 22
5. Connect one end of the power cord to the AC power connector on the back of the display, and the other end to an AC outlet. NOTE: The master power switch on the rear of the display must be in the On position before pressing the power button on the front of the display. WARNING! To reduce the risk - HP DreamColor Z31x | User Guide - Page 23
Adjusting the display 1. Tilt the display's panel forward or backward to set it to a comfortable angle. Ideally the panel surface should be perpendicular to your eyes. 2. Swivel the display to the left or right for the best viewing angle. Setting up the display 13 - HP DreamColor Z31x | User Guide - Page 24
3. Adjust the display's height to a comfortable position for your individual workstation. The display's top bezel edge should not exceed a height that is parallel to your eye height. A display that is positioned low and reclined may be more comfortable for users with corrective lenses. The display - HP DreamColor Z31x | User Guide - Page 25
. IMPORTANT: USB-C input must be manually selected for a video input. Once USB-C is selected retention damage are not covered under the HP warranty. To avoid image retention damage, always turn use or use the power management setting, if supported on your system, to turn off the display - HP DreamColor Z31x | User Guide - Page 26
Removing the display stand You can remove the display head from the stand to install the panel on a wall, a swing arm, or other mounting fixture. CAUTION: Before beginning to disassemble the display, be sure it is turned off and the power, signal, and network cables are all disconnected. Also - HP DreamColor Z31x | User Guide - Page 27
INF (Information) file ● ICM (Image Color Matching) files (one for each calibrated color space) ● USB Software Development Kit (SDK) for Linux, Windows, and scripts NOTE: The items listed above can be downloaded from the HP display support Web site. For more information, go to Downloading from the - HP DreamColor Z31x | User Guide - Page 28
color accuracy. These files can be manually copied to your computer. Refer to your host operating system guide for information on where to install these files. Downloading from the Internet To download the latest version of .INF and .ICM files from the HP displays support Web site: 1. Go to http - HP DreamColor Z31x | User Guide - Page 29
a. Go to http://www.hp.com/support. b. Enter the name of your HP product or product number in the Search all support box, and then click supported: FAT, FAT32, NTFS. 3. Insert the USB flash drive with the latest firmware into one of the DreamColor USB ports and follow the on-screen instructions to - HP DreamColor Z31x | User Guide - Page 30
consultation with visual effect and animation studios determined that the D65/100/2.4 calibrated value, the colorimetry of the white point will shift. HP recommends that you calibrate the display to the desired working luminance. For more information about calibration, see Display calibration - HP DreamColor Z31x | User Guide - Page 31
signal adjustments Downstream RGB adjust In some cases it may be necessary post-calibration to tweak the setup (black) or gain (white) of one or more device. Use video levels (64-960) This option is designed to support the accurate display of "video legal" signals that include footroom below black - HP DreamColor Z31x | User Guide - Page 32
If you are unsure whether you are using source material with head and footroom, check the application settings or check with someone who can tell you how the source material was captured or rendered. Note that you may need to adjust the lightness of your editing application interface after enabling - HP DreamColor Z31x | User Guide - Page 33
Fill to source aspect ratio (proportional) This option maintains the aspect ratio of the source input, making the image as large as possible, centering it in the display, and using 0% black to fill the unused areas of the screen. For example, a source input that is narrower than 17×9 will be - HP DreamColor Z31x | User Guide - Page 34
17:9 image full screen. The Fill to Screen Width option should be used when vertical center extractions are desired as part of the dailies or review screening process. The following illustration shows the visual result when a 3840×2160 source input is displayed on the display with the Fill to screen - HP DreamColor Z31x | User Guide - Page 35
Pixel-for-pixel This option is for source video that has a lower resolution than the display's native resolution of 4096×2160 and you wish to view the image without any scaling applied. If enabled, this option will display the source input in its native size and fill the remainder of the frame with - HP DreamColor Z31x | User Guide - Page 36
Function button for easy access. Refer to Changing the bezel function buttons on page 38 for instructions on assigning the bezel Function button. Digital cinema aspect ratio masking The display supports aspect ratio masking for the two standard aspect ratios, 1.85:1 and 2.39:1, within the DCI image - HP DreamColor Z31x | User Guide - Page 37
Understanding image adjustment options 27 - HP DreamColor Z31x | User Guide - Page 38
Mask to DCI 2.39:1 aspect ratio This option masks the top- and bottom-most 222 pixels of the 4096-wide frame (the top- and bottom-most 111 pixels for 2048-wide sources). The resultant image is then displayed as specified using the image scaling options described in the previous section. The - HP DreamColor Z31x | User Guide - Page 39
Working with markers The display includes a full set of marker overlays that can be used to indicate specific areas or regions of the frame. Multiple standard markers are included. Film aspect ratio markers Markers are provided for the standard theatrical aspect ratios 1.85:1 and 2.39:1. These - HP DreamColor Z31x | User Guide - Page 40
16:9 aspect ratio markers Markers are provided for the 16:9 aspect ratio. These markers support both 17:9 (4096×2160 or 2048×1080) and 16:9 (3840×2160, 1920×1080, or 1280×720) source inputs. ● 16:9 extraction: shows the 16:9 region within - HP DreamColor Z31x | User Guide - Page 41
4:3 aspect ratio markers Markers are provided for the 4:3 aspect ratio. These markers support both 17:9 (4096×2160 or 2048×1080) and 16:9 (3840×2160, 1920×1080, or 1280×720) source inputs. ● illustration shows the 16:9 safe action and safe title markers displayed on-screen. Working with markers 31 - HP DreamColor Z31x | User Guide - Page 42
. Custom markers can include up to 16 lines and each line can have a unique color and line width. (Line widths up to 10 pixels are supported.) There are four elements associated with custom markers. Marker element The StudioCal XML schema allows for the definition of up to ten lines per custom - HP DreamColor Z31x | User Guide - Page 43
in the custom marker and a "product" tag to define the display the markers are designed for. The "entries" tag supports integer values between 1 and 16. The "product" tag currently supports only one value, "Z31x". The element should be structured as follows: - HP DreamColor Z31x | User Guide - Page 44
version="1.0" encoding="ISO-8859-1"?> - HP DreamColor Z31x | User Guide - Page 45
nothing will be cut off on a consumer television. Digital cinema cropping If you display a 4096×2160 or 2048×1080 input signal as a PIP, you can instruct the display to show either the full DCI container or crop the PIP to either the 1.85:1 or 2.39:1 aspect ratio. If cropping to an - HP DreamColor Z31x | User Guide - Page 46
: The input the custom name will be assigned to. The following values are supported: ○ DisplayPort1 ○ DisplayPort2 ○ HDMI1 ○ HDMI2 ○ USB ● name: The custom - HP DreamColor Z31x | User Guide - Page 47
How to connect computers to the display Make the following hardware and cable connections from the computers to the display: 1. Connect a keyboard to the dedicated keyboard port on the display. The keyboard port is rotated 90 degrees from the other ports. NOTE: For more information about the - HP DreamColor Z31x | User Guide - Page 48
IMPORTANT: If you are switching between two computers using the KVM switch, HP does not recommend that you connect USB hard drives or flash drives to the USB ports on the display. All display USB ports are switched - HP DreamColor Z31x | User Guide - Page 49
● PIP on / off: Allows you to quickly turn the PIP on and off. When disabled this command will be displayed as "PIP On" and when enabled this command will displayed as "PIP Off." ● Swap primary / secondary: Use this option to quickly swap the primary and secondary inputs. Use of this option does not - HP DreamColor Z31x | User Guide - Page 50
you to store the configuration of the following display settings. ● Color settings ○ Active color preset ○ Luminance (if changed from the calibrated value) ○ Downstream RGB adjust ● Image adjustment ○ Image scaling ○ Digital cinema masking ○ Markers ○ Video legal ○ Overscan frame ○ Blue channel only - HP DreamColor Z31x | User Guide - Page 51
○ On/off state ○ Mode (2×1 dual split or PIP) ○ Input assignments ○ PIP video options ○ PIP digital cinema cropping ○ PIP markers ● Menu and message control ○ Configure function buttons User presets allow you to set up multiple settings for quick and easy recall. For example, if you use your display - HP DreamColor Z31x | User Guide - Page 52
XML schema. User presets element One element is provided to save and load user presets. This element contains one tag, "operation" which supports two values: "save" and "load." The element should be structured as follows: User preset file When user presets - HP DreamColor Z31x | User Guide - Page 53
○ Active color preset ○ Luminance (if changed from the calibrated value) ○ Downstream RGB adjust ● Image adjustment ○ Image scaling ○ active. NOTE: OSD menu items that are grayed out are either not supported with the selected video input and settings. The tables in the following sections list - HP DreamColor Z31x | User Guide - Page 54
coordinate display to xy/ u'v' (allows you to switch the information to display as either CIE 1931 xy or CIE 1976 u'v') Back Reset to last calibration Reset to factory calibration Downstream RGB adjust Red, Green, Blue Setup Red, Green, Blue Gain Reset Back Back 44 Chapter 2 Using the display - HP DreamColor Z31x | User Guide - Page 55
Video input menu Level 1 Video input Level 2 DisplayPort 1 DisplayPort 2 HDMI 1 HDMI 2 USB Type-C Auto-switch source Rename inputs USB port binding Back Level 3 Level 4 Enable Disable Back DisplayPort 1 Workstation 1 DisplayPort 2 HDMI 1 Workstation 2 Laptop HDMI 2 USB Type-C Windows - HP DreamColor Z31x | User Guide - Page 56
Image adjustment menu Level 1 Image adjustment Level 2 Image scaling Digital cinema masking Markers Level 3 Level 4 Fit to screen aspect ratio (proportional) Fit to screen width (proportional) Fit to screen height (proportional) Fill to 17:9 (non-proportional) Fill to 16:9 (non-proportional) - HP DreamColor Z31x | User Guide - Page 57
Level 1 Level 2 Level 3 Video legal Overscan frame by 5% Show blue channel only Advanced Back Overdrive Deinterlacer Cadence detection Back Split/PIP control menu Level 1 Split/PIP Control Level 2 Enable split/PIP Split/PIP mode Level 3 Level 4 Blue Cyan Magenta Yellow Back Overdrive may - HP DreamColor Z31x | User Guide - Page 58
Level 1 Level 2 2×1 dual split Picture-in-picture Assign inputs PIP video options PIP digital cinema region PIP position and size Level 3 Level 4 Primary (left side) DisplayPort 1 DisplayPort 2 HDMI 1 HDMI 2 USB Type-C Back Secondary (right side) DisplayPort 1 DisplayPort 2 HDMI 1 HDMI 2 USB - HP DreamColor Z31x | User Guide - Page 59
2 User 3 User 4 Back Level 3 Level 4 Calibration Level 1 Calibration Level 2 Level 3 Level 4 Recalibrate [active preset] Configure and calibrate preset Next Back Install StudioCal XML file Set calibration schedule View calibration schedule The following calibration schedule has been set - HP DreamColor Z31x | User Guide - Page 60
Level 1 Level 2 Align internal instrument Export last calibration data Set warm up time Back Level 3 Cancel calibration schedule Back Level 4 Do you want to cancel the calibration schedule? Yes, cancel schedule Back Would you like the display to wake itself up and warm up prior to the start of - HP DreamColor Z31x | User Guide - Page 61
3 Level 4 Level 2 Level 3 Level 4 Auto-sleep mode Do you want the display to go to sleep when there is no active video input? Note: Automated calibration is not possible if the entire display goes to sleep. Put the display to sleep Turn off the panel only Back Power on recall Do - HP DreamColor Z31x | User Guide - Page 62
CEA-861 (3840×2160 default timing) Back USB Type-C configuration How do you want to configure your USB Type-C connection? USB Type-C cannot simultaneously support 4K at a 60Hz refresh rate and USB 3.0. 4096×2160 60 Hz + USB 2.0 data 4096×2160 30 Hz + USB 3.0 data Back USB functionality in sleep - HP DreamColor Z31x | User Guide - Page 63
4 Disable USB ports during sleep Back Do you want the internal processor to be enabled? The internal processor must be enabled for display calibration, firmware updates, and remote management. Enable Disable Back [Date] [Time] Set date and time automatically Change date and time Time widget (xx - HP DreamColor Z31x | User Guide - Page 64
Back User preset support Do you want to allow user presets to be saved? Enable Disable Back Remote management services Enable/disable server Do you want to enable the internal remote management web server? Enable Disable Back IP configuration mode DHCP Manual - HP DreamColor Z31x | User Guide - Page 65
Level 1 Level 2 Lock management menu Factory reset Back Level 3 Dashboard security Back Do you want to lock the Management menu? If locked, it can only be unlocked by holding the second and fourth bezel buttons down for five seconds. Lock Unlock Back Level 4 What is required in order to connect - HP DreamColor Z31x | User Guide - Page 66
Level 1 Information Level 1 Information Level 2 Function button mode Bezel button color Bezel button brightness Bezel button auto-fade Back Level 3 Level 4 Function button 3: [Current assignment] Function button 4: [Current assignment] Switch to next active video input Aspect ratio display - HP DreamColor Z31x | User Guide - Page 67
cinema region Video legal: On/Off Overscan: On/Off Markers: On/Off Serial Number: serial number Firmware Revision: firmware revision ID Last Calibration: xxxxx hours Backlight Hours: xxxxx hours Internal Processor: On/Off Remote management server: On/Off IPv4 Address: xxx.xxx.xxx.xxx Back Level - HP DreamColor Z31x | User Guide - Page 68
of third party measurement instruments are supported. The display's calibration capabilities allow for a large number of different calibration strategies, including on-demand and scheduled automated calibration. Factory calibration The display is color calibrated at the factory with seven factory - HP DreamColor Z31x | User Guide - Page 69
Allow use of external instruments to toggle external instrument support on or off. 4. Press the Exit button to close the OSD. Calibration environment The recommended calibration environment varies depending on the instrument you are using for calibration. If you are using the built-in colorimeter or - HP DreamColor Z31x | User Guide - Page 70
basis. Display warm-up from cold power on The LEDs used in the display backlight require a period of stabilization before the display is calibrated. HP recommends that the displays be allowed to warm up so that the backlight can stabilize. The display's internal timer is configured to warn you - HP DreamColor Z31x | User Guide - Page 71
10 minutes before making color critical assessments. User calibration methods User calibration is the process of specifying the calibration targets (primaries, white point, gamma/EOTF, and luminance), and then instructing the display to calibrate to those targets. There are three primary methods - HP DreamColor Z31x | User Guide - Page 72
allows you to recalibrate an existing preset or to specify a new configuration for an existing preset. Both are accessed from the Calibration menu. Recalibration active preset This option instructs the display to recalibrate the active color preset. The preset is recalibrated using its current - HP DreamColor Z31x | User Guide - Page 73
per square meter (cd/m²): ● 250 cd/m²: The maximum luminance that can be calibrated to in the display ● 100 cd/m²: The standard luminance, originally defined by around 100 cd/m², based on the typical environment illumination in VFX studios ● 48 cd/m²: The standard front-of-screen illuminance for - HP DreamColor Z31x | User Guide - Page 74
session. StudioCal XML is an extensible XML schema developed by HP for display calibration and modification. It was first introduced with the HP DreamColor Z27x Studio Display and has been extended to support the additional capabilities of this display. While StudioCal XML files are designed - HP DreamColor Z31x | User Guide - Page 75
of the week to perform the calibration, and then select Next. TIP: Although you can choose any day and time, HP recommends you choose a time DreamColor USB ports on the bottom of the display. 3. Dismiss any calibration or firmware messages that display. 4. Open the Main Menu. 5. Select Calibration - HP DreamColor Z31x | User Guide - Page 76
Use the Calibration menu for this task. See Using external measurement instruments on page 67 for more information on the supported external the display. Automatically warming up the display at start of the day The Z31x can automatically warm itself up prior to the start of the day to ensure - HP DreamColor Z31x | User Guide - Page 77
can be used instead of the built-in instrument for calibration. In addition, external instruments can be used to align the internal instrument. Many of the supported instruments were chosen in consultation with HP's studio partners and represent the instruments they have standardized in their - HP DreamColor Z31x | User Guide - Page 78
). If using distance measurement, HP strongly recommends that you use a completely darkened environment for calibration. ● If necessary, use but is required for connection to the display. If multiple interfaces are supported by the instrument, the USB communication method must be enabled and active - HP DreamColor Z31x | User Guide - Page 79
a Photo Research spectroradiometer with the display: ● The display may take up to five seconds after instrument connection to display the first calibration menu. This is normal for this instrument. ● As this instrument is typically used for noncontact measurements, typically at a distance of one - HP DreamColor Z31x | User Guide - Page 80
software on an optical disc. HP recommends that you install the software, as it is required to calibrate the instrument before use with the display. Configuration The i1Pro 2 should be calibrated prior to use using the X-Rite software. Consult the product user guide for more information. Usage - HP DreamColor Z31x | User Guide - Page 81
instrument connection to display the first calibration menu. This is normal for this instrument. ● If used as a contact instrument, HP recommends calibration in a dim lighting environment. ● If used as a noncontact instrument, HP strongly recommends calibration in a dark environment. Using external - HP DreamColor Z31x | User Guide - Page 82
hp.com. These files can be used directly on the display or as learning tools. File name and disk format When a USB drive is inserted into one of the DreamColor USB ports, the display looks for a file named StudioCal.xml, which it uses for calibration standard encodings are supported, including UTF-8, - HP DreamColor Z31x | User Guide - Page 83
of presets to be calibrated by the XML file. This tag supports integer values of one, two, or three. Structure the element as follows: Calibration info element The calibration info element is nested within the calibration element and is used - HP DreamColor Z31x | User Guide - Page 84
original calibration. You will not be able to restore the original calibration if you have a measurement instrument problem. HP recommends that of the CIE locus will generate a calibration error. wx: The CIE x or u' value for the white point primary. Supports floating point values from 0.0 to 1.0. - HP DreamColor Z31x | User Guide - Page 85
as a flag, this attribute supports values of "TRUE" and is discussed later in this user guide. Gamma This tag allows you to calibration tag examples The following are examples of a StudioCal XML file showing the usage of the core calibration tags. The first example instructs the display to calibrate - HP DreamColor Z31x | User Guide - Page 86
preset is required. This profile can be generated by using a save_icc tag. This tag instructs the display to calculate an ICC profile for the calibrated preset and write it to the USB flash drive containing the StudioCal XML file. Calculating an ICC profile requires that additional measurements - HP DreamColor Z31x | User Guide - Page 87
is structured as follows: The value attribute supports 10-bit values between 1 and 1024. Select Klein cal file This used for measurements. The default cal file for the Z31x is 15 and that is the one calibrated at Klein Instruments, but you may desire to generate - HP DreamColor Z31x | User Guide - Page 88
This tag must be placed before the element. Validation After calibration, the display can be instructed to measure a set of patterns and record as follows: The entries attribute supports values between 1 and 10. Validation pattern child element - HP DreamColor Z31x | User Guide - Page 89
"/> Validation results file When validation is enabled, a text file is created containing all measurements made during - HP DreamColor Z31x | User Guide - Page 90
Archive LUT Designed to be used with a calibration, the archive LUT tag instructs the display to download the calibrated LUTs and matrix to the USB flash drive preset number you wish to download. Integer values from 0 to 7 are supported. folder: The name of the folder on the USB flash drive where you - HP DreamColor Z31x | User Guide - Page 91
studiocal> Upload LUT Designed to be used independent of a calibration, the upload LUT tag instructs the display to load LUT files stored on the attached as follows: The entries attribute supports values between 1 and 6. Upload LUT child element The tag - HP DreamColor Z31x | User Guide - Page 92
display contains two different memory stores: factory and user. ● The factory store is a protected memory location where the factory calibration is stored. When a calibration is written to the factory memory location, the user memory location is also rewritten to match the factory memory location - HP DreamColor Z31x | User Guide - Page 93
host computer from the EDID. This file is based on the StudioCal XML calibration schema, but uses the root element. A sample preset value file an existing preset or to create another preset. StudioCal XML supports this option with the tag. Designed to operate - HP DreamColor Z31x | User Guide - Page 94
or data from your most-recent calibration with a supported instrument will be sufficient. - HP DreamColor Z31x | User Guide - Page 95
When a USB drive is inserted into one of the DreamColor USB ports, the display reads the Video input element A unique custom name can be assigned to each video input. To support this, a video input parent element is used to enclose the information for each custom - HP DreamColor Z31x | User Guide - Page 96
Marker - HP DreamColor Z31x | User Guide - Page 97
Integer values between 1 and 10 are supported. color: The line's color. The following values are supported: ● white ● red ● green ="ISO-8859-1"?> Non-calibration elements 87 - HP DreamColor Z31x | User Guide - Page 98
element contains one tag, "operation" which supports two values: "save" and "load." not designed to be human readable or editable. HP strongly recommends that you not modify the values facilitate the "configure, calibrate, and deploy" model used by many large VFX and animation studios. With this tag - HP DreamColor Z31x | User Guide - Page 99
the drive, it is overwritten. Though this file is human-readable it is not designed to be manually edited and as a result the tag attributes are not documented. If an attribute has been changed to the new settings. Color space presets, being calibration-based, are not affected by this command. Non - HP DreamColor Z31x | User Guide - Page 100
on the optical disc provided with the display and on www.hp.com. This document provides information on the web dashboard. The to close the OSD. Checking and setting the display's IP address When remote management services are turned on and the display is connected to the network, the display will - HP DreamColor Z31x | User Guide - Page 101
Remote management services, and then press Select to open it. 4. Select IP configuration mode, and then press Select to open it. 5. Choose Manual, and If you forget the password, you can reset it to "DreamColor" from the Remote management services menu. To reset the default password: 1. Press one of - HP DreamColor Z31x | User Guide - Page 102
of a USB flash drive, and then insert it into one of the two DreamColor USB ports. 2. Press one of the front bezel buttons to display the button to open the OSD. 3. Select Management. 4. Select Remote management services. 5. Select Install client certificate. 6. Press OK to install the certificate - HP DreamColor Z31x | User Guide - Page 103
can also directly import StudioCal XML files for calibration automation, user presets, and so on. between the dashboard sections: 1. Click the DreamColor Remote Access menu, located at the upper logged out when you close the dashboard, you can manually log out of the dashboard session. To log out - HP DreamColor Z31x | User Guide - Page 104
Support and troubleshooting Solving common problems The following table lists possible problems, the possible cause of each problem, and the recommended solutions. Problem Video input menu. Set Auto-switch source to Disable and manually select the input. Check Video Cable is displayed on the - HP DreamColor Z31x | User Guide - Page 105
a particular language, it is available in English. ● Locate an HP service center Preparing to call technical support If you cannot solve a problem using the troubleshooting tips in this section, you may need to call technical support. Have the following information available when you call: ● Display - HP DreamColor Z31x | User Guide - Page 106
product yourself. Adjust only those controls that are covered in the operating instructions. If the display is not operating properly or has been dropped or damaged, contact an authorized HP dealer, reseller, or service provider. ● Use only a power source and connection appropriate for this display - HP DreamColor Z31x | User Guide - Page 107
latest specifications or additional specifications on this product, go to http://www.hp.com/go/ quickspecs/ and search for your specific display model to to 60°C 20% to 80% (non-condensing) 5% to 95%, 38.7° C max wet-bulb 31.1 in wide screen 21.83 lb 32.19 lb 29.06 in 9.76 in 22.38 in 41°F to 95 - HP DreamColor Z31x | User Guide - Page 108
W Typical settings 120 W Sleep 0.5 W * The display supports customer updatable firmware. These firmware updates may increase power consumption of , one USB Type-B, two USB 3.0 fast charging, two USB DreamColor, one KVM keyboard Preset display resolutions The display resolutions listed below - HP DreamColor Z31x | User Guide - Page 109
Preset 13 14 15 16 17 18 19 20 21 22 23 26 27 28 29 29 30 31 32 33 34 35 36 37 38 Pixel format 1920×1200 1920×1080 1920×1080 1920×1080 1920×1080 1920×1080 1920×1200 1920×1200 - HP DreamColor Z31x | User Guide - Page 110
modes that can be entered and stored. Energy saver feature The display supports a reduced power state. The reduced power state will be entered into return to its normal operating state. Refer to the computer manual for instructions on setting the energy saver mode (sometimes called power management - HP DreamColor Z31x | User Guide - Page 111
designs, produces, and markets products and services that can be used by everyone, including people with disabilities, either on a stand-alone basis or with appropriate assistive devices. Supported assistive technologies HP products support a wide variety of operating system assistive technologies
-
 1
1 -
 2
2 -
 3
3 -
 4
4 -
 5
5 -
 6
6 -
 7
7 -
8
-
9
-
10
-
11
-
12
-
13
-
14
-
15
-
16
-
17
-
18
-
19
-
20
-
21
-
22
-
23
-
24
-
25
-
26
-
27
-
28
-
29
-
30
-
31
-
32
-
33
-
34
-
35
-
36
-
37
-
38
-
39
-
40
-
41
-
42
-
43
-
44
-
45
-
46
-
47
-
48
-
49
-
50
-
51
-
52
-
53
-
54
-
55
-
56
-
57
-
58
-
59
-
60
-
61
-
62
-
63
-
64
-
65
-
66
-
67
-
68
-
69
-
70
-
71
-
72
-
73
-
74
-
75
-
76
-
77
-
78
-
79
-
80
-
81
-
82
-
83
-
84
-
85
-
86
-
87
-
88
-
89
-
90
-
91
-
92
-
93
-
94
-
95
-
96
-
97
-
98
-
99
-
100
-
101
-
102
-
103
-
104
-
105
-
106
-
107
-
108
-
109
-
110
-
111
 |
 |

User Guide