HP ENVY 700-000 Upgrading and Servicing Guide - Page 6
cage by the motherboard., on the base of the right side of the hard drive
 |
View all HP ENVY 700-000 manuals
Add to My Manuals
Save this manual to your list of manuals |
Page 6 highlights
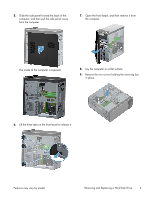
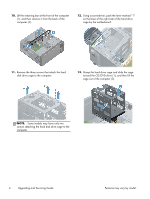
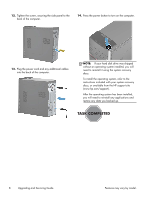
10. Lift the retaining bar at the front of the computer (1), and then remove it from the back of the computer (2). 12. Using a screwdriver, push the lever marked "1" on the base of the right side of the hard drive cage by the motherboard. 11. Remove the three screws that attach the hard disk drive cage to the computer. 13. Grasp the hard drive cage and slide the cage toward the CD/DVD drive (1), and then lift the cage out of the computer (2). NOTE: Some models may have only two screws attaching the hard disk drive cage to the computer. 4 Upgrading and Servicing Guide Features may vary by model.
-
 1
1 -
 2
2 -
 3
3 -
 4
4 -
 5
5 -
 6
6 -
 7
7 -
 8
8 -
 9
9 -
 10
10 -
 11
11 -
 12
12 -
13
-
14
-
15
-
16
-
17
-
18
-
19
-
20
-
21
-
22
-
23
-
24
-
25
 |
 |

10.
Lift the retaining bar at the front of the computer
(1), and then remove it from the back of the
computer (2).
11.
Remove the three screws that attach the hard
disk drive cage to the computer.
NOTE:
Some models may have only two
screws attaching the hard disk drive cage to the
computer.
12.
Using a screwdriver, push the lever marked “1”
on the base of the right side of the hard drive
cage by the motherboard.
13.
Grasp the hard drive cage and slide the cage
toward the CD/DVD drive (1), and then lift the
cage out of the computer (2).
4
Upgrading and Servicing Guide
Features may vary by model.