HP J7934G HP Jetdirect Administrator's Guide - Page 170
Assigning an IP Address, Setting Up Mac OS, HP LaserJet Utility, Settings, TCP/IP, Printer LPR, Verify
 |
UPC - 882780135604
View all HP J7934G manuals
Add to My Manuals
Save this manual to your list of manuals |
Page 170 highlights
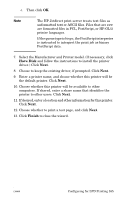
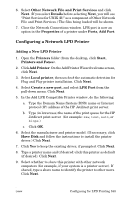
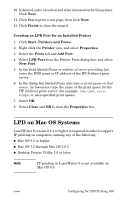
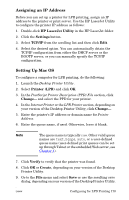
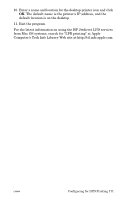
Assigning an IP Address Before you can set up a printer for LPR printing, assign an IP address to the printer or print server. Use the HP LaserJet Utility to configure the printer IP address as follows: 1. Double-click HP LaserJet Utility in the HP LaserJet folder. 2. Click the Settings button. 3. Select TCP/IP from the scrolling list and then click Edit. 4. Select the desired option. You can automatically obtain the TCP/IP configuration from either the DHCP server or the BOOTP server, or you can manually specify the TCP/IP configuration. Setting Up Mac OS To configure a computer for LPR printing, do the following: 1. Launch the Desktop Printer Utility. 2. Select Printer (LPR) and click OK. 3. In the PostScript Printer Description (PPD) File section, click Change... and select the PPD for your printer. 4. In the Internet Printer or the LPR Printer section, depending on your version of the Desktop Printer Utility, click Change.... 5. Enter the printer's IP address or domain name for Printer Address. 6. Enter the queue name, if used. Otherwise, leave it blank. Note The queue name is typically raw. Other valid queue names are text, binps, auto, or a user-defined queue name (user-defined print queues can be set up through Telnet or the embedded Web server, see Chapter 4). 7. Click Verify to verify that the printer was found. 8. Click OK or Create, depending on your version of the Desktop Printer Utility. 9. Go to the File menu and select Save or use the resulting save dialog, depending on your version of the Desktop Printer Utility. ENWW Configuring for LPD Printing 170
-
 1
1 -
2
-
3
-
4
-
5
-
6
-
7
-
8
-
9
-
10
-
11
-
12
-
13
-
14
-
15
-
16
-
17
-
18
-
19
-
20
-
21
-
22
-
23
-
24
-
25
-
26
-
27
-
28
-
29
-
30
-
31
-
32
-
33
-
34
-
35
-
36
-
37
-
38
-
39
-
40
-
41
-
42
-
43
-
44
-
45
-
46
-
47
-
48
-
49
-
50
-
51
-
52
-
53
-
54
-
55
-
56
-
57
-
58
-
59
-
60
-
61
-
62
-
63
-
64
-
65
-
66
-
67
-
68
-
69
-
70
-
71
-
72
-
73
-
74
-
75
-
76
-
77
-
78
-
79
-
80
-
81
-
82
-
83
-
84
-
85
-
86
-
87
-
88
-
89
-
90
-
91
-
92
-
93
-
94
-
95
-
96
-
97
-
98
-
99
-
100
-
101
-
102
-
103
-
104
-
105
-
106
-
107
-
108
-
109
-
110
-
111
-
112
-
113
-
114
-
115
-
116
-
117
-
118
-
119
-
120
-
121
-
122
-
123
-
124
-
125
-
126
-
127
-
128
-
129
-
130
-
131
-
132
-
133
-
134
-
135
-
136
-
137
-
138
-
139
-
140
-
141
-
142
-
143
-
144
-
145
-
146
-
147
-
148
-
149
-
150
-
151
-
152
-
153
-
154
-
155
-
156
-
157
-
158
-
159
-
160
-
161
-
162
-
163
-
164
-
 165
165 -
 166
166 -
 167
167 -
 168
168 -
 169
169 -
 170
170 -
 171
171 -
 172
172 -
 173
173 -
 174
174 -
 175
175 -
176
-
177
-
178
-
179
-
180
-
181
-
182
-
183
-
184
-
185
-
186
-
187
-
188
-
189
-
190
-
191
-
192
-
193
-
194
-
195
-
196
-
197
-
198
-
199
-
200
-
201
-
202
-
203
-
204
-
205
-
206
-
207
-
208
-
209
-
210
-
211
-
212
-
213
-
214
-
215
-
216
-
217
-
218
-
219
-
220
-
221
-
222
-
223
-
224
-
225
-
226
-
227
-
228
-
229
-
230
-
231
-
232
-
233
-
234
-
235
-
236
-
237
-
238
-
239
-
240
-
241
-
242
-
243
-
244
-
245
-
246
-
247
-
248
-
249
-
250
-
251
-
252
-
253
-
254
-
255
-
256
-
257
-
258
-
259
-
260
-
261
-
262
-
263
-
264
 |
 |