HP LD4200 HP LD4200 and LD4700 LCD Monitors User Guide - Page 29
Screen Adjustment Options
 |
UPC - 884420598480
View all HP LD4200 manuals
Add to My Manuals
Save this manual to your list of manuals |
Page 29 highlights
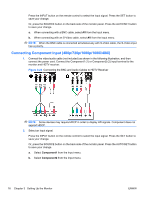
Screen Adjustment Options Figure 4-1 Front Panel Controls Component 1 Source 2 Menu 3 OSD Select/Adjust buttons 4 Auto/Set 5 Power 6 IR Receiver 7 Power Indicator Function Toggles between video inputs: ● AV - Composite Video, S-Video ● Component1 - HDTV, DVD ● Component2 - HDTV, DVD ● RGB PC - VGA or 15-pin D-Sub analog signal ● HDMI/DVI - Digital signal Opens or closes the OSD (On-screen Display) menu screen. Selects an OSD menu icon or adjusts the settings in the OSD screen. ▼ ▲ Adjusts up and down ◄ ► Adjusts the volume When OSD window is closed, activates the auto adjustment feature to optimize the screen image. When OSD window is open, press to select a menu item or save changes. Press to turn on the power. Press again to turn it off. Receives signals from the remote control. Lights up blue when the display operates normally (on mode). If the display is in sleep (Energy Saving) mode, the indicator color changes to amber. ENWW Screen Adjustment Options 21
-
 1
1 -
2
-
3
-
4
-
5
-
6
-
7
-
8
-
9
-
10
-
11
-
12
-
13
-
14
-
15
-
16
-
17
-
18
-
19
-
20
-
21
-
22
-
23
-
 24
24 -
 25
25 -
 26
26 -
 27
27 -
 28
28 -
 29
29 -
 30
30 -
 31
31 -
 32
32 -
 33
33 -
 34
34 -
35
-
36
-
37
-
38
-
39
-
40
-
41
-
42
-
43
-
44
-
45
-
46
-
47
-
48
-
49
-
50
-
51
-
52
-
53
-
54
-
55
-
56
-
57
-
58
-
59
-
60
-
61
-
62
-
63
-
64
-
65
-
66
-
67
-
68
-
69
-
70
-
71
-
72
-
73
-
74
-
75
-
76
-
77
-
78
-
79
 |
 |
