HP LaserJet M9040/M9050 HP LaserJet M9040/M9050 MFP - Job Aid - Clearing Jam
HP LaserJet M9040/M9050 - Multifunction Printer Manual
 |
View all HP LaserJet M9040/M9050 manuals
Add to My Manuals
Save this manual to your list of manuals |
HP LaserJet M9040/M9050 manual content summary:
- HP LaserJet M9040/M9050 | HP LaserJet M9040/M9050 MFP - Job Aid - Clearing Jam - Page 1
HP LaserJet M9040/M9050 MFP Series - Clear Jams Clear staple jams How do I? Clear a staple jam from the multifunction finisher Steps to perform 1 Open the stapler-unit door. 2 Slide the stapler unit of the stapler unit. © 2008 Copyright Hewlett-Packard Development Company, L.P. 1 www.hp.com - HP LaserJet M9040/M9050 | HP LaserJet M9040/M9050 MFP - Job Aid - Clearing Jam - Page 2
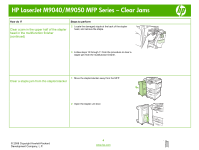
HP LaserJet M9040/M9050 MFP Series - Clear Jams How do I? Clear a staple jam from the multifunction finisher (continued) Steps to perform 5 Remove the staple cartridge. 6 Pull up on the lever labeled with a green dot. 7 Remove the damaged staple. 8 Press down on - HP LaserJet M9040/M9050 | HP LaserJet M9040/M9050 MFP - Job Aid - Clearing Jam - Page 3
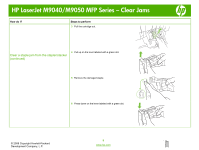
HP LaserJet M9040/M9050 MFP Series - Clear Jams How do I? Steps to perform 9 Reinstall the staple cartridge. 10 Slide the stapler unit into the device. 11 Close the stapler-unit door. Clear a jam in the upper half of the stapler head in the multifunction finisher 1 Follow steps 1 through 4 of - HP LaserJet M9040/M9050 | HP LaserJet M9040/M9050 MFP - Job Aid - Clearing Jam - Page 4
HP LaserJet M9040/M9050 MFP Series - Clear Jams How do I? Clear a jam in the upper half of the stapler head in the multifunction finisher (continued) Steps to perform 2 Locate the damaged staple at the back of the stapler head, and remove the staple. 3 Follow steps 10 through 11 - HP LaserJet M9040/M9050 | HP LaserJet M9040/M9050 MFP - Job Aid - Clearing Jam - Page 5
HP LaserJet M9040/M9050 MFP Series - Clear Jams How do I? Steps to perform 3 Pull the cartridge out. Clear a staple jam from the stapler/stacker ( the damaged staple. 6 Press down on the lever labeled with a green dot. © 2008 Copyright Hewlett-Packard Development Company, L.P. 5 www.hp.com - HP LaserJet M9040/M9050 | HP LaserJet M9040/M9050 MFP - Job Aid - Clearing Jam - Page 6
HP LaserJet M9040/M9050 MFP Series - Clear Jams How do I? Clear a staple jam from the stapler/stacker (continued) no more than five) might not be stapled. If a print job is sent and the stapler is jammed or is out of staples, the job will still print as long as the path to the output bin is not - HP LaserJet M9040/M9050 | HP LaserJet M9040/M9050 MFP - Job Aid - Clearing Jam - Page 7
HP LaserJet M9040/M9050 MFP Series - Clear Jams Clear paper jams How do I? Clear jams from the duplexer Steps to perform 1 Move the output device away from the MFP to gain access to the left door. WARNING! Avoid touching the adjacent fusing area. It can be hot. 2 Open the left door and carefully - HP LaserJet M9040/M9050 | HP LaserJet M9040/M9050 MFP - Job Aid - Clearing Jam - Page 8
HP LaserJet M9040/M9050 MFP Series - Clear Jams How do I? Clear jams from the duplexer (continued) Steps to perform 5 Open the front door. 6 Check for paper in the duplex printing accessory area, and remove any paper by pulling it out of the MFP. Be careful not to tear the paper. 7 Reinstall the - HP LaserJet M9040/M9050 | HP LaserJet M9040/M9050 MFP - Job Aid - Clearing Jam - Page 9
HP LaserJet M9040/M9050 MFP Series - Clear Jams How do I? Clear jams from the input-tray areas Clear jams sure you have removed all pieces of torn media. 2 Open and close the right door to reset the MFP. Clear jams inside the right door 1 Open the right door. 2 Check for media in the right door - HP LaserJet M9040/M9050 | HP LaserJet M9040/M9050 MFP - Job Aid - Clearing Jam - Page 10
HP LaserJet M9040/M9050 MFP Series - Clear Jams How do I? Clear jams inside the right door (continued) Steps to perform 3 Open the jam access cover. Pull out and lift the green tab. Clear jams in trays 2 and 3 4 Remove any media from this area by pulling it out of the MFP. 5 Push the green lever - HP LaserJet M9040/M9050 | HP LaserJet M9040/M9050 MFP - Job Aid - Clearing Jam - Page 11
HP LaserJet M9040/M9050 MFP Series - Clear Jams How do I? Clear jams in trays 2 and 3 (continued) Steps to perform 3 Close the tray. 4 Open the right door, remove any visible media, and close the right door. This resets the MFP. Clear jams in tray 4 1 Open the vertical transfer door on tray 4. - HP LaserJet M9040/M9050 | HP LaserJet M9040/M9050 MFP - Job Aid - Clearing Jam - Page 12
HP LaserJet M9040/M9050 MFP Series - Clear Jams How do I? Clear jams in tray 4 (continued) Steps to perform 3 If you into the output bins, slowly and carefully pull the media straight out of the MFP so that it does not tear. © 2008 Copyright Hewlett-Packard Development Company, L.P. 6 www - HP LaserJet M9040/M9050 | HP LaserJet M9040/M9050 MFP - Job Aid - Clearing Jam - Page 13
HP LaserJet M9040/M9050 MFP Series - Clear Jams How do I? Clear jams in the stacker or stapler/stacker (continued) Steps to perform 2 Move the output device away from the MFP. NOTE: Only the stacker has the wire on the lower bin. 3 On the stacker, lift the wire on the lower bin of the device, - HP LaserJet M9040/M9050 | HP LaserJet M9040/M9050 MFP - Job Aid - Clearing Jam - Page 14
HP LaserJet M9040/M9050 MFP Series - Clear Jams How do I? Clear jams in the stacker or stapler/stacker (continued) Steps to perform 6 Locate the green handle in the paper path module, and then pull down on the handle. Clear jams in the paper-path area of the multifunction finisher 7 Carefully - HP LaserJet M9040/M9050 | HP LaserJet M9040/M9050 MFP - Job Aid - Clearing Jam - Page 15
HP LaserJet M9040/M9050 MFP Series - Clear Jams How do I? Clear jams in the paper-path area of the multifunction finisher (continued) Steps to perform 3 Close the finisher cover. 1 Move the finisher away from the MFP. Clear jams in between the multifunction finisher and the MFP 2 Carefully - HP LaserJet M9040/M9050 | HP LaserJet M9040/M9050 MFP - Job Aid - Clearing Jam - Page 16
HP LaserJet M9040/M9050 MFP Series - Clear Jams How do I? Steps to perform 4 Push the multifunction finisher back into place. Clear jams in between the multifunction finisher and the MFP (continued) 1 Move the finisher away from the MFP. Clear booklet jams in the multifunction finisher 2 If - HP LaserJet M9040/M9050 | HP LaserJet M9040/M9050 MFP - Job Aid - Clearing Jam - Page 17
HP LaserJet M9040/M9050 MFP Series - Clear Jams How do I? Clear booklet jams in the multifunction finisher (continued) Steps to perform 4 Open the stapler-unit door. 5 Turn the bottom green knob clockwise to advance the jammed paper through the folding rollers - HP LaserJet M9040/M9050 | HP LaserJet M9040/M9050 MFP - Job Aid - Clearing Jam - Page 18
HP LaserJet M9040/M9050 MFP Series - Clear Jams How do I? Clear jams in the left door (fuser area) Steps to perform 1 Move the output device away from the MFP any jammed or damaged media from this area by pulling it out of the MFP. 4 Press down on the green tab and carefully check for media. Be - HP LaserJet M9040/M9050 | HP LaserJet M9040/M9050 MFP - Job Aid - Clearing Jam - Page 19
HP LaserJet M9040/M9050 MFP Series - Clear Jams How do I? Clear jams in the left door (fuser area) (continued) Steps to perform 5 Close the left door. Push the output device back into place. Clear jams in the 8-bin mailbox 1 Move the 8-bin mailbox away from the MFP. To do this, stand on the left
-
 1
1 -
 2
2 -
 3
3 -
 4
4 -
 5
5 -
 6
6 -
 7
7 -
8
-
9
-
10
-
11
-
12
-
13
-
14
-
15
-
16
-
17
-
18
-
19
 |
 |
HP LaserJet M9040/M9050 MFP Series – Clear Jams
© 2008 Copyright Hewlett-Packard
Development Company, L.P.
1
www.hp.com
Clear staple jams
How do I?
Steps to perform
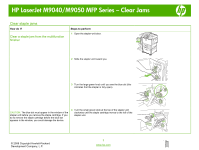
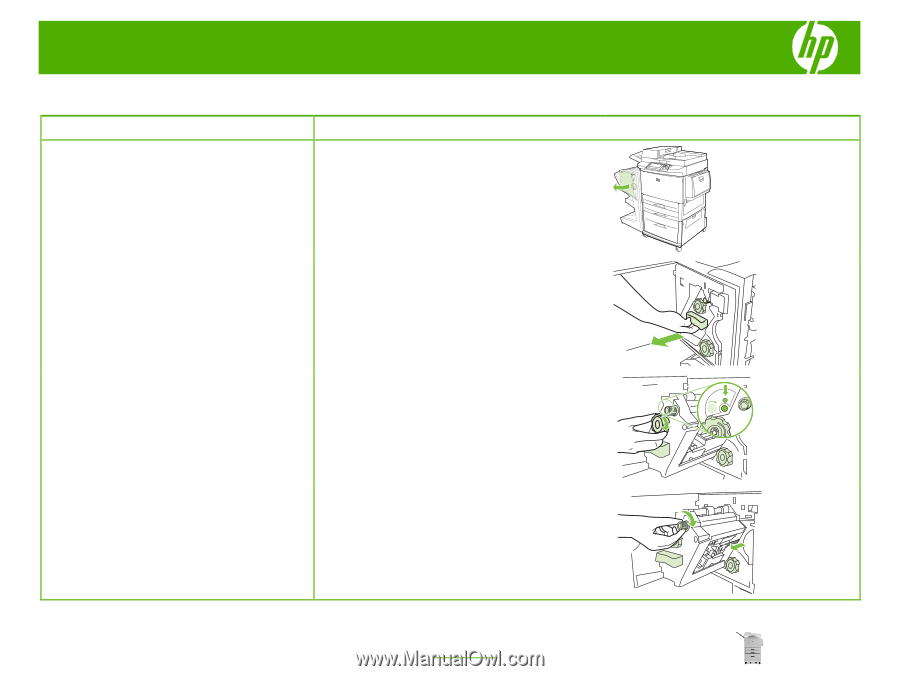
Clear a staple jam from the multifunction
finisher
1
Open the stapler-unit door.
2
Slide the stapler unit toward you.
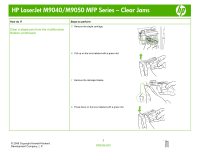
3
Turn the large green knob until you see the blue dot (this
indicates that the stapler is fully open).
CAUTION:
The blue dot must appear in the window of the
stapler unit before you remove the staple cartridge. If you
try to remove the staple cartridge before the blue dot
appears in the window, you could damage the device.
4
Turn the small green knob at the top of the stapler unit
clockwise until the staple cartridge moves to the left of the
stapler unit.