HP Omni 100-5052 Upgrade and Service Guide - Page 5
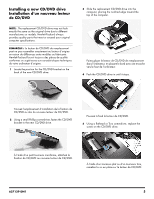
Using a flathead or Torx screwdriver, remove the, screw for the CD/DVD drive.
 |
View all HP Omni 100-5052 manuals
Add to My Manuals
Save this manual to your list of manuals |
Page 5 highlights
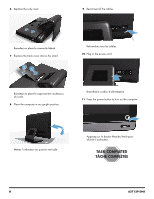
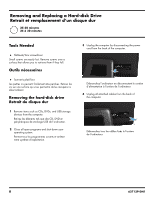
5 Lay the computer down on a flat surface, covered with a soft cloth to protect the screen from scratches or other damage. 7 Slide the side cover off the computer in the direction indicated by the arrow. Posez l'ordinateur sur une surface plane recouverte d'un chiffon doux afin de protéger l'écran contre les éraflures ou autres dommages. 6 Remove the back cover above the stand at the back of the computer. TIP: Insert a flathead screwdriver or other object with a flat tip into the slot to pry the cover off. Faites glisser le panneau latéral dans la direction indiquée par la flèche pour le retirer de l'ordinateur. 8 Markings on the CD/DVD drive cover indicate the location of the screw. 2 1 Retirez le capot arrière au-dessus du socle à l'arrière de l'ordinateur. CONSEIL : Insérez un tournevis à pointe plate ou un autre objet avec une extrémité plate dans le logement pour faire levier et le libérer. Les repères sur le capot du lecteur de CD/DVD indiquent l'emplacement de la vis. 9 Using a flathead or Torx screwdriver, remove the screw for the CD/DVD drive. 627129-DN1 Utilisez un tournevis plat ou un tournevis Torx pour retirer la vis pour retirer la vis du lecteur de CD/DVD. 3
-
 1
1 -
 2
2 -
 3
3 -
 4
4 -
 5
5 -
 6
6 -
 7
7 -
 8
8 -
 9
9 -
 10
10 -
 11
11 -
12
-
13
-
14
-
15
-
16
-
17
-
18
-
19
-
20
-
21
-
22
-
23
-
24
-
25
-
26
 |
 |
